
Mazda CX-5 Service & Repair Manual: Refrigerant Pressure Sensor [Manual Air Conditioner]
Purpose
-
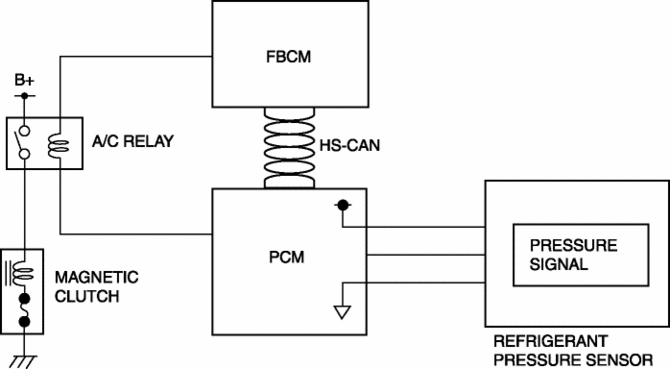
The refrigerant pressure sensor detects the refrigerant pressure in the refrigerant cycle.
Function
-
The refrigerant pressure sensor converts the detected refrigerant pressure to an electric signal and sends it to the PCM.
Construction
-
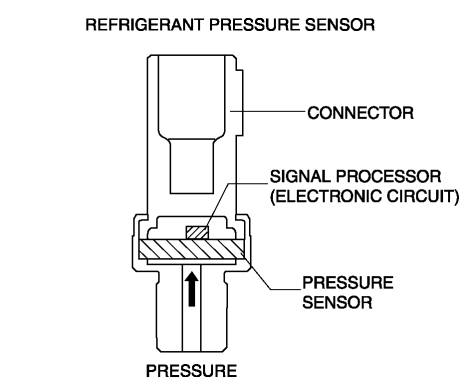
The refrigerant pressure sensor is installed on the cooler pipe.
-
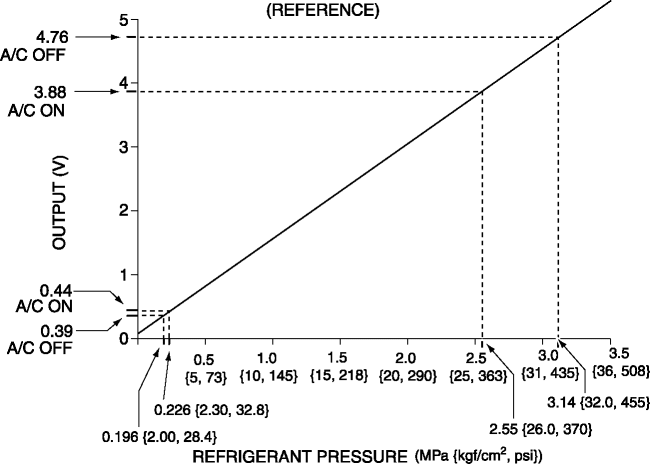
A capacitance type refrigerant pressure sensor, which converts refrigerant pressure into a linear electric signal, has been adopted.
-
Consists of a pressure detecting part and signal processing part.
-
The pressure detecting part is a variable capacity condenser, which changes capacitance according to the pressure.
-
The signal processing part detects the capacitance of pressure detecting part, converts it to voltage, then outputs it to the climate control unit.
Operation
Capacitance type
-
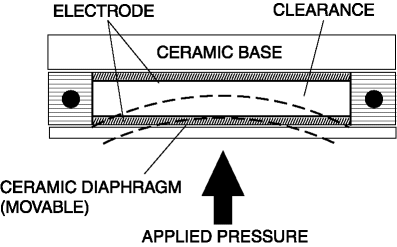
There is a clearance between the movable ceramic diaphragm and the ceramic base, and each side has an electrode.
-
When pressure is applied from the ceramic diaphragm side, the ceramic diaphragm deforms, and the clearance between the electrodes changes. As a result, capacitance is changed and pressure is detected.
Fail-safe
-
Function not equipped.
 Refrigerant Pressure Sensor [Full Auto Air Conditioner]
Purpose
The refrigerant pressure sensor detects the refrigerant pressure in the refrigerant
cycle.
Function
The refrigerant pressure sensor converts the detected refrigerant pre ...
 Refrigerant System Service Cautions
Handling Insufficient Refrigerant Level
If an insufficient refrigerant level is detected at troubleshooting, do
not charge (add) the refrigerant. Because an accurate amount of refrigerant
...
Other materials:
Center Roof Antenna Removal/Installation
1. Disconnect the negative battery cable..
2. Remove the following parts:
a. Front scuff plate.
b. Rear scuff plate.
c. B-pillar lower trim.
d. Front seat belt adjusting cover.
e. Front seat belt upper anchor installation bolt.
f. B-pillar upper trim.
g. Trunk board.
h. Trunk end t ...
Passenger Compartment Temperature Sensor Inspection [Full Auto Air Conditioner]
1. Measure the temperature around the passenger compartment temperature sensor
and measure the resistance between passenger compartment temperature sensor terminals
A and B.
If the characteristics of the passenger compartment temperature sensor are
not as shown in the graph, replace t ...
Power Outer Mirror
Outline
The power outer mirror adjusts the outer mirror glass position up/down and
left/right using the up/down adjustment motor and, left/right adjustment motor.
The up/down adjustment motor and, left/right adjustment motor turns clockwise
(down/right direction) or counterclock ...
