Mazda CX-5 Service & Repair Manual: Rear Door Garnish Removal/Installation
WARNING:
-
Using a utility knife with bare hands can cause injury. Always wear gloves when using a utility knife.
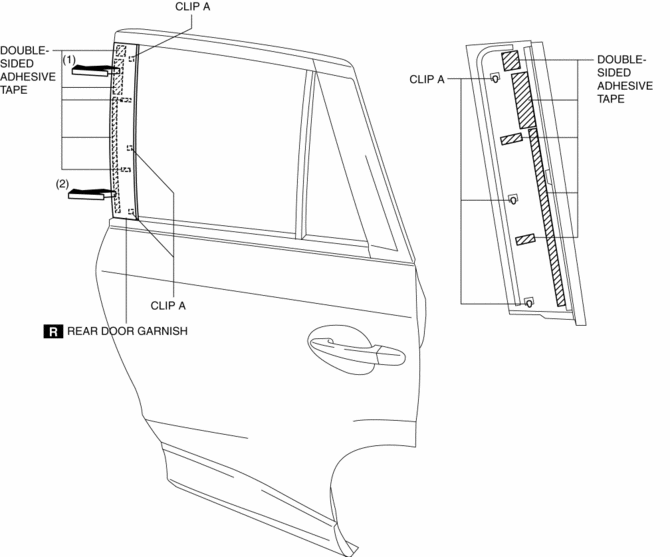
Front
1. Using a tape-wrapped fastener remover, remove clips A in the direction of arrow (1), (2) shown in the figure.
2. Remove the double-sided adhesive tape in the position shown in the figure using the utility knife, remove the rear door garnish from the rear door sash.

3. Install in the reverse order of removal.
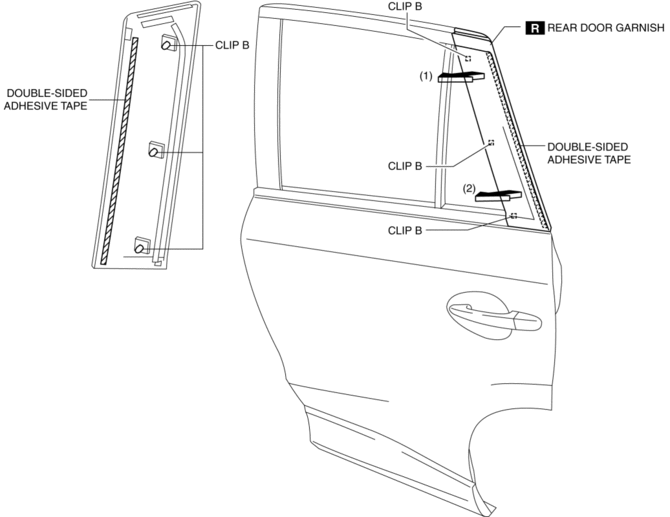
Rear
1. Using a tape-wrapped fastener remover, remove clips B in the direction of arrow (1), (2) shown in the figure.
2. Remove the double-sided adhesive tape in the position shown in the figure using the utility knife, remove the rear door garnish from the rear door sash.

3. Install in the reverse order of removal.
 Rear Door Checker Removal/Installation
1. Fully close the rear door glass.
2. Disconnect the negative battery cable..
3. Remove the rear door trim..
4. Remove the rear door speaker..
5. Remove bolt.
6. Remove nuts.
7. P ...
 Rear Door Hinge Removal/Installation
1. Disconnect the negative battery cable..
2. Remove the following parts:
a. Rear door.
b. Front scuff plate.
c. Rear scuff plate.
d. B-pillar lower trim.
3. Remove in the order shown in t ...
Other materials:
Air Bag System Service Cautions [Standard Deployment Control System]
Air Bag System Component Disassembly
Disassembling the air bag system components could cause it to not operate
(deploy) normally. Never disassemble any air bag system components.
Air Bag Module, Pre-tensioner Seat Belt Handling
Oil, grease, or water on the air bag modules ...
Outer Mirror Garnish Removal/Installation
1. Disconnect the negative battery cable..
2. Remove the outer mirror glass..
3. Insert a tape-wrapped flathead screwdriver into the upper outer mirror garnish
and remove tab A, B, C, D in the direction of arrow (1).
4. Insert a tape-wrapped flathead screwdriver into the upper outer mirr ...
Front Side Frame (Partial Cutting) Removal [Panel Replacement]
Symbol Mark
Removal Procedure
1. Drill the 4 locations indicated by (A) shown in the figure, then remove suspension
mounting reinforcement and outer frame reinforcement.
2. Rough cut location indicated by (B) shown in the figure.
3. Drill the 6 locations indicated by (C) shown in the fig ...
