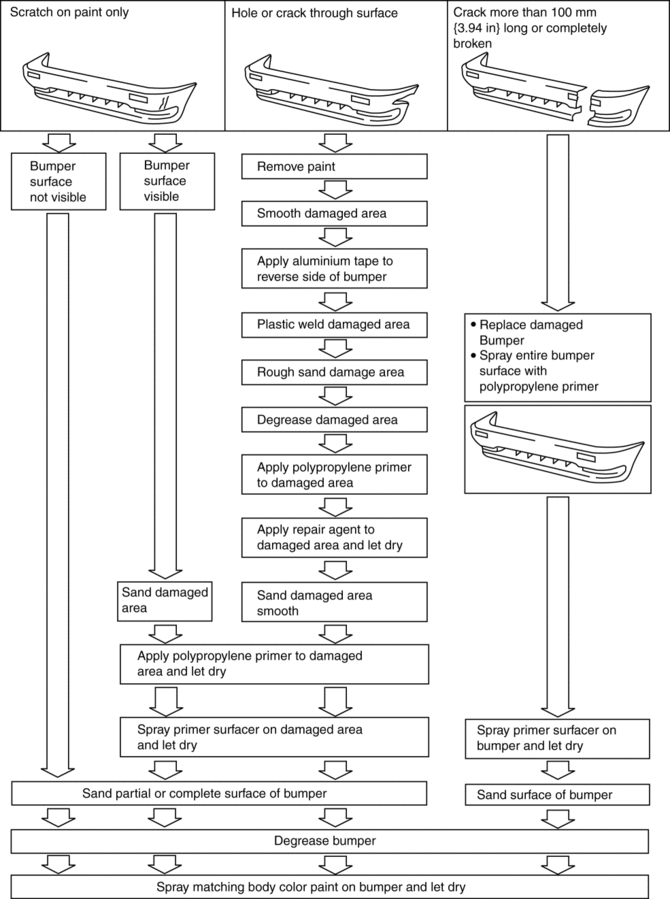
Mazda CX-5 Service & Repair Manual: Polypropylene Bumper Repair [Plastic Body Parts]
 Mudguard Removal/Installation
1. Remove the front over fender..
2. Remove screws A.
3. Remove fasteners B.
4. Pull the mudguard in the direction of the arrow shown in the figure.
5. Install in the reverse order of ...
 Rear Beltline Molding Removal/Installation
CAUTION:
Affix protective tape to the position shown in the figure.
1. Fully open the rear door glass.
2. Insert a tape-wrapped flathead screwdriver and then detach the clip A in ...
Other materials:
Radiator
Purpose, Function
The radiator disperses the engine coolant heat flowing internally by receiving
against the vehicle while it is driven or air flow produced by the cooling fan.
Construction
The radiator is installed to the front of the engine compartment.
Four mounting ...
Rear Parking Brake Cable Removal/Installation
1. Remove the front console box..
2. Remove the shift lever knob. (MTX).
3. Remove the shift panel..
4. Remove the upper panel..
5. Remove the rear console..
6. Loosen the adjusting nut.
7. Remove the floor under cover No.2..
8. Remove in the order indicated in the table.
9. Install ...
Vanity Mirror Illumination Bulb Removal/Installation
1. Disconnect the negative battery cable..
2. Insert a tape-wrapped flathead screwdriver into the service hole in the position
shown in the figure.
3. Move a flathead screwdriver in the direction of the arrow (1) shown in the
figure and detach the lens tab and sunvisor.
4. Detach a ...
