Mazda CX-5 Service & Repair Manual: Oil Seal (Control Valve Body) Replacement [Fw6 A EL, Fw6 Ax EL]
1. Disconnect the negative battery cable..
2. Remove the air cleaner component..
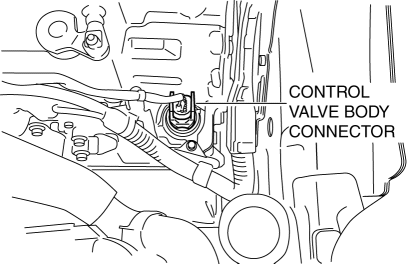
3. Disconnect the control valve body connector.
CAUTION:
-
Make sure that your hand does not touch the terminal as the connector terminal could be damaged.
-
Water or foreign objects entering the connector can cause a poor connection or corrosion. Be sure not to drop water or foreign objects on the connector when disconnecting it.
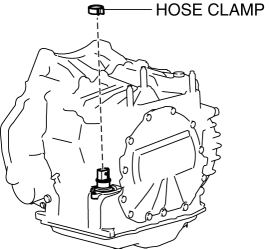
4. Remove the hose clamp.
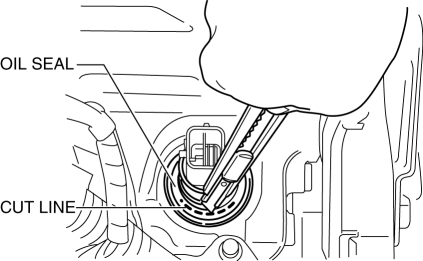
5. Cut the oil seal using a utility knife as shown in the following illustration.
CAUTION:
-
Do not damage the transaxle case.
-
Do not damage the control valve body coupler connector.
-
To prevent foreign matter penetration, clean the oil seal area thoroughly and cut the oil seal so as not to leave cutting fragments.
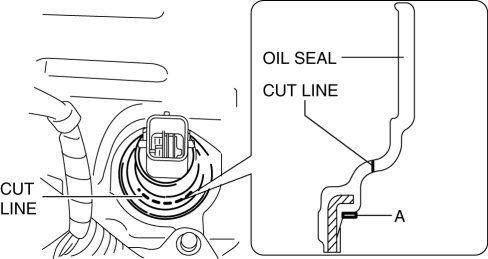
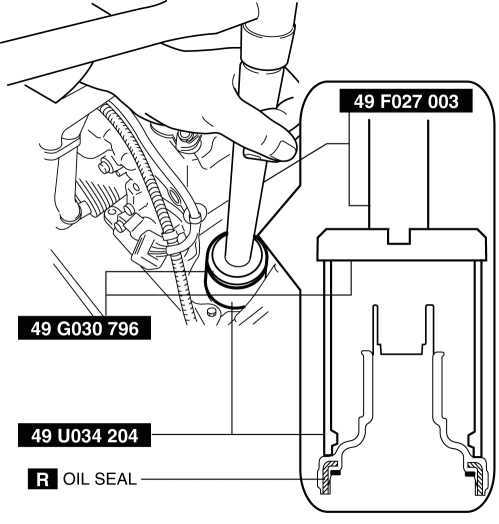
6. Using a tape-wrapped flathead screwdriver, remove the oil seal from the transaxle case.

NOTE:
-
Remove the oil seal by tapping the tip of a tape-wrapped flathead screwdriver on the inner circumference surface A area of the oil seal.
7. Temporarily install the oil seal (control valve body) by hand.
8. Using the SSTs
and a hammer, install the oil seal (control valve body) so that it is not tilted and there is no height difference between the transaxle case surface and the end surface of the oil seal.
CAUTION:
-
When installing the oil seal (control valve body), do not mistakenly hit the control valve body connector with the hammer. Otherwise the control valve body connector could be damaged making it no longer waterproof.
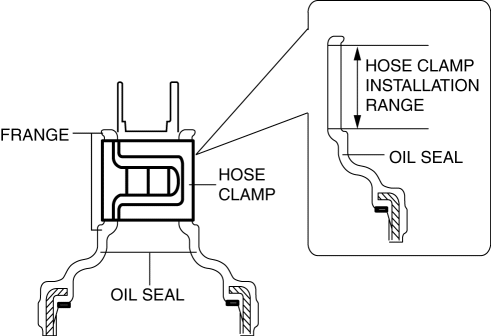
9. Install a new hose clamp to the position shown in the figure.
CAUTION:
-
If the hose clamp is reused it could cause ATF leakage, therefore use a new hose clamp.
-
Install the hose clamp tab to within the range shown in the figure.
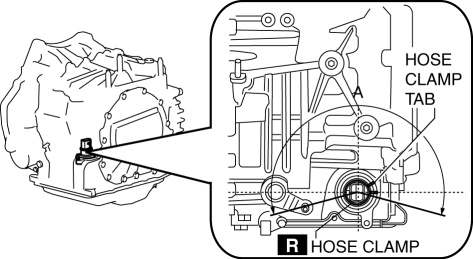
A: 210°
-
Install the hose clamp so that it does not interfere with the top and bottom flanges of the oil seal to maintain the waterproofing integrity.
10. Connect the control valve body connector.
CAUTION:
-
Make sure that your hand does not touch the terminal as the connector terminal could be damaged.
-
Verify that there is no fluid or foreign matter adhering to the connector before connecting the connector.
-
Insert the connector straight as the connector terminal could be damaged.
-
Rotate the connector lever until a click is heard.
11. Install the air cleaner component..
12. Connect the negative battery cable..
 Oil Pump [Skyactiv G 2.0]
Outline
The oil pump has a mechanism for feedback control of oil pressure. As a result,
an oil pressure increase of more than the set pressure is suppressed and oil
pump drive resistance ...
 On/Off Solenoid Removal/Installation [Fw6 A EL, Fw6 Ax EL]
WARNING:
A hot transaxle and ATF can cause severe burns. Turn off the engine and wait
until they are cool.
Always wear protective eye wear when using the air compressor. If the ...
Other materials:
Mirror Base Installation
1. Cut away all of the original sealant using a razor.
WARNING:
Using a razor with bare hands can cause injury. Always wear gloves when using
a razor.
2. Clean and degrease the ceramic coating on the glass and the base.
CAUTION:
Keep the area free of dirt and grease, and ...
Positive Crankcase Ventilation (PCV) Valve
Purpose, Function
Prevents release of blow-by gas (unburnt gas) into the atmosphere.
The PCV valve is open/closed by the intake manifold vacuum.
Construction
The PCV valve is installed to the oil separator.
The PCV valve consists of a spring and valve.
...
Active Command Modes Inspection [Front Body Control Module (Fbcm)]
1. Connect the M-MDS to the DLC-2.
2. After the vehicle is identified, select the following items from the initialization
screen of the M-MDS.
a. Select “DataLogger”.
b. Select “Modules”.
c. Select “F_BCM”.
3. Select the active command modes from the PID table.
4. Perform t ...
