Mazda CX-5 Owners Manual: Manual Transaxle Operation
Manual Transaxle Shift Pattern
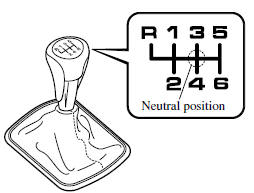
The shift pattern of the transaxle is conventional, as shown.
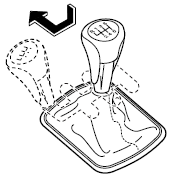
Depress the clutch pedal all the way down while shifting; then release it slowly.
Your vehicle is equipped with a device to prevent shifting to R (reverse) by mistake.
Push the shift lever downward and shift to R.
WARNING
Do not use sudden engine braking on slippery road surfaces or at high speeds:
Shifting down while driving on wet, snowy, or frozen roads, or while driving at high speeds causes sudden engine braking, which is dangerous.
The sudden change in tire speed could cause the tires to skid. This could lead to loss of vehicle control and an accident.
Be sure to leave the shift lever in 1 or R position and set the parking brake when leaving the vehicle unattended: Otherwise the vehicle could move and cause an accident.
CAUTION
● Keep your foot off the clutch pedal except when shifting gears. Also, do not use the clutch to hold the vehicle on an upgrade. Riding the clutch will cause needless clutch wear and damage.
● Do not apply any excessive lateral force to the gear lever when changing from 5th to 4th gear.
This could lead to the accidental selection of 2nd gear, which can result in damage to the transaxle.
● Make sure the vehicle comes to a complete stop before shifting to R.
Shifting to R while the vehicle is still moving may damage the transaxle.
NOTE
If shifting to R is difficult, shift back into neutral, release the clutch pedal, and try again.
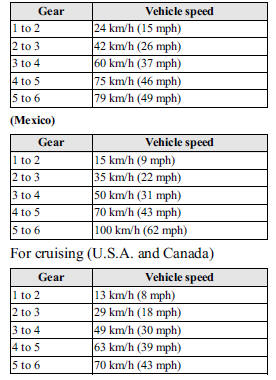
Recommendations for Shifting
Upshifting
For normal acceleration, we recommend these shift points.
(U.S.A. and Canada)
Downshifting
When you must slow down in heavy traffic or on a steep upgrade
, downshift before the engine starts to overwork. This reduces the chance of stalling and gives better acceleration when you need more speed.
On a steep downgrade
, downshifting helps maintain safe speed and prolongs brake life.
 Transaxle
...
 Automatic Transaxle Controls
Various Lockouts:
NOTE
The Sport AT has an option that is not included in the traditional automatic
transaxle giving the driver the option of selecting each gear instead of leaving
it to the ...
Other materials:
Winter Driving
Carry emergency gear, including tire chains, window scraper, flares, a small
shovel, jumper cables, and a small bag of sand or salt.
Ask an Authorized Mazda Dealer to perform the following precautions: l Have the
proper ratio of antifreeze in the radiator.
• Inspect the battery and its cable ...
Accelerator Pedal Position (App) Sensor Inspection
Voltage Inspection
NOTE:
Because the APP sensor is integrated in the accelerator pedal, replacing
the APP sensor includes replacement of the accelerator pedal.
1. Connect the M-MDS to the DLC?2.
2. Switch the ignition ON (engine off or on).
3. Verify that the APP sensor output ...
Clutch Disc Inspection [C66 M R]
Operation Inspection
1. Inspect the lining surface for discoloration and grease adhesion.
2. Inspect the torsion spring for weakness and the rivets for looseness.
3. Using a vernier caliper, measure the depth between the lining surface and
the rivet head.
Minimum clutch disc thicknes ...
