Mazda CX-5 Service & Repair Manual: Lumber Support Motor Inspection
WARNING:
-
Handling a side air bag improperly can accidentally operate (deploy) the air bag, which may seriously injure you. Read the service warnings/cautions in the Workshop Manual before handling the front seat (side air bag integrated)..
1. Disconnect the negative battery cable and wait for 1 min
..
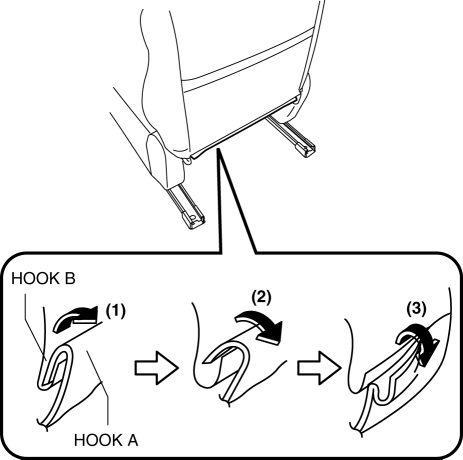
2. Slide hook A in the order of arrows (1), (2), (3) shown in the figure and disconnect them from hook B.
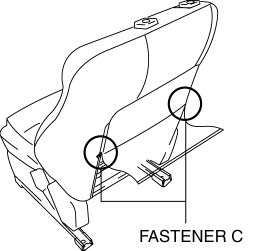
3. Open fasteners C.
4. Disconnect the lumber support motor connector.
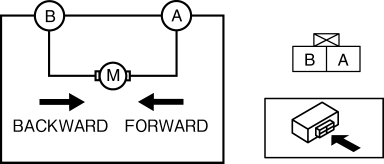
5. Apply battery positive voltage to the lumber support motor terminals and inspect the front seat back operation.
-
If not as specified, replace the lumber support motor..
|
Front seat back operation |
Connection |
|
|
A |
B |
|
|
Forward |
B+ |
GND |
|
Backward |
GND |
B+ |
 Lift Motor Removal/Installation
WARNING:
Handling a side air bag improperly can accidentally operate (deploy) the
air bag, which may seriously injure you. Read the service warnings/cautions
in the Workshop Manual befor ...
 Lumber Support Motor Removal/Installation
WARNING:
Handling a side air bag improperly can accidentally operate (deploy) the
air bag, which may seriously injure you. Read the service warnings/cautions
in the Workshop Manual befor ...
Other materials:
Efficient Installation Of Body Panels
Checking Preweld Measurements And Watching
Align to the standard reference dimensions, based upon the body dimensions
illustration, so that new parts are installed in the correct position.
Welding Notes
For the number of weld points, welding should be performed in accord ...
Audio Unit Personalization Features Setting Procedure
Door Locks Systems
1. Switch the ignition ON (engine off or on).
2. Turn the audio unit power on.
3. Select the following from the audio unit screen.
a. “Setup”
b. “Vehicle”
c. “Door Locks“
4. Select the following items and change the setting.
Advanced keyless entry system ...
D Pillar Reinforcement (Lower) Installation [Panel Replacement]
Symbol Mark
Installation Procedure
1. When installing new parts, measure and adjust the body as necessary to conform
with standard dimensions.
2. Drill holes for the plug welding before installing the new parts.
3. After temporarily installing new parts, make sure the related parts fit p ...
