Mazda CX-5 Service & Repair Manual: Instrument Cluster Disassembly/Assembly
CAUTION:
-
If the instrument cluster is hit forcefully during disassembly such as by being dropped, it could get damaged and the system may not operate normally. When disassembling the instrument cluster, perform the procedure on a workbench on clean clothes being careful not to drop it.
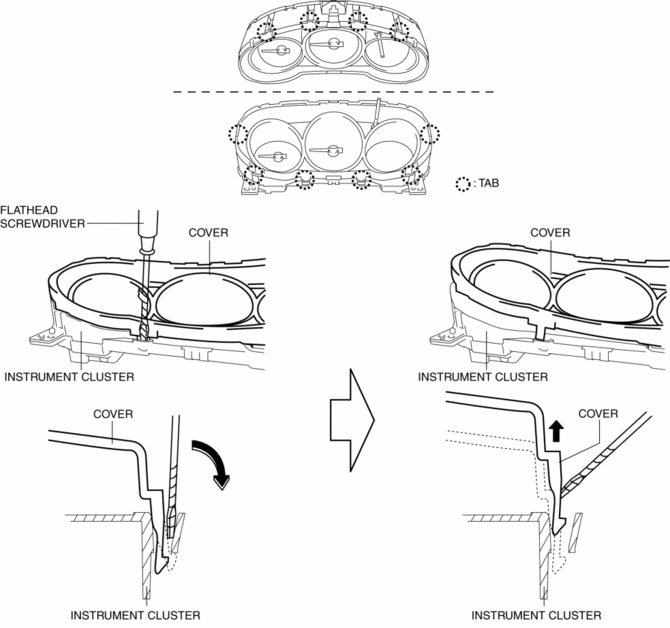
1. Move a tape-wrapped flathead screwdriver in the direction of the arrow shown in the figure, lift up the cover while pressing the cover tab, and disengage the cover tab from the instrument cluster.

2. Disengage all the cover tabs from the instrument cluster and remove the cover.
3. Assemble in the reverse order of disassembly.
 Instrument Cluster Configuration (Using Read/Write Function)
NOTE:
When performing configuration, it is necessary to read the vehicle specification
information from the instrument cluster before replacing it. Connect the M-MDS
to the vehicle and p ...
 Instrument Cluster Inspection
Speedometer inspection
Using a speedometer tester
1. Adjust the tire pressure to the specification.
2. Using a speedometer tester, verify that the tester reading is as indicated
in the following ...
Other materials:
Air Fuel Ratio (A/F) Sensor Heater Control [Skyactiv G 2.0]
Outline
Based on the control of the A/F sensor heater, a stabilized oxygen concentration
is detected even at low exhaust temperatures, and feedback control of fuel injection
even at cold engine start is made possible for improved cold temperature exhaust
emission performance.
...
Seat Belt Precautions
Seat belts help to decrease the possibility of severe injury during accidents
and sudden stops. Mazda recommends that the driver and all passengers always wear
seat belts.
All of the seat belt retractors are designed to keep the lap/shoulder belts out
of the way when not in use.
The driver&# ...
Engine Tune Up
Engine Tune-up Preparation
NOTE:
If the accelerator pedal is depressed continuously for a specified time,
the engine speed may decrease to the idle speed. This is due to the fuel cut
control operation, which prevents overheating, and it does not indicate a malfunction.
The engine s ...
