Mazda CX-5 Service & Repair Manual: Hood Latch Switch
Purpose
-
Detects the open/closed condition of the hood.
Function
-
The hood latch switch is utilized in the theft-deterrent system control.
-
For the theft-deterrent system, refer to (see THEFT-DETERRENT SYSTEM.).
Construction
-
Built into the hood latch.
-
Switch turns on and off by the rotation of the latch bar.
-
When the hood is completely closed, the hood latch switch is on (contact point: closed).
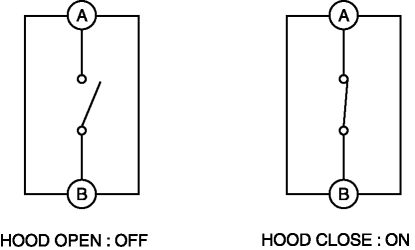
Operation
Hood close (latch) operation
1. When the hood is closed, the hood lock striker enters the latch lever groove.
2. When the hood is then further closed, the latch lever is pressed by the hood lock striker and rotates.
3. When the hood is completely closed, the latch lever is in a latched condition and presses the hood latch switch which turns the switch on.
Hood open (unlatch) operation
1. When the hood release lever is pulled, the hood opens and the latch lever is in an unlatched condition, and the hood latch switch turns off.
Fail-safe
-
Function not equipped.
 Hood Latch And Release Lever Removal/Installation
Hood Latch
1. Open the hood.
2. Disconnect the negative battery cable..
3. Remove the front bumper..
4. Insert a tape-wrapped flathead screwdriver into the position shown in the
figure.
...
 Hood Latch Switch Inspection
1. Disconnect the negative battery cable..
2. Remove the front bumper..
3. Disconnect the hood latch switch connector..
4. Verify that the continuity is as indicated in the table.
NOTE:
...
Other materials:
Evaporator Temperature Sensor Inspection [Full Auto Air Conditioner]
NOTE:
Inspect the evaporator temperature sensor when it is installed to the A/C
unit.
1. Set the fan speed at MAX HI.
2. Set the temperature control at MAX COLD.
3. Set the RECIRCULATE mode.
4. Turn the A/C switch off.
5. Close all doors and windows.
6. Wait for 5 min.
7 ...
Panel Light Control Indicator Alarm
Purpose
The panel light control indicator alarm notifies the driver that the panel
light brightness is either at maximum or minimum.
Function
If the panel light control switch is in the maximum rotation position right
or left when the TNS switch ON signal (TNS and headlight ...
Check Valve Removal/Installation
Except U.S.A. And CANADA
1. Remove the floor under cover..
2. Remove in the order indicated in the table.
1
Evaporative hose
2
Check valve
3. Install in the reverse order of removal. ...
