Mazda CX-5 Service & Repair Manual: Hood Latch And Release Lever Removal/Installation
Hood Latch
1. Open the hood.
2. Disconnect the negative battery cable..
3. Remove the front bumper..
4. Insert a tape-wrapped flathead screwdriver into the position shown in the figure.
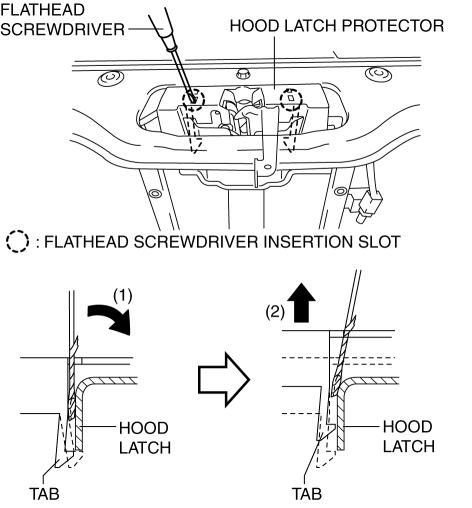
5. Move the tape-wrapped flathead screwdriver in the direction of arrow (1) shown in the figure to press the hood latch protector tab, and lift the tab up in the direction of arrow (2) and detach its tab from the fuse box.
6. Detach all the hood latch protector tabs from the hood latch and remove the hood latch protector.
7. While pressing the tabs of the clip in the direction of arrow (1) shown in the figure, press it in the direction of arrow (2) to detach the connector tabs from the body.
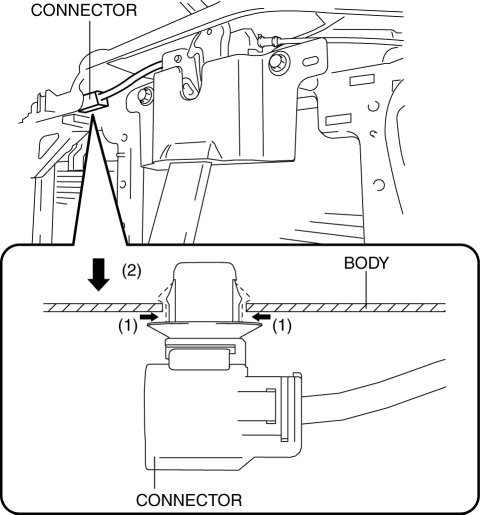
8. Remove the connector antenna from the body.
9. Disconnect the connector.
10. Disconnect the hood release cable.
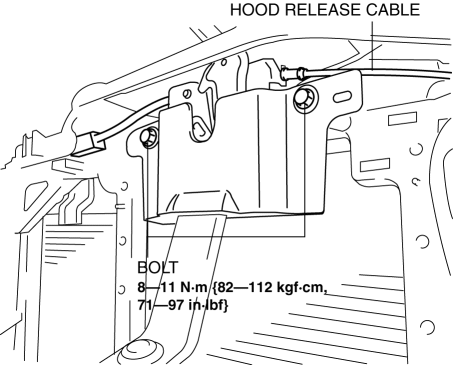
11. Remove the bolts.
12. Remove the hood latch.
13. Install in the reverse order of removal.
14. Adjust the hood..
Hood Release Lever
1. While pulling the hood release lever, insert a tape-wrapped flathead screwdriver into the position shown in the figure.
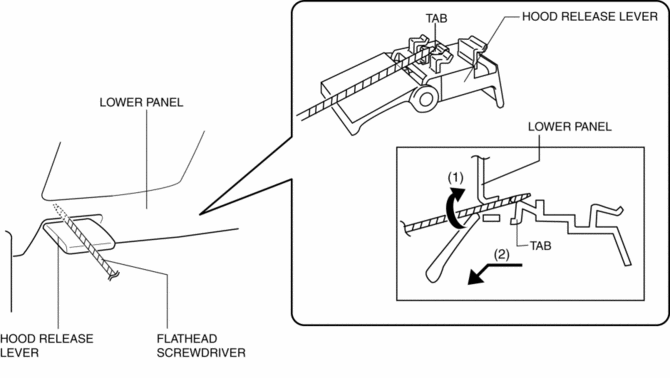
2. Move the tape-wrapped flathead screwdriver in the direction of arrow (1) shown in the figure to press the tab, and pull the hood release lever in the direction of arrow (2) to detach it from the lower panel.
CAUTION:
-
Remove the hood release lever while being careful not to damage the hood release cable with the flathead screwdriver.
3. Pull the hood release lever to remove it from the lower panel.
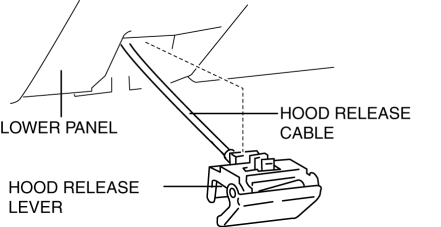
4. Disconnect the hood release cable from the hood release lever.
5. Install in the reverse order of removal.
 Hood Disassembly/Assembly
1. Disassemble in the order indicated in the table.
1
Fastener
2
Hood insulator
3
Shroud seaming welt
...
 Hood Latch Switch
Purpose
Detects the open/closed condition of the hood.
Function
The hood latch switch is utilized in the theft-deterrent system control.
For the theft-deterrent system ...
Other materials:
AWD
All-Wheel Drive (AWD) Operation
• AWD provides excellent drivability
on snow-covered and ice-packed roads, sand and mud, as well as on steep slopes and
other slippery surfaces.
• A system malfunction or operation conditions
are indicated by a warning.
Refer to Warning/Indicator Light ...
Seat Belt
Outline (Standard Deployment Control System)
Three-point front seat belts with the following functions for front seat
passengers adopted.
ELR (Emergency Locking Retractor: emergency locking mechanism)
Load limiter
Pre-tensioner seat belt.
T ...
Positive Crankcase Ventilation (PCV) System
Purpose, Outline
Prevents release of blow-by gas (unburnt gas) into the atmosphere.
The intake manifold vacuum introduces blow-by gas to the intake manifold
via the PCV valve and the ventilation hose.
System Diagram
Structure
The positive crankcase ventilation sys ...
