Mazda CX-5 Service & Repair Manual: Heated Oxygen Sensor (HO2 S) Inspection
HO2S Inspection
1. Connect the M-MDS to the DLC?2.
2. Switch the ignition ON (engine on).
3. Warm up the engine to normal operating temperature.
4. Access the following PIDs using the M-MDS..
-
VSS (Vehicle speed)
-
RPM (Engine speed)
-
O2S12 (HO2S output voltage)
5. Drive the vehicle and decelerate the engine speed by releasing the accelerator pedal fully when the engine speed is 3,000 rpm or more
.
6. Verify that the HO2S output voltage (PID: O2S12) is 0.3 V or less
while decelerating as shown in the figure.

-
If not as specified, replace the HO2S..
HO2S Heater Inspection
WARNING:
-
A hot engine and exhaust system can cause severe burns. Turn off the engine and wait until they are cool before removing the exhaust system.
1. Disconnect the negative battery cable..
2. Lift up the vehicle.
3. Remove the floor under cover. (vehicles with floor under cover).
4. Disconnect the HO2S connector.
5. Measure the resistance between HO2S terminals C and D.
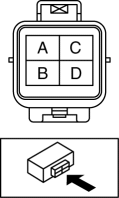
-
If not as specified, replace the HO2S..
-
HO2S heater resistance
-
2—50 ohms [normal temperature]
 Heated Oxygen Sensor (HO2 S) Heater Control
Outline
Based on the control of the HO2S heater, a stabilized oxygen concentration
is detected even at low exhaust temperatures, and feedback control of fuel injection
even at cold engine ...
 Heated Oxygen Sensor (HO2 S) Removal/Installation
WARNING:
A hot engine and exhaust system can cause severe burns. Turn off the engine
and wait until they are cool before removing the exhaust system.
CAUTION:
Do not allow fla ...
Other materials:
Purge Solenoid Valve
Purpose, Function
Introduces evaporative gas absorbed by the charcoal canister to the intake
manifold.
The purge solenoid valve opens according to the control signal from the PCM.
Construction
The purge solenoid valve is installed in the engine compartment.
...
Battery [Skyactiv G 2.0]
Purpose, Function
The battery stores electricity generated by the generator. In addition, it
supplies power to electronic devices if necessary.
Construction
The battery is installed in the engine compartment. (vehicle left)
Fail-safe
Function not equipped.
...
Replace Electrical Battery
If the buttons on the transmitter are inoperable and the operation indicator
light does not flash, the battery may be dead.
Replace with a new battery before the transmitter becomes unusable.
CAUTION
● Make sure the battery is installed correctly.
Battery leakage could occur if it is no ...
