Mazda CX-5 Service & Repair Manual: Headliner Removal/Installation
1. Disconnect the negative battery cable..
2. Remove the following parts:
a. Sunroof seaming welt (with sunroof system).
b. A-pillar trim.
c. Front map light.
d. Sunvisor.
e. Front scuff plate.
f. Rear scuff plate.
g. B-pillar lower trim.
h. Adjust anchor cover.
i. Upper anchor installation bolt on the seat belt.
j. B-pillar upper trim.
k. Assist handle.
l. Trunk board.
m. Trunk end trim.
n. Trunk side trim.
o. D-pillar trim.
p. C-pillar trim.
3. Disconnect the roof wiring harness connector and remove the roof wiring harness connector clip from the body.
4. Disconnect the rear washer hose C. (with rear washer system).
5. Temporarily install the seaming welt shown in the figure to the headliner.
CAUTION:
-
If fasteners are removed without temporarily installing the seaming welt, the headliner may fall off and the part may be damaged. Before removing fasteners, temporarily install the seaming welt to prevent the headliner from falling off.
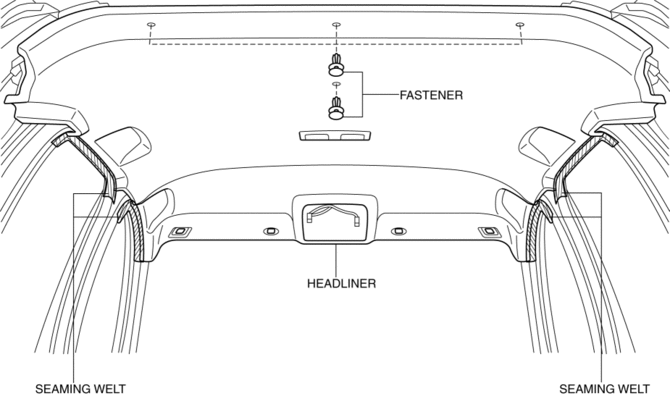
6. Remove fasteners.
7. Partially peel back the seaming welt. Take the headliner out from the opened liftgate.
8. Install in the reverse order of removal.
 Headliner
Purpose/Function
The headliner is equipped with a shock absorbing pad for driver's head protection
during a collision.
Construction
The front and rear side of the headliner ...
 Roof Molding Installation
1. Install the roof molding to the front T-studs.
2. Hook the roof molding to clips and attach the roof molding while pressing
it in the direction of the arrow shown in the figure.
3. Instal ...
Other materials:
Engine SST
1: Mazda SST number
2: Global SST number
Example
1:49 UN20 5072
2:205–072
Holder
1:–
2:AKS042808
Adapter
1: 49 UN20 5072
2: 205–072
Holder
1: 49 B011 105
2: –
...
ABS Control
Outline
ABS control occurs when wheel slip is determined by the DSC CM (based on
the four ABS wheel-speed sensors). Then, the DSC HU inlet and outlet solenoid
valves are operated and brake fluid pressure is controlled accordingly to prevent
wheel lock-up.
Feature
Use of ...
Front Fender Junction Installation [Panel Replacement]
Symbol Mark
Installation Procedure
1. When installing new parts, measure and adjust the body as necessary to conform
with standard dimensions.
2. Drill holes for the plug welding before installing the new parts.
3. After temporarily installing new parts, make sure the related parts fit p ...
