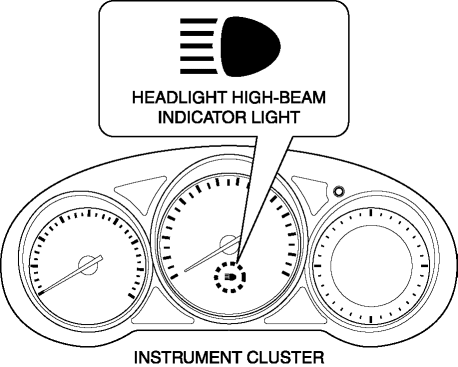
Mazda CX-5 Service & Repair Manual: Headlight High Beam Indicator Light
Purpose
-
Notifies the user that the headlights (HI) are illuminated.
Function
-
Illuminates when the headlight (HI) or parking illumination conditions are met.
Construction
-
Displayed in the instrument cluster.
Operation
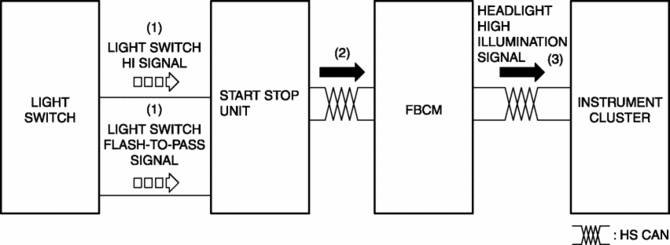
1. When the light switch is operated to the HI or parking position, a light switch HI or parking signal is input to the start stop unit.
2. The start stop unit sends the light switch HI or parking signal to the front body control module (FBCM).
3. The front body control module (FBCM) sends the light switch HI signal to the instrument cluster as a headlight HI illumination signal.
4. When the instrument cluster receives the headlight HI illumination signal, it illuminates the headlight high-beam indicator light.
Fail-safe
-
Function not equipped.
 Gear Position Indicator [Fw6 A EL, Fw6 Ax EL]
Purpose/Function
The gear position indicator illuminates while under manual shift control
and displays the gear number while driving.
Construction
The gear position indicator is ...
 Key Warning Light (Red)/Key Indicator Light (Green)
Purpose
KEY warning light (red)
The KEY warning indicator light (red) notifies the user that the engine cannot
be started, the remote transmitter is outside of the vehicle, or that there
...
Other materials:
Lift Motor Removal/Installation
WARNING:
Handling a side air bag improperly can accidentally operate (deploy) the
air bag, which may seriously injure you. Read the service warnings/cautions
in the Workshop Manual before handling the front seat (side air bag integrated)..
1. Switch the ignition off (LOCK).
2. ...
Entertainment System
Outline
The following entertainment system has been adopted.
Audio system (with audio system)
Car-navigation system (with car-navigation system)
Park assist system (with park assist system)
Bluetooth system (with Bluetooth system)
...
Rear ABS Wheel Speed Sensor Inspection [Awd]
Installation Visual Inspection
1. Inspect the following items:
If there is any malfunction, replace the applicable part.
a. Excessive play of the ABS wheel-speed sensor
b. Deformation of the ABS wheel-speed sensor
c. Deformation or damage of the ABS sensor rotor
Clearance Inspec ...
