Mazda CX-5 Service & Repair Manual: General Procedures (Front And Rear Axles)
Wheel and Tire Installation
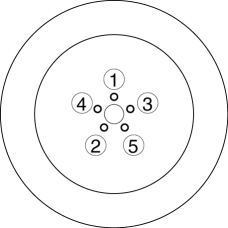
1. When installing the wheels and tires, tighten the wheel nuts in a criss-cross pattern to the following tightening torque.

-
Tightening torque
-
108—147 N·m {12—14 kgf·m, 80—108 ft·lbf}
Suspension Links Removal/Installation
1. For the joint sections with rubber bushings, raise the vehicle using a lift, and then temporarily tighten the installation bolts and nuts. Lower the vehicle to the ground and tighten them to the specified tightening torque.
Connector Disconnection
1. Disconnect the negative battery cable before performing any work that requires handling of connectors..
Headlight Auto Leveling System Initialization (Vehicle with discharge headlight system)
1. Initialize the auto leveling sensor, when performing the following services.
-
Removing the auto leveling sensor
-
Disconnecting the auto leveling sensor link
-
Removing the suspension parts related the vehicle height
Electronic AWD Control System Parts
1. After servicing the electronic AWD control system parts, verify that no DTC has been stored. Clear any DTCs remaining in the memory.
 Driveline/Axle SST
Front and Rear Axle
49 T028 3A0
Ball joint puller set
49 T028 301
Dust boot installer
49 U034 204
Dust boot installer
...
 4WD
4WD
...
Other materials:
Engine Front Cover
Purpose, Function
The engine front cover covers the front of the engine to prevent engine oil
spillage, noise leakage, and foreign material penetration.
Construction
The engine front cover is installed to the front of the engine.
The lightweight engine front ...
Shift Position Indicator Light [Fw6 A EL, Fw6 Ax EL]
Purpose/Function
The shift position indicator light indicates the selector lever position.
Construction
The shift position indicator light is built into the instrument cluster.
Operation
The TCM sends a shift position indicator light illumination request signal ...
Body Sealing [Water Proof And Rust Preventive]
Sealant is applied to the parts where the panels meet and to the hemmed parts
of the door panel and hood panel to provide water proofing and rust proofing.
...
