
Mazda CX-5 Service & Repair Manual: Fuel Gauge Sender Unit Inspection [Awd]
Fuel gauge sender unit (main)
NOTE:
-
For the fuel gauge sender unit removal/installation, refer to the fuel pump removal/installation because the fuel gauge sender unit is integrated with the fuel pump..
1. Verify that the resistance at fuel gauge sender unit (main) terminals D and C is as indicated in the table according to the height of the float.
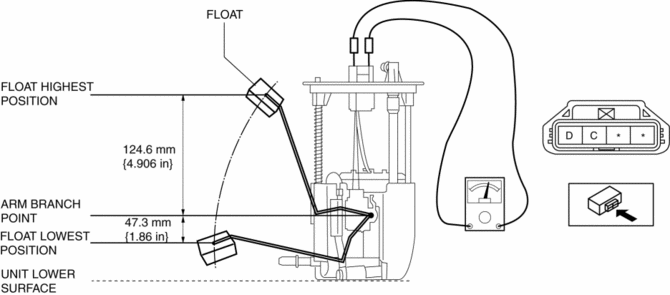
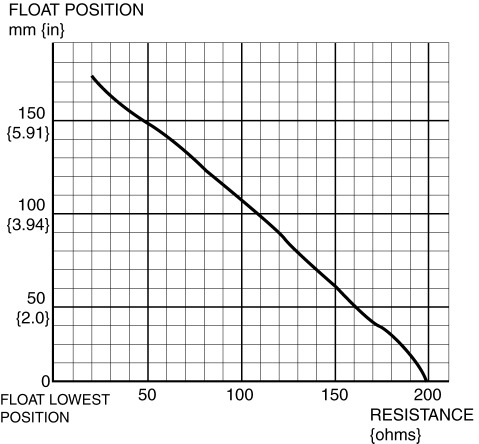
-
If not as indicated in the table, replace the fuel gauge sender unit (main).
Fuel gauge sender unit (sub)
1. Remove the fuel gauge sender unit (sub)..
2. Verify that the resistance at fuel gauge sender unit (sub) terminals B and A is as indicated in the table according to the height of the float.
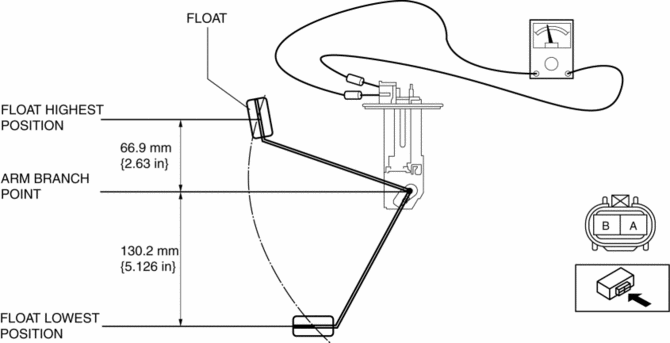
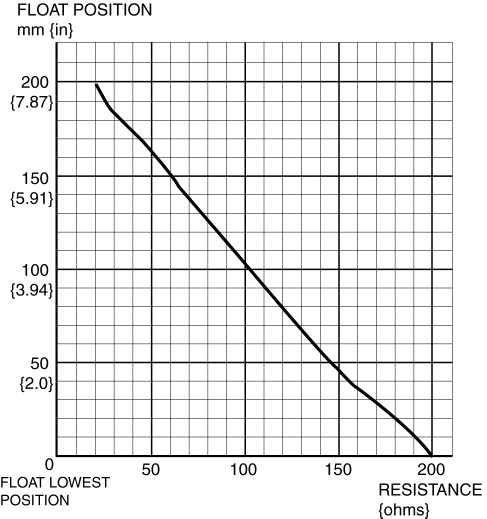
-
If not as indicated in the table, replace the fuel gauge sender unit (sub).
 Fuel Gauge Sender Unit Inspection [2 Wd]
NOTE:
For the fuel gauge sender unit removal/installation, refer to the fuel pump
removal/installation because the fuel gauge sender unit is integrated with the
fuel pump..
1. Veri ...
 Fuel Gauge Sender Unit Removal/Installation [2 Wd]
WARNING:
Always keep sparks and flames away from fuel when servicing the fuel system.
Fuel can be easily ignited which could cause serious injury or death, and damage
to equipment.
...
Other materials:
Automatic Transaxle Fluid (ATF) Replacement [Fw6 A EL, Fw6 Ax EL]
WARNING:
Do not perform the servicing while the ATF is hot. Otherwise, it could cause
severe burns or serious injury.
1. Remove the front under cover No.2..
2. Remove the dipstick securing bolt.
3. Remove the dipstick.
4. Remove the drain plug and washer, and drain the ATF ...
Oil Cooler
Purpose, Function
The oil cooler routes engine oil and engine coolant through the interior
and disperses the engine oil heat using the engine coolant. As a result, the
oil temperature is maintained properly to reduce the engine oil deterioration.
Construction
A 9-layered ty ...
Airflow Temperature Control [Full Auto Air Conditioner]
Purpose
The airflow temperature control changes the airflow temperature according
to the vehicle conditions.
Function
The air mix actuator is driven and the air mix door position is changed according
to the set temperature and the vehicle environment.
The climate co ...
