Mazda CX-5 Service & Repair Manual: Fuel Filler Lid Opener And Lever Removal/Installation
Fuel-filler Lid Opener
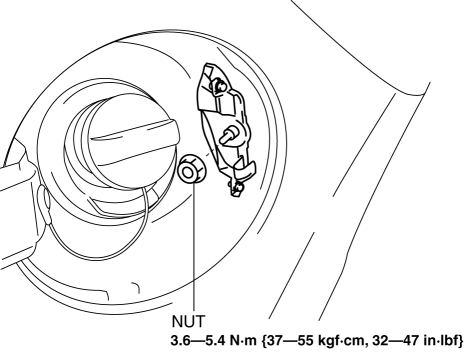
1. Open the fuel-filler lid.
2. Remove the nut.
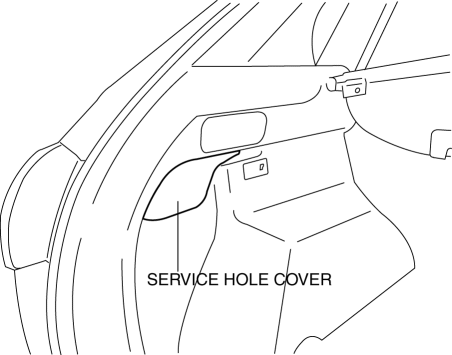
3. Remove the service hole cover on the trunk side trim.
4. While pressing the tabs of the stopper bracket in the direction of arrow (1) shown in the figure, press it in the direction of arrow (2) to detach it from the body.
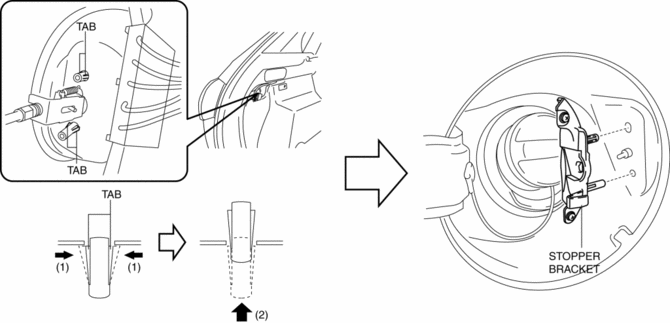
5. Detach all the stopper bracket tabs from the body and remove the stopper bracket.
6. Remove the fuel-filler lid opener in the direction of the arrow.
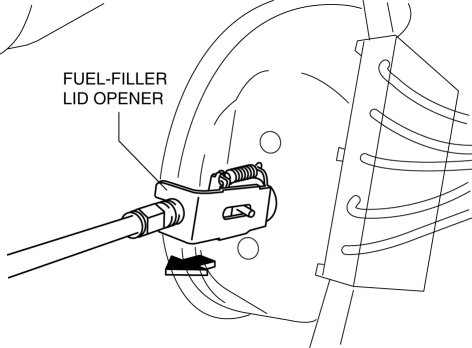
7. Disconnect the fuel-filler lid opener cable from the fuel-filler lid opener.
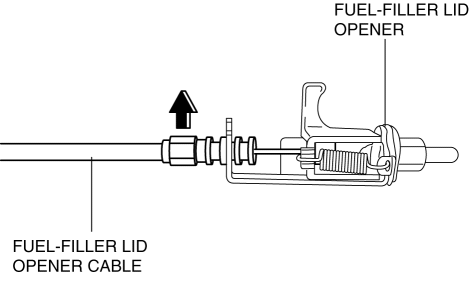
8. Install in the reverse order of removal.
Fuel-filler Lid Opener Lever
1. Remove the front scuff plate. (Driver's side).
2. Remove the front side trim. (Driver's side).
3. Partially peel back the floor covering.
4. Remove the bolts.
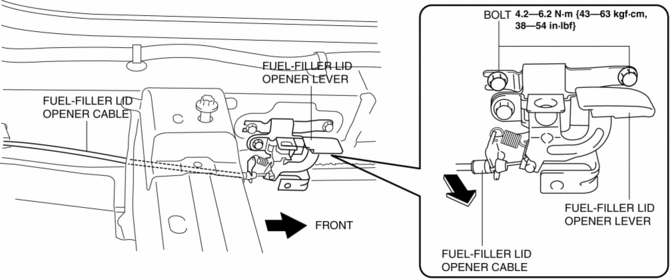
5. Disconnect the fuel-filler lid opener cable from the fuel-filler lid opener lever.
6. Install in the reverse order of removal.
 Fuel Filler Lid Adjustment
1. Verify that the gap and height difference between the fuel-filler lid and
body.
2. Loosen the bolts and adjust the fuel-filler lid.
Standard clearance
a: 1.7—3.7 mm {0.07—0.14 ...
 Fuel Filler Lid Opener Cable Removal/Installation
1. Disconnect the negative battery cable..
2. Remove the following parts:
a. Front scuff plate (LH).
b. Front seat (LH).
c. Rear scuff plate.
d. B-pillar lower trim (LH).
e. Rear seat (4:2 ...
Other materials:
Interior Equipment (View A)
1 Door-lock knob
2 TCS OFF switch
3 Tire pressure monitoring system set switch
4 Turn and lane-change signal
5 Lighting control
6 Instrument cluster
7 Dashboard illumination knob
8 Wiper and washer lever
9 Push button start
10 AFS OFF switch
11 BSM OFF switch
12 Outside mirror ...
Torque Sensor
Purpose/ Function
The torque sensor detects the steering torque and the steering direction,
and outputs the signal to the Electric Power Steering (EPS) control module (CM).
Construction, Operation
The Hall IC-type torque sensor is installed to the top of the steering column
...
Generator Control [Skyactiv G 2.0]
Outline
Idling stability has been improved by optimum control of generator voltage
according to engine operation and electrical load conditions.
The PCM determines the engine operation and electrical load conditions based
on the input signals from each control part and controls ...
