Mazda CX-5 Service & Repair Manual: Front Seat Removal/Installation
WARNING:
-
Handling a side air bag improperly can accidentally operate (deploy) the air bag, which may seriously injure you. Read the service warnings/cautions in the Workshop Manual before handling the front seat (side air bag integrated)..
-
If the sliding mechanisms on both sides are not locked after assembling the front seat, the front seat will operate accidentally while the vehicle is driven, which could result in serious injury. After assembling the front seat, shake it up and down and verify that the sliding mechanism on the both sides are locked.
CAUTION:
-
If the slide bar is operated after the front seat is removed, the left/right slide positions will deviate and the adjuster unit could be damaged after the front seat is installed. After removing a front seat, do not operate the slider lever.
-
Verify that there are no malfunctions in the forward/back slide of the seat and in the adjuster unit after installing a front seat.
-
When performing the procedure with a front seat removed from the vehicle, perform the procedure on a clean cloth so as not to damage or soil the seat.
-
When the passenger's seat is removed, perform the seat weight sensor inspection using the M-MDS after installing the passenger's seat..
-
When the passenger's seat is replaced with a new one, perform the seat weight sensor calibration using the M-MDS..
NOTE:
-
When removing the front seat from the vehicle or putting it back in, it can be performed smoothly by removing the headrest.
1. Switch the ignition off (LOCK).
2. Disconnect the negative battery cable and wait for 1 min
..
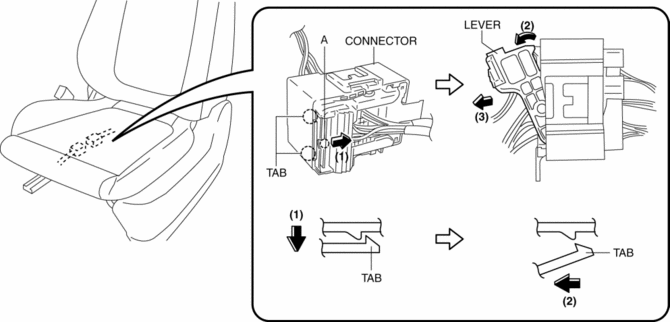
3. Press part A in the direction of the arrow (1) shown in the figure and disengage tabs, move the lever in the direction of the arrow (2) and disconnect the connector in the direction of the arrow (3).

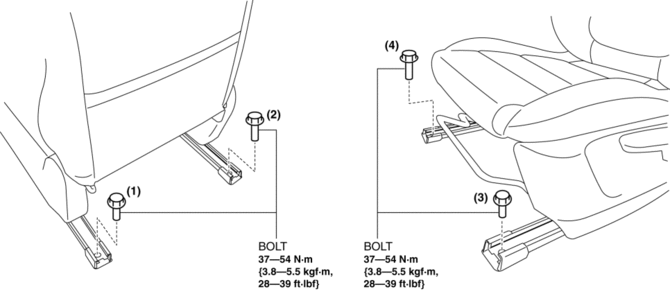
4. Remove the bolts in the order of (1), (2), (3), (4) shown in the figure, then take the front seat out from the opened front door.

5. Install in the reverse order of removal.
 Front Seat Rail Guide Cover Removal/Installation
WARNING:
Handling a side air bag improperly can accidentally operate (deploy) the
air bag, which may seriously injure you. Read the service warnings/cautions
in the Workshop Manual befor ...
 Front Seat Side Cover Removal/Installation
WARNING:
Handling a side air bag improperly can accidentally operate (deploy) the
air bag, which may seriously injure you. Read the service warnings in the Workshop
Manual before handlin ...
Other materials:
Rear Door Latch And Lock Actuator Inspection
The following actuator and switch are integrated with the rear door latch
and lock actuator.
From the actuator/switch name and operation in the following table, select
the actuator or switch to be inspected, and perform the inspection following
the inspection procedure des ...
Conventional Brake System
Outline
A brake pedal with an intrusion minimizing mechanism has been adopted. As
a result, driver safety has been improved.
A small diameter long-stroke type master cylinder has been adopted, improving
operability and response.
A vacuum pump has been adopted, improving ...
Refrigerant Charging
CAUTION:
Do not use a different type of refrigerant or charge beyond the specified
level. Otherwise, cooling ability will be lowered and the A/C compressor could
be damaged.
Charging Recycled HFC-134a Refrigerant
1. Connect an HFC-134a recovery/recycling/recharging device to the ...
