Mazda CX-5 Service & Repair Manual: Front Sash Molding Removal
WARNING:
-
Using a utility knife with bare hands can cause injury. Always wear gloves when using a utility knife.
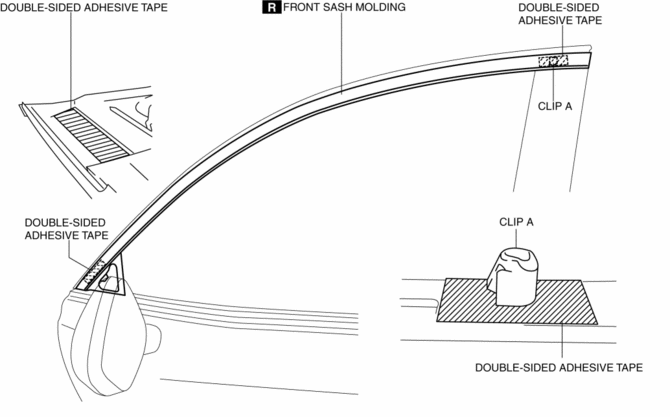
1. Using a utility knife, carefully remove the double-sided adhesive tape in the locations shown below.
CAUTION:
-
When removing the double-sided adhesive tape, be careful not to damage clip A.

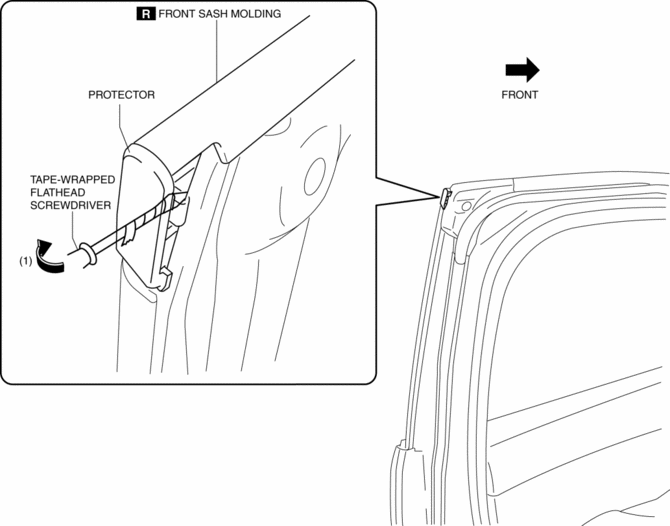
2. Insert a tape-wrapped flathead screwdriver shown in the figure and remove the protector in the direction of arrow (1).

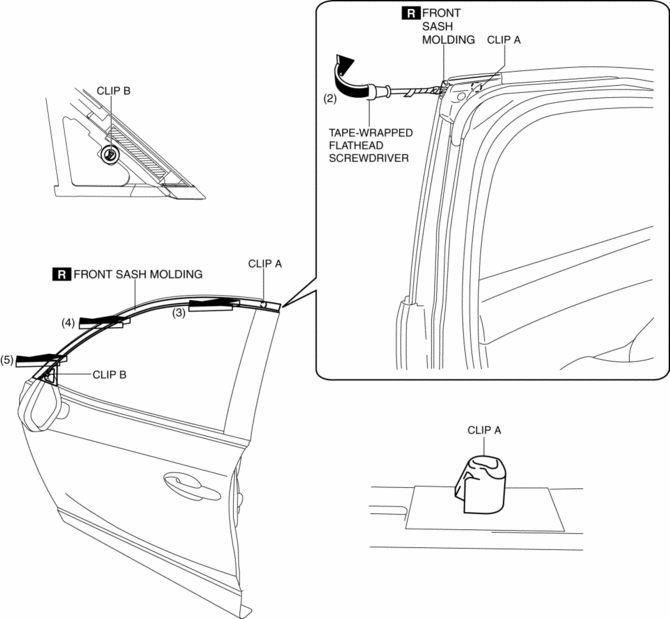
3. Insert a tape-wrapped flathead screwdriver shown in the figure and remove clip A in the direction of arrow (2).

4. Remove the front sash molding in the direction of arrow in the order of (3), (4), (5) while detaching clip B.
5. Install in the reverse order of removal.
 Front Sash Molding Installation
WARNING:
Using a utility knife with bare hands can cause injury. Always wear gloves
when using a utility knife.
NOTE:
Double-sided adhesive tape has already been attached to t ...
 Rear Door Trim Disassembly/Assembly
1. Disassemble in the order shown in the figure.
1
Switch panel cover
2
Power window subswitch.
3
Fastener
...
Other materials:
Rear Turn Light Bulb Removal/Installation
1. Disconnect the negative battery cable..
2. Insert a tape-wrapped flathead screwdriver into the service hole in the position
shown in the figure.
3. Move the flathead screwdriver in the direction of the arrow (1) shown in the
figure, pull out the service hole cover, and detach the serv ...
A/C Unit Disassembly/Assembly
1. Disassemble in the order indicated in the table.
CAUTION:
If a non-specified grease is used, it may result in abnormal noise or improper
operation of the links. Apply only the specified grease to each link.
2. Assemble in the reverse order of disassembly.
...
Crankshaft Pulley
Purpose, Function
The crankshaft pulley transmits the drive force to the auxiliary parts via
the drive belt.
The crankshaft pulley suppresses torsional vibration of the crankshaft.
Construction
The crankshaft pulley is installed to the front of the crankshaft.
...
