Mazda CX-5 Service & Repair Manual: Front Console Box Removal/Installation
NOTE:
-
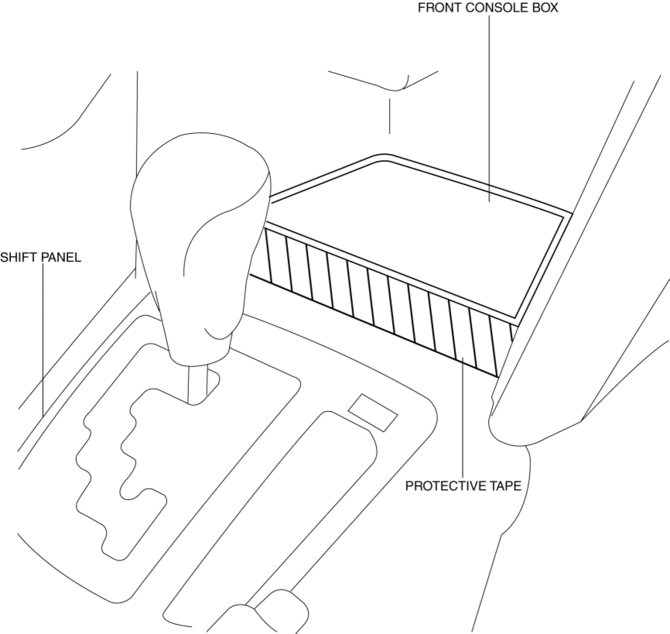
Affix protective tape to the position shown in the figure.

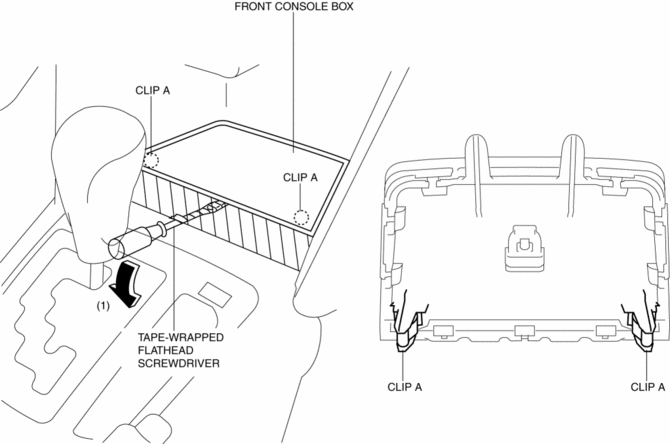
1. Insert a tape-wrapped flathead screwdriver in the position indicated by the arrow in the figure and detach clips A.

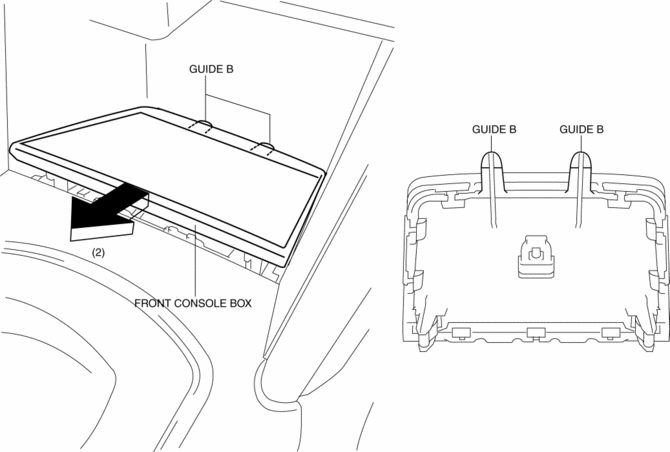
2. Pull the front console box in the direction of the arrow (2) and remove it while detaching the guides B.

NOTE:
-
When the occur to gap between the front console box and shift panel, remove the shift panel then assemble to the front console box. after install the front console box and shift panel as single unit.
3. Install in the reverse order of removal.
 Assist Handle Removal/Installation
Removal
1. Insert a tape-wrapped flathead screwdriver into the service hole and remove
the assist handle covers.
2. Remove the assist handle in the direction of the arrow (1) and (2), while
...
 Front Console Removal/Installation
CAUTION:
Affix protective tape to the position shown in the figure.
1. Disconnect the negative battery cable..
2. Remove the following parts:
a. Decoration panel.
b. Shift l ...
Other materials:
Differential Oil Temperature Sensor Removal/Installation
WARNING:
Hot differential oil may cause severe burns. Do not perform maintenance while
differential oil is hot.
1. Disconnect the negative battery cable.
2. Disconnect the differential oil temperature sensor connector.
3. Remove the differential oil temperature sensor.
4. ...
Tire Pressure Monitoring System Set Switch Inspection
1. Remove the TPMS set switch..
2. Verify that the resistance between the TPMS set switch terminals B and C is
as indicated in the table.
If not as indicated in the table, replace the TPMS set switch.
TPMS set switch specification
Terminal
...
Instrument Cluster Removal/Installation
CAUTION:
If configuration is not performed when the instrument cluster is replaced
with a new one, the vehicle specification information is not stored in the instrument
cluster and the system will not operate normally.
When performing configuration, it is necessary to read the ...
