Mazda CX-5 Service & Repair Manual: Floor Side Panel Removal [Panel Replacement]
Symbol Mark

Removal Procedure
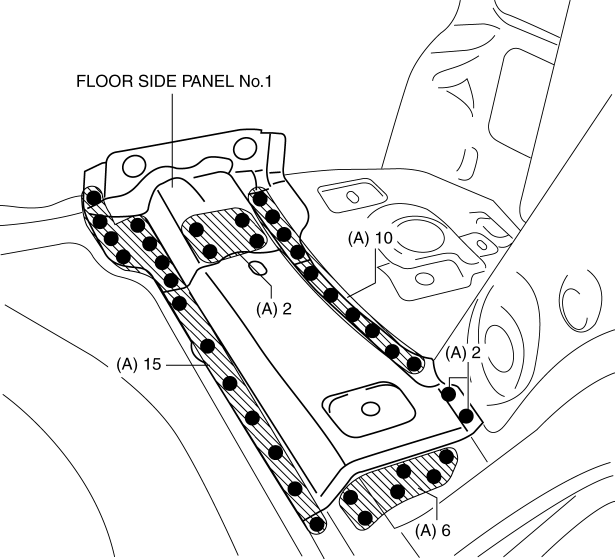
1. Drill the 35 locations indicated by (A) shown in the figure, then remove the floor side panel No.1.
2. Drill the 5 locations indicated by (B) shown in the figure.
3. Drill the 4 locations indicated by (C) from rear wheel housing shown in the figure.
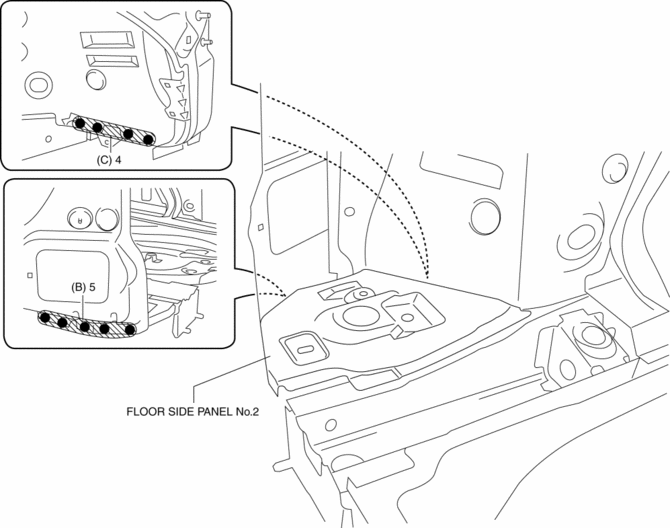
4. Remove the floor side panel No.2.
 Floor Side Panel Installation [Panel Replacement]
Symbol Mark
Installation Procedure
1. When installing new parts, measure and adjust the body as necessary to conform
with standard dimensions.
2. Drill holes for the plug welding before inst ...
 Floor Under Cover Removal/Installation
1. Lift up the vehicle.
2. Remove bolts A.
3. Remove fasteners B.
4. Remove the floor under cover No.1.
5. Remove nuts C.
6. Remove fasteners D.
7. Remove bolts E.
8. Remove the ...
Other materials:
Bumper Slider Removal/Installation
Front Bumper Slider
1. Disconnect the negative battery cable..
2. Remove the seal board upper..
3. Remove the front bumper..
4. Remove bolts A.
5. Pull the front bumper slider in the direction of the arrow while detaching
pins B and hook C.
6. Install in the reverse order of removal ...
Reduction Gear
Purpose/ Function
The reduction gear transmits the rotation input from the EPS motor, decreasing
the rotation speed and increasing the torque simultaneously.
Construction
The reduction gear consists of the worm wheel located on the steering column
main shaft and the worm sh ...
Front Side Frame Removal [Panel Replacement]
Symbol Mark
Removal Procedure
1. Drill the 15 locations indicated by (A) shown in the figure.
2. Drill the 4 locations indicated by (B) shown in the figure.
NOTE:
When drilling the 4 locations indicated by (B) shown in the figure, do not
drill a hole all the way through or there ...
