Mazda CX-5 Service & Repair Manual: Electric Variable Valve Timing Actuator Inspection
WARNING:
-
A hot engine can cause severe burns. Turn off the engine and wait until it is cool before servicing.
CAUTION:
-
Do not disassemble the electric variable valve timing actuator because it is a precision unit.
1. Disconnect the negative battery cable..
2. Remove the plug hole plate..
3. Remove the electric variable valve timing motor/driver..
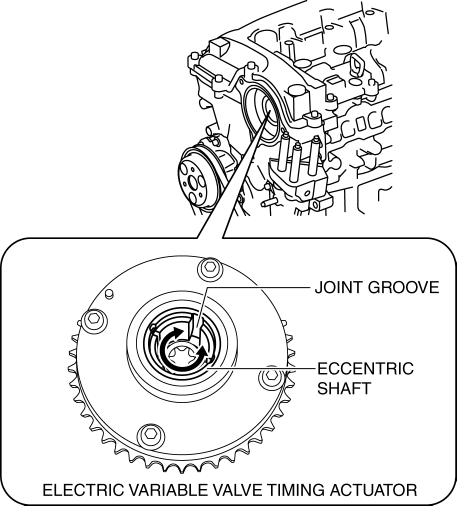
4. Rotate the eccentric shaft of the electric variable valve timing actuator by hand and verify that it rotates smoothly.

-
If it does not rotate smoothly, replace the electric variable valve timing actuator..
NOTE:
-
Hook a finger onto the joint groove of the eccentric shaft to rotate the shaft easily.
-
The eccentric shaft stops rotating at the maximum retard position when it is rotated counterclockwise as viewed from the front, and at the maximum advance position when rotated clockwise.
-
The eccentric shaft rotates 15.8 turns from the maximum retard position to the maximum advance position.
5. Install in the reverse order of removal.
 Compression Inspection
WARNING:
Hot engines and oil can cause severe burns. Be careful not to burn yourself
during removal/installation of each component.
Fuel vapor is hazardous. It can very easily ignit ...
 Electric Variable Valve Timing Actuator
Purpose, Function
The electric variable valve timing actuator changes the phases of the intake
camshaft relative to the crankshaft. As a result, the open/close period of the
intake valve ...
Other materials:
Fuel Draining Procedure
WARNING:
Fuel line spills and leakage from the pressurized fuel system are dangerous.
Fuel can ignite and cause serious injury or death and damage. To prevent this,
complete the following inspection with the engine stopped.
Fuel is very flammable liquid. If fuel spills or leaks ...
Refrigerant Pressure Sensor [Manual Air Conditioner]
Purpose
The refrigerant pressure sensor detects the refrigerant pressure in the refrigerant
cycle.
Function
The refrigerant pressure sensor converts the detected refrigerant pressure
to an electric signal and sends it to the PCM.
Construction
The refriger ...
Engine Oil Level Inspection
1. Position the vehicle on level ground.
2. Warm up the engine.
3. Stop the engine and allow at least 5 min before continuing.
4. Remove the dipstick, wipe it cleanly, and reinstall it fully.
5. Remove the dipstick and verify that the oil level is between the F and L marks
on the dipstick. ...
