Mazda CX-5 Service & Repair Manual: Corner Junction Installation [Panel Replacement]
Symbol Mark

Installation Procedure
1. When installing new parts, measure and adjust the body as necessary to conform with standard dimensions.
2. Drill holes for the plug welding before installing the new parts.
3. After temporarily installing new parts, make sure the related parts fit properly.
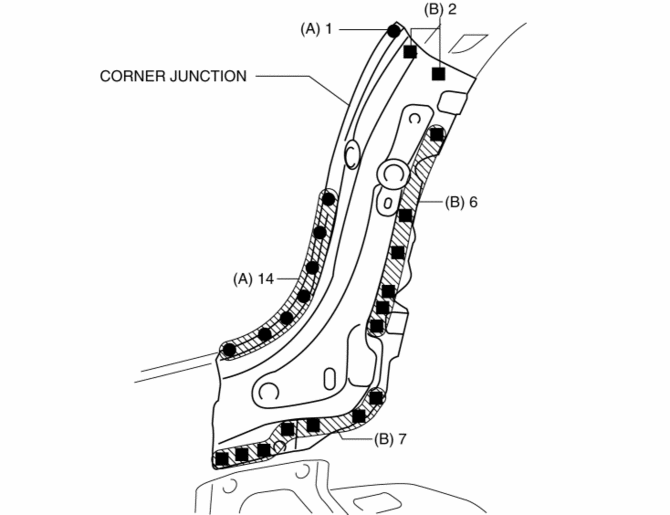
4. Spot weld the 15 locations indicated by (A) shown in the figure.
5. Plug weld the 15 locations indicated by (B) shown in the figure, then install the corner junction.

 Corner Junction Removal [Panel Replacement]
Symbol Mark
Removal Procedure
1. Drill the 27 locations shown in the figure.
2. Remove the corner junction. ...
Other materials:
Drive Belt Removal/Installation
WARNING:
A hot engine can cause severe burns. Turn off the engine and wait until it
is cool before servicing.
NOTE:
Remove/install the drive belt from the underside of the vehicle.
Generator Drive Belt Removal/Installation
CAUTION:
To prevent damage to the dri ...
Front Shock Absorber And Coil Spring Disassembly/Assembly
WARNING:
Removing/installing the front shock absorber and coil spring is dangerous.
The front shock absorber and coil spring could fly off and cause serious injury
or death, and damage the vehicle.
1. Remove the front shock absorber and coil spring..
2. Remove in the order ...
SRS Air Bag Deployment Criteria
This chart indicates the applicable SRS equipment that will deploy depending
on the type of collision.
(The illustrations are the representative cases of collisions.)
X: The SRS air bag equipment is designed to deploy in a collision.
*1 (With Driver and Front Passenger Occupant Classification ...
