Mazda CX-5 Service & Repair Manual: Cooling System Cap Inspection
WARNING:
-
Never remove the cooling system cap or loosen the radiator drain plug while the engine is running, or when the engine and radiator are hot. Scalding engine coolant and steam may shoot out and cause serious injury. It may also damage the engine and cooling system.
-
Turn off the engine and wait until it is cool. Even then, be very careful when removing the cap. Wrap a thick cloth around it and slowly turn it counterclockwise to the first stop. Step back while the pressure escapes.
-
When you are sure all the pressure is gone, press down on the cap using the cloth, turn it, and remove it.
1. Clean the cooling system cap and the sealed part.
2. Inspect the cooling system cap for cracks or everted seal.
-
If there is any malfunction, replace the cooling system cap.
3. Attach the cooling system cap to the radiator cap tester.
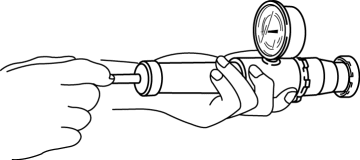
4. Hold the cooling system cap downward and apply pressure gradually. Verify that the pressure is held stable for 10 s.
-
If the pressure is not held stable, replace the cooling system cap.
-
Cooling system cap valve opening pressure
-
93.2—122.6 kPa {0.951—1.250 kgf/cm2, 13.6—17.7 psi}
 Cooling Fan Motor Removal/Installation
WARNING:
Never remove the cooling system cap or loosen the radiator drain plug while
the engine is running, or when the engine and radiator are hot. Scalding engine
coolant and steam may ...
 Cooling System Cap
Purpose, Function
The cooling system cap maintains appropriate pressure in the engine coolant
passage. In addition, cooling efficiency has been improved by increasing the
engine coolant b ...
Other materials:
Engine Oil Control
Outline
The PCM reduces the oil pump load applied to the engine by controlling the
appropriate engine hydraulic pressure according to the engine operation conditions.
The engine hydraulic pressure switches in two steps. When hydraulic pressure
is not needed, the oil pump dischar ...
Electronic Control System Outline [Fw6 A EL, Fw6 Ax EL]
Outline
In the electronic control system, the TCM calculates the control content
based on signals from each type of sensor and switch to operate output parts
such as each solenoid. In consideration of suppressed shift shock, smooth driving,
and improved fuel economy, the TCM performs ...
Dashboard Removal/Installation
1. Disconnect the negative battery cable..
2. Remove the following parts:
a. Windshield wiper arm and blade.
b. Cowl grille.
c. Windshield wiper motor.
d. Front scuff plate.
e. Front side trim.
f. Glove compartment.
g. Dashboard under cover.
h. Decoration panel.
i. Center panel. ...
