Mazda CX-5 Service & Repair Manual: Washer Motor Removal/Installation
1. Disconnect the negative battery cable..
2. Set the front over fender aside..
3. Set the mudguard (RH) aside..
4. Remove the front bumper..
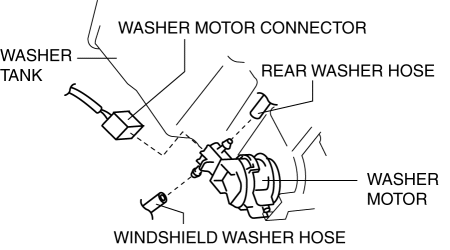
5. Disconnect the washer motor connector from the washer motor.
6. Disconnect the windshield washer hose from the washer motor.
7. Disconnect the rear washer hose from the washer motor.
NOTE:
-
If the washer motor is removed with washer fluid in the washer tank, the washer fluid may leak out. When removing the washer motor from the washer tank, place a container under the washer tank to collect washer fluid, and perform the procedure.
8. Rotate the washer motor counterclockwise/clockwise rotation repeatedly in the direction of the arrows (1) and (2) shown in the figure, and then remove it in the direction of the arrow (3).
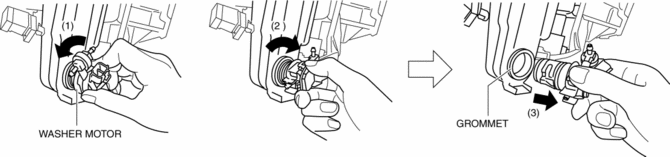
9. Remove the grommet.
10. Install in the reverse order of removal.
 Washer Motor Inspection
1. Disconnect the negative battery cable..
2. Set the front over fender aside..
3. Set the mudguard (RH) aside..
4. Remove the front bumper..
5. Disconnect the washer motor connector from the ...
 Washer Nozzle
Purpose
The washer nozzle sprays the washer fluid sent from the washer motor to the
optimum positions on the windshield.
Construction
A ball-shaped spray orifice is set inside t ...
Other materials:
Solar Radiation Sensor Removal/Installation [Full Auto Air Conditioner]
NOTE:
When removing the solar radiation sensor, perform the procedure in the posture
shown in the figure.
1. Disconnect the negative battery cable..
2. Remove the following parts:
a. Front scuff plate (passenger-side).
b. Front side trim (passenger-side).
c. Dashboard ...
Sunvisor Removal/Installation
1. Disconnect the negative battery cable. (with vanity mirror illumination).
2. Remove the screw A.
3. Rotate the sunvisor in the direction of the arrow.
4. Unhook and remove the sunvisor.
5. Disconnect the vanity mirror illumination connector. (with vanity mirror illumination)
6. Pr ...
Variable Valve Timing Mechanism
Outline
Achieves optimum valve timing according to the driving conditions by the
variable valve timing mechanism changing the phases of the camshaft.
An electric type variable valve timing mechanism on the intake side and a
hydraulic pressure type on the exhaust side has been ad ...
