Mazda CX-5 Service & Repair Manual: Brake/Taillight Bulb Removal/Installation
1. Disconnect the negative battery cable..
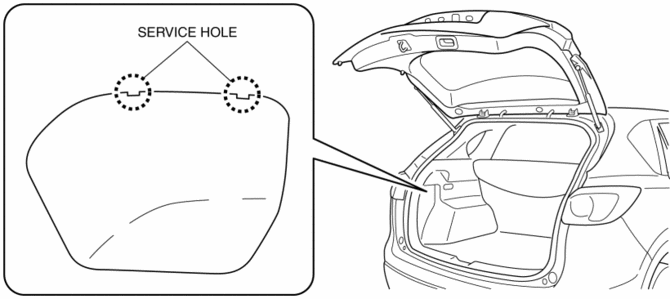
2. Insert a tape-wrapped flathead screwdriver into the service hole in the position shown in the figure.
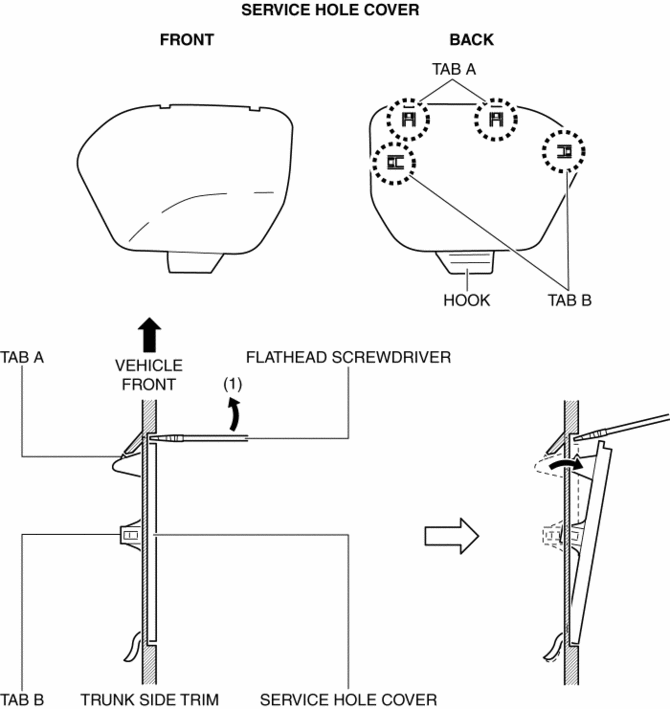
3. Move the flathead screwdriver in the direction of the arrow (1) shown in the figure, pull out the service hole cover, and detach the service hole cover tab and trunk side trim.
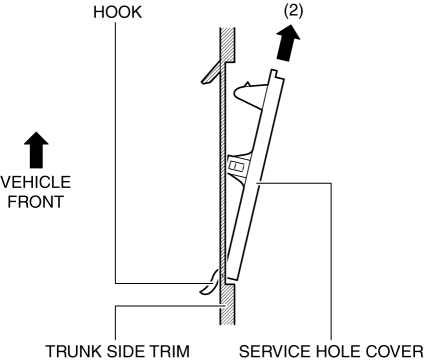
4. Pull out the service hole cover in the direction of the arrow (2) shown in the figure and pull out the service hole cover hook from the trunk side trim.
5. Remove the service hole cover.
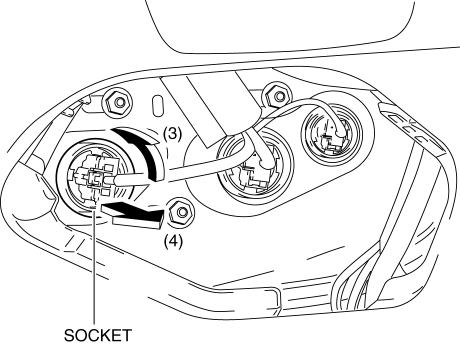
6. Rotate the socket in the direction of the arrow (3) shown in the figure and remove it from the rear combination light in the direction of the arrow (4) shown in the figure.
7. Remove the brake/taillight bulb.

8. Install in the reverse order of removal.
 Brake Pedal Removal/Installation
CAUTION:
The clearance between the brake switch and the brake pedal is automatically
adjusted to the correct amount when the brake switch is inserted into the installation
hole on the br ...
 Brakes
Abbreviations
AAS
Active Adaptive Shift
ABS
Antilock Brake System
ABDC
After Bottom Dead Center
ACC
...
Other materials:
Dashboard Removal/Installation
1. Disconnect the negative battery cable..
2. Remove the following parts:
a. Windshield wiper arm and blade.
b. Cowl grille.
c. Windshield wiper motor.
d. Front scuff plate.
e. Front side trim.
f. Glove compartment.
g. Dashboard under cover.
h. Decoration panel.
i. Center panel. ...
Floor Side Panel Removal [Panel Replacement]
Symbol Mark
Removal Procedure
1. Drill the 35 locations indicated by (A) shown in the figure, then remove the
floor side panel No.1.
2. Drill the 5 locations indicated by (B) shown in the figure.
3. Drill the 4 locations indicated by (C) from rear wheel housing shown in the
figure. ...
Sirius Satellite Radio Unit
Purpose
Satellite radio programming can be listened to.
Function
The voltage signal sent from the center roof antenna (SIRIUS satellite radio
antenna) is output to the audio unit.
Construction
The SIRIUS satellite radio unit is installed to the interior of the glo ...
