Mazda CX-5 Service & Repair Manual: Blind Spot Monitoring (Bsm) Off Indicator Light
Purpose
-
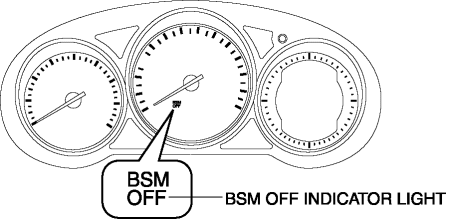
The BSM OFF indicator light informs the driver that the Blind Spot Monitoring (BSM) system is turned off or there is a malfunction in the system.
Function
-
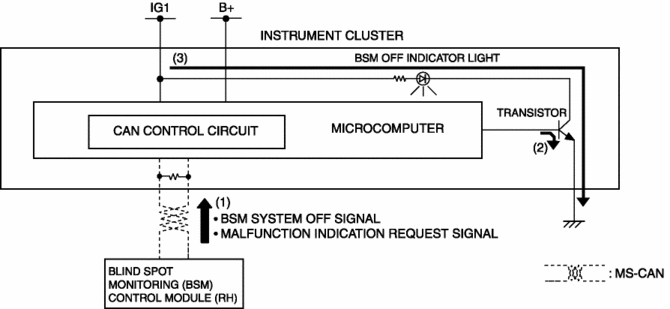
The instrument cluster illuminates the BSM OFF indicator light based on the BSM system off signal sent via a CAN signal from the BSM control module (RH).
-
The instrument cluster flashes the BSM OFF indicator light based on the malfunction indication request signal sent via a CAN signal from the BSM control module (RH).
-
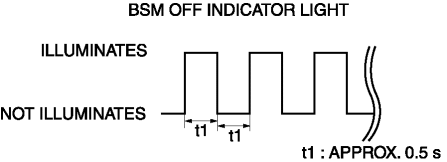
The flash pattern of the BSM OFF indicator light is as shown in the figure.
Construction
-
The BSM OFF indicator light are equipped in the instrument cluster.
Operation
-
The instrument cluster receives (1) the BSM system off signal or malfunction indication request signal from the BSM control module (RH) via the CAN signal.
-
The instrument cluster turns the transistor on (2) intermittently for a malfunction indication request signal and continuously for a BSM system off signal.
-
When the transistor turns on intermittently, the BSM OFF indicator light flashes (3) and when it turns on continuously, the BSM OFF indicator light illuminates (3).
Fail-safe
-
Function not equipped.
 Blind Spot Monitoring (Bsm) Control Module Removal/Installation
1. Disconnect the negative battery cable..
2. Remove the rear combination light..
3. Remove the rear bumper..
4. Disconnect the connector.
5. Remove the nuts.
6. Remove the BSM control m ...
 Blind Spot Monitoring (Bsm) Off Switch
Purpose
The blind spot monitoring (BSM) system can be turned on or off optionally
by the driver.
Function
The switch operation signal is sent to the instrument cluster.
Co ...
Other materials:
DSC Related Parts Sensor Initialization Procedure
WARNING:
If the initialization procedure is not completed, the DSC will not operate
properly and it might cause an unexpected accident. Therefore, after replacing
or removing the DSC HU/CM or SAS control module, make sure to perform the initialization
procedure to insure proper DSC ...
Cabin Side Frame Straight Line Dimensions [Dimensions]
Point symbol
Designation
Hole diameter or bolt or nut size mm {in}
A
Front side frame outer datum hole
?12 {0.47}
B
Front fender panel installation hole
?10 {0.39}
...
Power Metal Oxide Semiconductor Field Effect Transistor (Power Mos Fet) Removal/Installation
[Full Auto Air Conditioner]
NOTE:
When removing the power MOS FET, perform the procedure in the posture shown
in the figure.
1. Disconnect the negative battery cable..
2. Remove the dashboard under cover..
3. Disconnect the connector.
4. Rotate the power MOS FET (2) while pressing the tab (1). ...
