
Mazda CX-5 Service & Repair Manual: Auxiliary Jack/Usb Port Removal/Installation
1. Disconnect the negative battery cable..
2. Remove the upper console..
3. While pressing the auxiliary jack/USB port. tabs in the direction of the arrows (1) shown in the figure, press the auxiliary jack/USB port. in the direction of the arrow (2) to detach the auxiliary jack/USB port. tabs from the upper console.
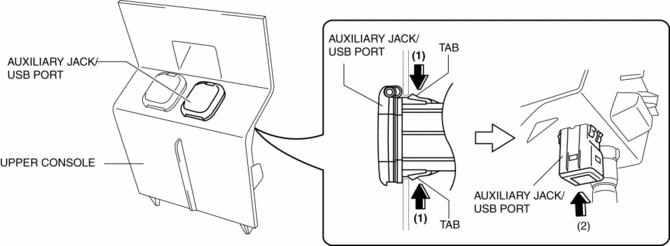
4. Remove the auxiliary jack/USB port.
5. Install in the reverse order of removal.
 Auxiliary Jack/Usb Port Inspection
Auxiliary jack inspection
1. Disconnect the negative battery cable..
2. Remove the following parts:
a. Upper console.
b. Auxiliary jack/USB port.
3. Connect a commercially-available plug to t ...
 Center Roof Antenna
Purpose, Function
Converts radio broadcast waves to electric signals and sends the signals
to the audio unit.
Construction
A center roof antenna has been adopted which does not ...
Other materials:
Starter Interlock Switch [Skyactiv G 2.0]
Purpose, Function
The starter interlock switch mechanism prevents vehicle surge when the engine
is started, enhancing safety. The engine cannot be started unless the clutch
is depressed.
Construction
The mechanism is provided with a starter interlock switch on the circuit
...
Ambient Temperature Sensor [Full Auto Air Conditioner]
Purpose
The ambient temperature sensor detects the ambient temperature.
Function
The ambient temperature sensor converts the detected temperature to an electric
signal.
Construction
A thermistor-type ambient temperature sensor has been adopted.
The ambient ...
Ignition Switch
Push Button Start Positions
The system operates only when the driver is in the vehicle or within operational
range while the key is being carried.
Each time the push button start is pressed, the ignition switches in the order
of off, ACC, and ON. Pressing the push button start again from ON sw ...
