Mazda CX-5 Owners Manual: AUX/USB/iPod mode
Audio can be heard from the vehicle's speakers by connecting a commercially available portable audio unit to the auxiliary jack.
A commercially-available, non-impedance (3.5 ) stereo mini plug cable is required.
Contact an Authorized Mazda Dealer for details.
In addition, audio can be played from the vehicle audio device by connecting USB memory or an iPod to the USB port.

1 How to use AUX mode 2 How to use USB mode (Type A) 3 How to use USB mode (Type B) 4 How to use iPod mode (Type A) 5 How to use iPod mode (Type B)
WARNING
Do not adjust the portable audio unit or a similar product while driving the vehicle:
Adjusting the portable audio unit or a similar product while driving the vehicle is dangerous as it could distract your attention from the vehicle operation which could lead to a serious accident. Always adjust the portable audio unit or a similar product while the vehicle is stopped.
CAUTION
●Always close the auxiliary jack/ USB port lid when it is not in use.
If foreign matter or liquid penetrates the auxiliary jack/USB port, it may cause a malfunction.
● Depending on the portable audio device, noise may occur when the device is connected to the vehicle accessory socket. (If noise occurs, do not use the accessory socket.)
NOTE
• Before using the auxiliary jack/USB port, refer to the instruction manual for the portable audio device.
• Use a commercially-available, nonimpedance (3.5 ) stereo mini plug for connecting the portable audio unit to the auxiliary jack. Before using the auxiliary jack, read the manufacturer's instructions for connecting a portable audio unit to the auxiliary jack.
• To prevent discharging of the battery, do not use the auxiliary input for long periods with the engine off or idling.
• When connecting a device to the auxiliary jack or USB port, noise may occur depending on the connected device. If the device is connected to the vehicle's accessory socket, the noise can be reduced by unplugging it from the accessory socket.
How to connect USB port/ Auxiliary jack
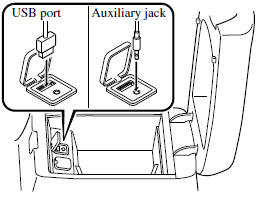
Connecting a device
1. Open the console lid.
2. Open the auxiliary jack/USB port lid.
3. Connect the device plug to the USB port.
Connecting with connector cable
1. Open the console lid.
2. Open the auxiliary jack/USB port lid.
3. Pass the connection plug cord through the cutout of the console and insert the plug into the auxiliary jack.
WARNING
Do not allow the connection plug cord to get tangled with the parking brake or the shift lever:
Allowing the plug cord to become tangled with the parking brake or the shift lever is dangerous as it could interfere with driving, resulting in an accident.
CAUTION
Do not place objects or apply force to the auxiliary jack with the plug connected.
NOTE
• Insert the plug to the auxiliary jack/USB port securely.
• Insert or pull out the plug with the plug perpendicular to the auxiliary jack/USB port hole.
• Insert or remove the plug by holding its base.
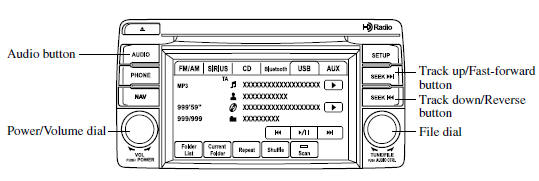
How to use AUX mode
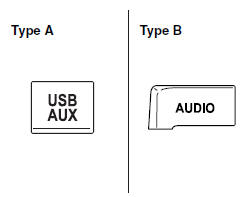
(Type A)
1. Switch the ignition to ACC or ON.
2. Press the power/volume dial to turn the audio system on.
3. Press the USB/AUX button ( ) of the
audio unit to change to the AUX mode.
(Type B)
1. Switch the ignition to ACC or ON.
2. Press the power/volume dial to turn the audio system on.
3. Press the audio button ( ) to display
the audio screen.
4. Press the  on-screen tab to switch
to the AUX mode.
NOTE
• When the device is not connected to the auxiliary jack, the mode does not switch to the AUX mode.
• Set the volume of the portable audio unit to the maximum within the range that the sound does not become distorted, then adjust the volume using the power/volume dial of the audio unit or the up/down switch of the audio control switch.
• Audio adjustments other than audio volume can only be done using the portable audio device.
• If the connection plug is pulled out from the auxiliary jack while in AUX mode, noise may occur.
How to use USB mode (Type A)

Playback
1. Switch the ignition to ACC or ON.
2. Press the power/volume dial to turn the audio system on.
3. Press the USB/AUX button ( ) to switch
to the USB mode and start playback.
NOTE
• When the USB memory is not connected, the mode does not switch to USB mode.
• When there is no playable data in the USB memory, “NO CONTENTS” is indicated.
• Playback of the USB memory is in the order of the folder numbers. Folders which have no MP3/WMA/AAC files are skipped.
• Do not remove the USB memory while in the USB mode. The data may be damaged.
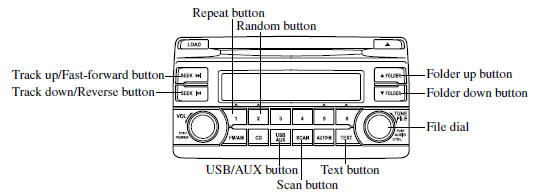
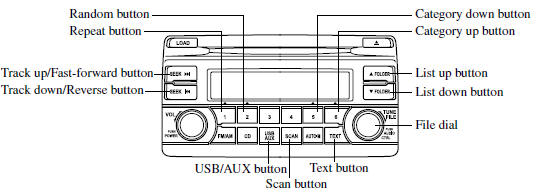
Fast-forward/Reverse
Press and hold the fast-forward button (
 ) to advance through a track at high
speed.
Press and hold the reverse button ( )
)
to reverse through a track at high speed.
Track search
Press the track up button (  ) or
) or
turn the file dial clockwise once to skip forward to the beginning of the next track.
Press the track down button ( ) or
turn the file dial counterclockwise within a few seconds after playback begins to
track down to the beginning of the previous track.
Press the track down button ( ) or
turn the file dial counterclockwise after a few seconds have elapsed to start playback
from the beginning of the current track.
Folder search
To change to the previous folder, press the folder down button (
 ), or press the folder up button (
) to advance to the next folder.
Music Scan
This function scans the titles in a folder currently being played and plays ten seconds of each song to aid you in finding a song you want to listen to.
Press the scan button ( ) during
playback to start the scan play operation (the track number will flash). Press the
scan button ( ) again to cancel scan
playback.
NOTE
If the unit is left in scan, normal playback will resume where scan was selected.
Repeat playback
(Track repeat)
Press the repeat button (1) during playback to play the current track repeatedly. “TRACK RPT” is displayed during playback.
Press the repeat button (1) two times while “TRACK RPT” is displayed to cancel.
(Folder repeat)
Press the repeat button (1) two times during playback to repeat the playback of the songs in the current folder. “FOLDER RPT” is displayed during playback.
Press the repeat button (1) while “FOLDER RPT” is displayed to cancel.
Random playback
(Folder random)
Press the random button (2) during playback to play the tracks in the folder randomly. “FOLDER RDM” is displayed during playback.
Press the random button (2) two times while “FOLDER RDM” is displayed to cancel.
(Media random)
Press the random button (2) two times during playback to play the songs in the USB memory randomly. “MEDIA RDM” is displayed during playback.
Press the random button (2) while “MEDIA RDM” is displayed to cancel.
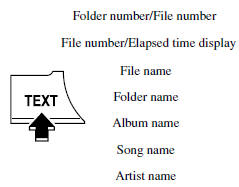
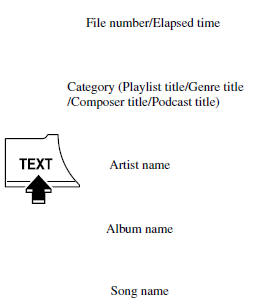
Switching the display
For files with a file name and other information that have been input, the display
switches between display of the file name and other information each time the text
button ( ) is pressed during playback.
NOTE
• The information (artist name, music name) is displayed only when the USB memory information in the USB memory has information which can be displayed on the screen.
• This unit cannot display some characters.
Characters which cannot be displayed are indicated by an asterisk (
).
Display scroll
Only 9 characters (File name) or 13 characters (Except file name) can be displayed
at one time. To display the rest of the characters of a long title, press and hold
the text button ( ). The display scrolls
the next 13 characters. Press and hold the text button (
) again after the last 13 characters have been displayed to return to the beginning
of the title.
NOTE
The number of characters which can be displayed is restricted.
Error Messages
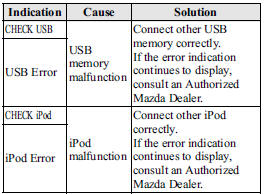
When the message “CHECK USB” is displayed, it indicates that there is some error in the USB memory. Verify that the content recorded in the USB memory has MP3/WMA/AAC files and re-connect correctly. If the message reappears, have the unit checked by an Authorized Mazda Dealer.
How to use USB mode (Type B)

Playback
1. Switch the ignition to ACC or ON.
2. Press the power/volume dial to turn the audio system on.
3. Press the audio button ( ) to display
the audio screen.
4. Touch the  on-screen tab to switch
to USB mode and start playback.
NOTE
• When a USB memory is not connected to
the USB port, the mode does not switch to the USB mode even if the
 on-screen tab is touched.
• Do not remove the USB memory while in the USB mode. Otherwise, the data could be damaged.
Pause
Touch the on-screen button to pause
playback.
Touch the  on-screen button while
playback is paused to cancel the pause.
Fast-forward/Reverse
Operations using audio panel
Press and hold the fast-forward button (
) to advance through a track at high speed.
Press and hold the reverse button (
 ) to reverse through a track at high
speed.
Operations on screen
Touch and hold the  on-screen button
to advance through a track at high speed.
Touch and hold the reverse button
 to reverse through a track at high
speed.
Track search
Operations using audio panel
Press the track up button (  ) or
) or
turn the file dial clockwise once to skip forward to the beginning of the next track.
Press the track down button (  )
)
or turn the file dial counterclockwise within a few seconds after playback begins
to track down to the beginning of the previous track.
Press the track down button ( )
)
or turn the file dial counterclockwise after a few seconds have elapsed to start
playback from the beginning of the current track.
Operations on screen
Touch the  on-screen button once
to skip forward to the beginning of the next track.
Touch the  on-screen button within
a few seconds after playback begins to track down to the beginning of the previous
track.
Touch the  on-screen button after
a few seconds have elapsed to start playback from the beginning of the current track.
Displaying file list
The optional file list in the USB memory can be viewed.
(Viewing file list in optional folder)
Touch the  on-screen button to display
the folder list in the USB memory. Touch the folder to display the file list.
(Viewing file list in the current folder)
Touch the  on-screen button.
Selecting file
Select a desired file to play the song.
NOTE
Press the  on-screen button on
the file list screen to display the list of folders.
(Selection from all folders in USB memory)
1. When the  on-screen button is
touched, the folder list in the USB memory is displayed.
2. Select the folder name from the displayed list.
3. The files in the selected folder are displayed.
4. Select the file you want to play.
(Selection from inside folder in which a song is currently being played)
1. Press the  on-screen button to
select the song list.
2. Touch the song you want to listen to.
Music scan
This function scans the titles in a folder currently being played and plays ten seconds of each song to aid you in finding a song you want to listen to.
1. Touch the  on-screen button during
playback to play 10 seconds of each subsequent track starting from the next song.
2. Touch the  on-screen button during
playback to continue the playback from that point.
NOTE
If the unit is left in scan, normal playback will resume where scan was selected.
Repeat playback
(Repeating song during playback)
Touch the  on-screen button during
playback. “  ” is displayed during playback.
Touch the  on-screen button two
times while “ ” is displayed to cancel.
(Repeating folder during playback)
Touch the  on-screen button two
times during playback. “ ” is displayed
during playback.
Touch the  on-screen button while
“  ”
”
is displayed to cancel.
Shuffle playback
(To listen to tracks in shuffled order within a folder)
Touch the  on-screen button during
playback. “ ” is displayed during playback.
Touch the  on-screen button two
times while “ ” is displayed to cancel.
(To listen to tracks in shuffled order within USB memory)
Touch the  on-screen button two
times during playback. “  ” is displayed
during playback.
Touch the  on-screen button while
“ ” is displayed to cancel.
Text scroll
If a whole title cannot be displayed at one time, touch the
 on-screen button on the right side
of each title. When the last character is displayed, touch the
 onscreen button to display the first
character of the title.
NOTE
• The
 on-screen button is displayed only
when the whole title is not displayed.
• The information (artist name, music name, album name) is displayed only when the USB memory has information which can be displayed on the screen.
• This unit cannot display some characters.
Character which cannot be displayed are indicated by an asterisk (
).
• The number of characters which can be displayed is restricted.
Error Message
s
If the message “USB Error” is displayed, it indicates that there is no playable file in the USB memory or there is an error in the USB memory. Verify that the content recorded in the USB memory has MP3/ WMA/AAC files and re-connect correctly.
If the message reappears, have the unit checked by an Authorized Mazda Dealer.
How to use iPod mode (Type A)
Connectable iPod is as follows:
• iPod: 5G • iPod classic • iPod nano: 1/2/3/4/5G • iPod touch*1: 1/2G • iPhone*1: 3G/3GS *1 For only iPod functions
NOTE
The iPod functions on the iPod cannot be operated while it is connected to the unit because the unit controls the iPod functions.
Playback
1. Switch the ignition to ACC or ON.
2. Press the power/volume dial to turn the audio system on.
3. Press the USB/AUX button (  ) to
) to
switch to the iPod mode and start playback.
NOTE
• When an iPod is not connected, the mode does not switch to the iPod mode.
• When there is no playable data in the iPod, “NO CONTENTS” is flashed.
• Do not remove the iPod while in the iPod mode. Otherwise, the data could be damaged.
Fast-forward/Reverse
Press and hold the fast-forward button (
) to advance through a track at high speed.
Press and hold the reverse button (
 ) to reverse through a track at high
speed.
Track search
Press the track up button (  ) or
) or
turn the file dial clockwise once to skip forward to the beginning of the next track.
Press the track down button (  )
)
or turn the file dial counterclockwise within a few seconds (depends on iPod software
version) after playback begins to track down to the beginning of the previous track.
Press the track down button (  )
)
or turn the file dial counterclockwise after a few seconds (depends on iPod software
version) have elapsed to start playback from the beginning of the current track.
Category search
Press the category down button (5) to select the previous category and press the category up button (6) to select the next category.
NOTE
The types of categories include Playlist, Artist, Album, Song, Podcast, Genre, Composer, and Audio book.
List search
Press the list down button ( ) to
) to
select the previous list and press the list up button (
 ) to select the next list.
NOTE
When the selected category is Song or Audio book, there is no list.
Music Scan
This function scans the titles in a list currently being played and plays 10 seconds of each song to aid you in finding a song you want to listen to.
Press the scan button (  ) during
playback to start the scan play operation (the track number will flash). Press the
scan button ( ) again to cancel scan
playback.
NOTE
If the unit is left in scan, normal playback will resume where scan was selected.
Repeat playback
Press the repeat button (1) during playback to repeat the playback of the song in the current list. “TRACK RPT” is displayed during playback.
Press the repeat button (1) while displaying “TRACK RPT” to cancel.
Random playback
(Song random)
Press the random button (2) during playback to play the tracks in the list randomly. “SONG RDM” is displayed during playback.
Press the random button (2) two times while “SONG RDM” is displayed to cancel.
(Album random)
Press the random button (2) two times during playback to play the songs in the iPod randomly. “ALBUM RDM” is displayed during playback.
Press the random button (2) while “ALBUM RDM” is displayed to cancel.
NOTE
The track number being played randomly is in the order of the iPod shuffle table.
Switching the display
For files with a file name and other information that have been input, the display
switches between display of the file name and other information each time the text
button (  ) is pressed during playback.
NOTE
• The information (artist name, music name) is displayed only when the iPod has information which can be displayed.
• This unit cannot display some characters.
Characters which cannot be displayed are indicated by an asterisk ( ).
Display scroll
13 characters (Except file name) can be displayed at one time. To display the rest of the characters of a long title, press and hold the text button ( ). The display scrolls the next 13 characters. Press and hold the text button ( ) again after the last 13 characters have been displayed to return to the beginning of the title.
NOTE
The number of characters which can be displayed is restricted.
Error Messages
If the message “CHECK iPod” is displayed, it indicates that there is a malfunction in the iPod. Verify that the content recorded in the iPod has playable files and connect correctly. If the message reappears, have the unit checked by an Authorized Mazda Dealer.
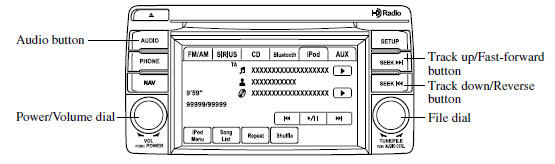
How to use iPod mode (Type B)
The connectable iPods are as follows:
• iPod: 5G • iPod classic • iPod nano: 1/2/3/4/5G • iPod touch*1: 1/2G • iPhone*1: 3G/3GS *1 Only iPod function
NOTE
The iPod functions on the iPod cannot be operated while it is connected to the unit because the unit controls the iPod functions.
Playback
1. Switch the ignition to ACC or ON.
2. Press the power/volume dial to turn the audio system on.
3. Press the audio button (  ) to display
the audio screen.
4. Touch the  on-screen tab to switch
to the iPod mode and start playback.
NOTE
• When the iPod is connected to the USB
port, the  on-screen tab changes to
the  on-screen tab.
• Do not remove the iPod while in the iPod mode.
Otherwise, the data could be damaged.
Pause
Touch the  on-screen button to pause
playback. Touch the  onscreen button
while playback is paused to cancel the pause.
Fast-forward/Reverse
Operations using audio panel
Press and hold the fast-forward button (
 ) to advance through a track at high
speed.
Press and hold the reverse button (
 ) to reverse through a track at high
speed.
Operations on screen
Touch and hold the  on-screen button
to advance through a track at high speed.
Touch and hold the  on-screen button
to reverse through a track at high speed.
Track search
Operations using audio panel
Press the track up button ( ) or
) or
turn the file dial clockwise once to skip forward to the beginning of the next track.
Press the track down button (  )
)
or turn the file dial counterclockwise within a few seconds (depends on iPod software
version) after playback begins to track down to the beginning of the previous track.
Press the track down button ( )
)
or turn the file dial counterclockwise after a few seconds (depends on iPod software
version) have elapsed to start playback from the beginning of the current track.
Operations on screen
Touch the  on-screen button once
to skip forward to the beginning of the next track.
Touch the  on-screen button within
a few seconds (depends on iPod software version) after playback begins to track
down to the beginning of the previous track.
Touch the  on-screen button after
a few seconds (depends on iPod software version) have elapsed to start playback
from the beginning of the current track.
Displaying song list
The song list in the iPod can be viewed.
NOTE
The song list may not display depending on the conditions.
(Displaying optional list)
1. Touch the  on-screen button during
playback.
2. Touch the category which you want to select. The record list or song list is displayed.
(Displaying a list being played)
Touch the on-screen button.
NOTE
Press the on-screen button to display the upper list.
Selecting from list
Select the desired song to play.
1. Press the  on-screen button to
select the song list.
2. Touch the song you want to listen to.
NOTE
The selected song list becomes the play list.
Repeat playback
Touch the  on-screen button during
playback. “  ” is displayed during playback.
Touch the  on-screen button two
times while “  ” is displayed to cancel.
Shuffle playback
(Shuffling songs in list being played)
Touch the  on-screen button during
playback. “  ” is displayed during playback.
Touch the  on-screen button two
times while “ ” is displayed to cancel.
(Shuffling album in list being played)
Touch the  on-screen button two
times during playback. “ ” is displayed
during playback.
Touch the  on-screen button while
“ ” is displayed to cancel.
NOTE
The track number being shuffle played is in the order of the iPod shuffle table.
Text scroll
If a whole title cannot be displayed at one time, touch the
 on-screen button on the right side
of the title to display the whole title. When the last character is displayed, touch
the  on-screen button to display the
first character of the title.
NOTE
• The
 on-screen button is displayed only
when no titles are displayed.
• The information (artist name, music name) is displayed only when the iPod has information which can be displayed on the screen.
• This unit cannot display some characters.
Characters which cannot be displayed are indicated by an asterisk (
).
• The number of characters which can be displayed is restricted.
Error Messages
If the message “iPod Error” is displayed, it indicates that there are no playable files in the iPod or there is a malfunction.
Verify that the content recorded in the iPod has playable files and re-connect correctly. If the message reappears, have the unit checked by an Authorized Mazda Dealer.
Error Indications
If you see an error indication on the display, find the cause in the chart. If you cannot clear the error indication, take the vehicle to an Authorized Mazda Dealer.
 Audio Control Switch Operation
When the audio unit is turned on, operation of the audio unit from the steering
wheel is possible.
NOTE
Because the audio unit will be turned off under the following conditions,
the switches wil ...
 Bluetooth®
Bluetooth® Hands-Free
When a Bluetooth® device (mobile phone) is connected to the vehicle's Hands-Free
unit via radio wave transmission, a call can be made or received by pressing the
talk ...
Other materials:
Driveline/Axle Abbreviations
AAS
Active Adaptive Shift
ABS
Antilock Brake System
ABDC
After Bottom Dead Center
ACC
Accessories
AFS
Adaptive Front Lighting System
ALC
...
Rain Sensor Removal/Installation
1. Disconnect the negative battery cable..
2. Spread open the rain sensor cover in the direction of the arrows (1) and disengage
tabs A to remove it.
3. Disconnect the rain sensor connector in the direction of the arrow (2).
4. Slide rain sensor tabs B in the direction of the arrow ...
Brake Switch Inspection
CAUTION:
Inspect the brake switch with it installed to the brake pedal, otherwise
the brake switch may not operate normally. If the brake switch is removed from
the brake pedal, replace the brake switch with a new one.
1. Remove the lower panel..
2. Remove the front heat duct ( ...
