Mazda CX-5 Service & Repair Manual: Initial Learning [Fw6 A EL, Fw6 Ax EL]
Introduction
-
If the control valve body and oil pressure switch are replaced, always perform the initial learning. If the initial learning is not completed, engine rev-up may occur or shift shock may increase. DTC P06B8:00 is displayed while the initial learning has not been implemented.
-
The procedure for the initial learning has a procedure which uses the M-MDS and one which does not. The initial learning can be activated easily using the M-MDS.
WARNING:
-
The initial learning forcibly changes gears within the driving shift range while the engine is running. Before implementing the initial learning, securely apply the parking brake and set the wheel blocks for both the front and rear wheels. Otherwise, the vehicle will move which could cause injury or property damage.
Using M-MDS
Preparation before servicing
1. Verify initial learning implementation necessity for replacement parts.
|
Replacement part |
Initial learning necessity |
|
Control valve body replacement |
Necessary |
|
Oil pressure switch replacement |
Necessary |
|
Automatic transaxle replacement |
Unnecessary |
|
ON/OFF solenoid replacement |
Unnecessary |
|
Coupler component replacement |
Unnecessary |
2. Apply the parking brake firmly, and set the wheel blocks for both the front and rear wheels.
3. Inspect the ATF level..
4. Bring the M-MDS inside the vehicle and connect it to the DLC-2.
5. Perform vehicle identification using the M-MDS.
6. Start the engine.
7. After the vehicle is identified, select the following items from initialization of the M-MDS.
a. Select “Data logger”.
b. Select “Module”.
c. Select “TCM”.
8. While checking the PID TFT (ATF temperature), warm-up the engine and allow the ATF temperature to reach 40—110 °C {72—198 °F}
.
Starting procedure for initial learning
1. After the vehicle is identified, select the following items from initialization of the M-MDS.
a. Select “Self-test”
b. Select “Module”
c. Select “TCM”
d. Select “Retrieve CMDTCs”
NOTE:
-
DTC P06B8:00 is displayed while the initial learning has not been implemented.
2. Start the engine and wait for 30 s or more
.
3. Perform the following steps (1) to (4) with the brake pedal depressed.
CAUTION:
-
When the brake fluid pressure sensor value is the specification or less, shut down the initial learning to assure safety. Accordingly, be careful of the following when performing the initial learning:
-
Strongly depress the brake pedal while performing the initial learning.
-
Do not depress the brake pedal again. Otherwise, the brake booster pressure will decrease and the brake force will weaken.
a. Shift the selector lever from P position to D position and click the DTC clear button for the M-MDS.
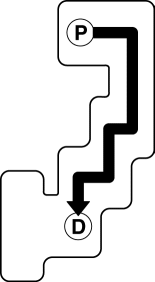
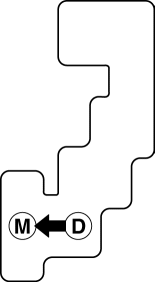
b. When the M-MDS screen returns to the DTC display screen, shift the selector lever from D position to M position within 10 s
and verify that the engine speed increases from idling.
NOTE:
-
The initial learning implements after idle speed starts increasing. If idle speed does not start increasing, repeat the procedure from Step 2.
-
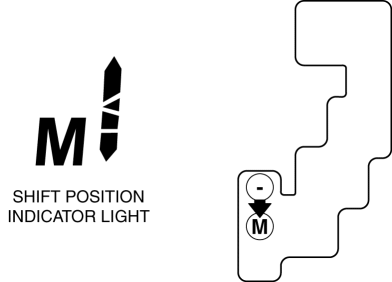
If the initial learning is shut down for any reason while performing the learning, shift position indicator light does not flash. If shift position indicator light does not flash, repeat the procedure from Step 2.
c. Verify that the engine speed returns to idle and shift position indicator light flashes two times
.

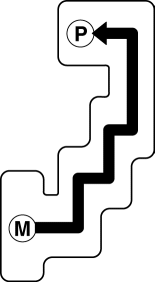
d. After shift position indicator light flashes twice, shift the selector lever from M position to P position and stop the engine.
NOTE:
-
Be careful not to miss looking at shift position indicator light because the light flashes only one time
.
4. Release the brake pedal.
5. Switch the ignition to KOEO and verify the DTC.
-
If DTC P06B8:00 is displayed, repeat the procedure from Step 2. If any other DTCs are displayed, perform the applicable DTC troubleshooting..
Not Using of M-MDS
Preparation before servicing
1. Verify initial learning implementation necessity for replacement parts.
|
Replacement part |
Initial learning necessity |
|
Control valve body replacement |
Necessary |
|
Oil pressure switch replacement |
Necessary |
|
Automatic transaxle replacement |
Unnecessary |
|
ON/OFF solenoid replacement |
Unnecessary |
|
Coupler component replacement |
Unnecessary |
2. Apply the parking brake firmly, and set the wheel blocks for both the front and rear wheels.
3. Inspect the ATF level..
4. Start the engine.
5. Warm-up the engine and allow the ATF temperature to reach 40—110 °C {72—198 °F}
.
Starting procedure for initial learning
1. Start the engine and wait for 30 s or more
.
2. Perform the following steps (1) to (7) with the brake pedal depressed.
CAUTION:
-
When the brake fluid pressure sensor value is the specification or less, shut down the initial learning to assure safety. Accordingly, be careful of the following when performing the initial learning:
-
Strongly depress the brake pedal while performing the initial learning.
-
Do not depress the brake pedal again. Otherwise, the brake booster pressure will decrease and the brake force will weaken.
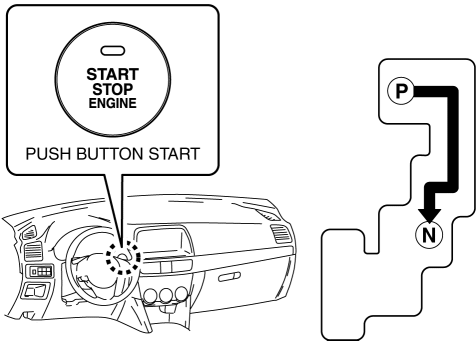
a. Shift the selector lever from P position to N position, press the push button start one time
, and stop the engine.
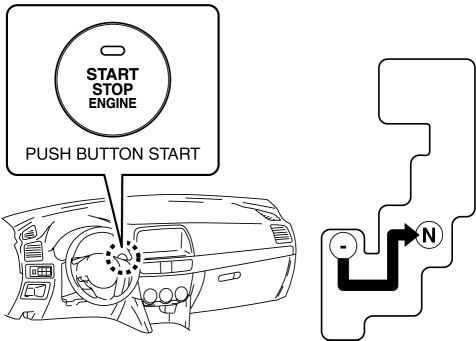
b. Shift the selector lever from N position to M- position, press the push button start one time
while holding the lever in the M- position, and wait for 5 s or more
(ignition switch ON (engine on)).
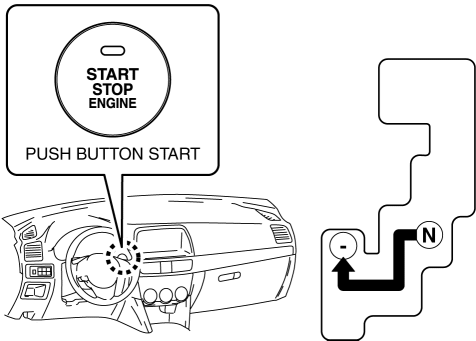
c. Shift the selector lever from M- position to N position, press the push button start one time
, and start the engine.
d. Shift the selector lever from N position to M+ position and wait for 5 s or more
while holding the lever in the M+ position.

e. Select the selector lever from M+ position to M- position and wait for 5 s or more
while holding the lever in the M- position.
f. When starting idle up, shift the selector lever from the M- position to M position and verify that shift position indicator light flashes two times
.
NOTE:
-
The initial learning implements after idle speed starts increasing. If idle speed does not start increasing, repeat the procedure from Step 1.
g. After shift position indicator light flashes twice, shift the selector lever from M position to P position and stop the engine.
NOTE:
-
Be careful not to miss looking at shift position indicator light because the light flashes only one time
.
3. Release the brake pedal.
4. Clear the DTC using the M-MDS and switch the ignition to off..
5. Switch the ignition ON (engine off or on) and verify that DTC P06B8:00 is not recorded using the M-MDS..
-
If the DTC P06B8:00 is displayed, repeat the procedure from Step 1.
 High Clutch [Fw6 A EL, Fw6 Ax EL]
Purpose/Function
The high clutch operates in 4GR, 5GR, and 6GR and intermittently operates
the rear carrier by drive force from the turbine shaft.
For the high clutch, a centrifugal ...
 Intermediate Shaft Removal/Installation
WARNING:
The steering column (EPS motor) temperature increases directly after continuous
turning of the steering mechanism which could cause burns if it is touched.
Before performing any ...
Other materials:
PCM Removal/Installation
CAUTION:
There are two types of PCM settings. If the incorrect PCM is installed, it
could cause interference with engine control.
When replacing the PCM, verify the first four digits of the part number indicated
on the PCM label before replacement, and replace the PCM with one ...
Auto Dimming Mirror Removal/Installation
1. Disconnect the negative battery cable..
2. Remove the screw B.
3. Remove the auto-dimming mirror in the direction of arrow (1) shown in the
figure.
4. Detach tabs while push the cover No.2 in the direction of the arrow (2) shown
in the figure, then remove the cover No.2 in the d ...
Trip Computer Information System
Outline
The trip computer system displays the instantaneous fuel economy, average
fuel economy, remaining distance to empty, and the average vehicle speed.
The instrument cluster performs trip computer system fail-safe..
Function
The instrument cluster controls the tri ...
