
Mazda CX-5 Service & Repair Manual: All Wheel Drive System
Outline
-
The electronic all-wheel drive (AWD) control system automatically and optimally controls drive torque distribution for the front and rear wheels. Due to this off-road mobility and driving stability are improved.
-
Based on the input signals from each sensor, the AWD control module (CM) determines vehicle driving and road conditions, and controls output current to the electronic control coupling (AWD solenoid) inside the rear differential. This control allows for optimal distribution of the drive torque from the engine to the rear wheels.
-
Also, the AWD CM automatically controls the AWD, greatly reducing the load on the driver and improving operability.
Structural View
Structure
-
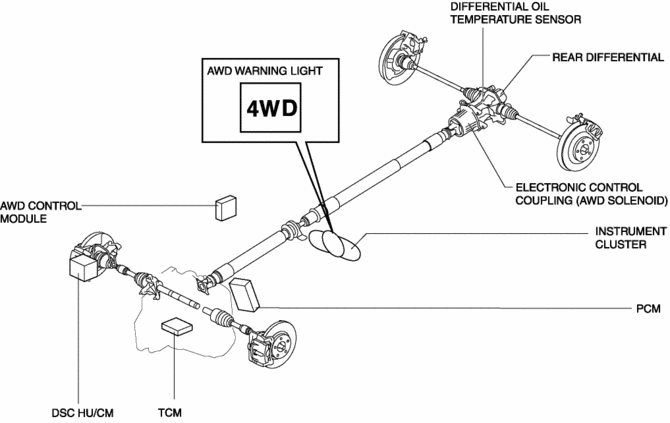
Consists of the following parts:
|
Electronic control coupling (AWD solenoid) |
|
|
AWD CM |
|
|
Differential oil temperature sensor |
|
|
AWD warning light |
|
System Diagram
Features
-
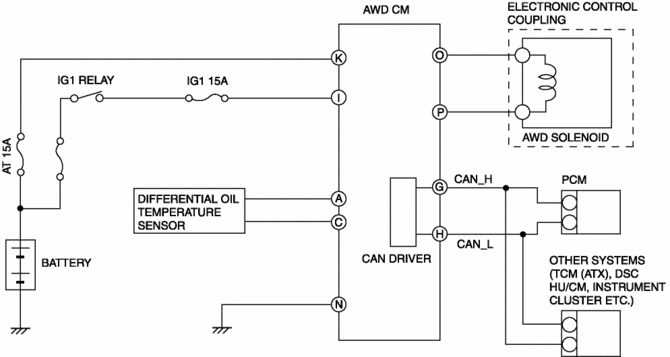
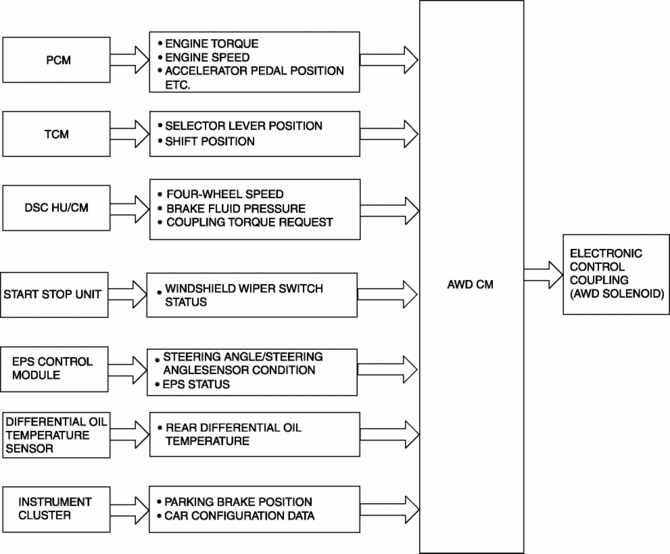
Based on the inputted signals listed below, the AWD CM calculates the optimal amount of torque distribution for the rear wheels and outputs a corresponding electric control current to the electronic control coupling (AWD solenoid).
-
The module controls the current outputted to the AWD solenoid by changing the rate of the ON/OFF timing.
|
Signal output part |
Signal name |
Note |
|
PCM |
Engine speed Engine torque Accelerator pedal position Cruise control status Engine off time Ambient temperature Car configuration data |
Transmitted as a CAN signal |
|
TCM |
Selector lever position Transmission gear position |
|
|
DSC HU/CM |
Four-wheel speed Brake fluid pressure Coupling torque request |
|
|
EPS control module |
Steering angle/steering angle sensor condition EPS status |
|
|
Start stop unit |
Windshield wiper switch status |
|
|
Instrument cluster |
Parking brake position Car configuration data |
|
|
Differential oil temperature sensor |
Rear differential oil temperature |
— |
Block Diagram
Operation
Normal Control
-
When starting off or accelerating during straight-ahead driving, torque transmitted to the rear wheels is optimally controlled to ensure sufficient acceleration performance. Due to this, standing-start and acceleration performance is improved.
-
If a parking brake signal input to the AWD CM indicates, the module controls the torque transmitted to the rear wheels.
Tight Cornering Control
-
When the AWD CM determines that the vehicle is in tight cornering, it reduces the torque transmitted to the rear wheels to avoid tight corner braking characteristics.
Integrated DSC Control
-
If a signal from the DSC HU/CM input to the AWD CM indicates that ABS control is activated, the module controls the torque transmitted to the rear wheels to prevent undue influence on ABS control.
-
Also, when a coupling torque request signal is received from the DSC HU/CM, the module controls the torque transmitted to the rear wheels to match the amount of requested torque.
Other Control
-
In case the rear differential oil temperature exceeds the specified amount, or when there is an unusually large variation in the rotation speed of the front and rear wheels (ex. when trying to get unstuck), control is temporarily suspended in order to protect the AWD system. When this occurs the AWD warning light flashes to indicate the situation to the driver.
 4WD
4WD
...
 Awd Control Module
Purpose, Function
The AWD CM calculates the optimal amount of torque distribution for the rear
wheels and outputs a corresponding electric current to the electronic control
coupling (AWD ...
Other materials:
Sirius Satellite Radio Unit Removal/Installation
CAUTION:
The audio unit communicates with the SIRIUS satellite radio unit and records
the presence/non-presence of the SIRIUS satellite radio unit when the ignition
is switched to ACC or ON (engine off or on) after connecting the negative battery
cable.
If the commander ...
Turn Signal/Hazard Warning Indicator Lights
Purpose
Notifies the driver that a turn light, the hazard warning lights are flashing.
Function
Flashes according to the turn switch and hazard warning switch operations.
Construction
Displayed in the instrument cluster.
Operation
Turn system
1. When th ...
Control Valve Body [Fw6 A EL, Fw6 Ax EL]
Purpose/Function
A direct linear solenoid has been adopted for the solenoid valve which contributes
to improved shift response, drive feel and reduced shift shock by the improved
precision of the hydraulic pressure control.
Construction
The control valve body consists of in ...
