Mazda CX-5 Service & Repair Manual: Accelerator Pedal, Kickdown Switch
Purpose, Function
-
The driver's intentions are transmitted to the PCM via the accelerator pedal.
-
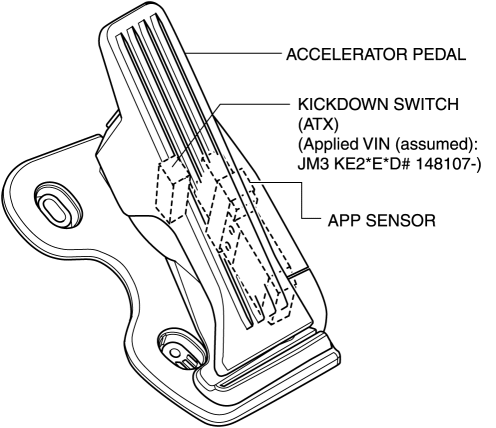
Kickdown switch (ATX) (Applied VIN (assumed): JM3 KE2*E*D# 148107?)
-
If the accelerator pedal is depressed carelessly, kickdown control will be implemented based on the accelerator pedal being determined as fully open, and vehicle shock will occur. A kickdown switch has been adopted so that it can be determined that the accelerator pedal is fully open based on the driver’s intention of depressing the accelerator pedal for kickdown.
Construction
-
The accelerator pedal has a built-in APP sensor and kickdown switch (ATX).
-
For the APP sensor, refer to CONTROL SYSTEM..
Kickdown Switch (ATX) (Applied VIN (assumed): JM3 KE2*E*D# 148107?)
-
A load can be felt while the accelerator pedal is being depressed and when it is further depressed the kickdown switch turns on.

-
The driver can control the kickdown by knowing the amount of accelerator depression.
-
The kickdown switch is only a measure of the kickdown. An electrical signal is not transmitted by the kickdown switch turning on/off, and vehicle control is not affected.
 Accelerator Pedal Removal/Installation
1. Disconnect the negative battery cable..
2. Remove in the order indicated in the table.
1
APP sensor connector
2
Accelerator pedal
...
 Air Bag Module And Pre Tensioner Seat Belt Deployment Procedures [Standard Deployment
Control System]
Air Bag Module And Pre Tensioner Seat Belt Deployment Procedures [Standard Deployment
Control System]
WARNING:
A live (undeployed) air bag module or pre-tensioner seat belt may accidentally
operate (deploy) when it is disposed of and cause serious injury. Do not dispose
of a live (undepl ...
Other materials:
Starter Interlock Switch [Skyactiv G 2.0]
Purpose, Function
The starter interlock switch mechanism prevents vehicle surge when the engine
is started, enhancing safety. The engine cannot be started unless the clutch
is depressed.
Construction
The mechanism is provided with a starter interlock switch on the circuit
...
Rear Buckle Removal/Installation
1. Switch the ignition to off.
2. Disconnect the negative battery cable and wait for 1 min or more..
3. Press the release switch, then disconnect the rear center seat belt and rear
buckle.
4. Fold down the rear seat back.
5. Remove the trunk board..
6. Remove the bolt.
7. Remo ...
Brake System/ABS Warning Light
Purpose/Function
The brake system/ABS warning light is built into the instrument cluster.
If a malfunction is detected in the system with the parking brake released,
the warning light illuminates to notify the driver.
Construction/Operation
When the DSC system and CAN l ...
