Mazda CX-5 Owners Manual: Supplemental Restraint System Components
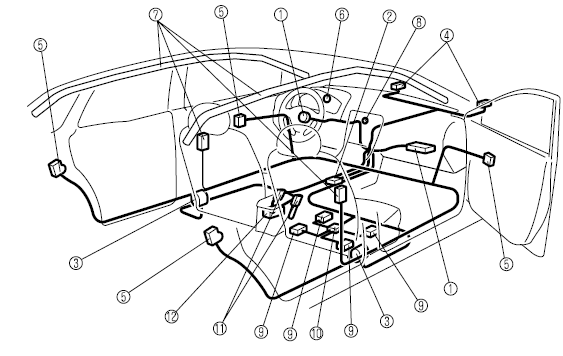
1 Driver/Front passenger inflators and air bags
2 Roll-over sensorí, crash sensors, and diagnostic module (SAS unit)
3 Front seat belt pretensioners
4 Front air bag sensors
5 Side crash sensors
6 Air bag/front seat belt pretensioner system warning light
7 Side and curtain inflators and air bags
8 Front passenger air bag deactivation indicator light
9 Front passenger seat weight sensors
10 Front passenger seat weight sensor control module
11 Driver and front passenger seat belt buckle switches
12 Driver seat slide position sensor
NOTE
8-12 are equipped only on models with the driver and front passenger occupant classification system.
 Supplemental Restraint System (SRS) Precautions
The front and side supplemental restraint systems (SRS) include up to 6 air bags.
Please verify which kinds of air bags are equipped on your vehicle by locating the
“SRS AIRBAG” location indic ...
 How the SRS Air Bags Work
Your Mazda is equipped with the following types of SRS air bags. SRS air bags
are designed to work together with the seat belts to help to reduce injuries during
an accident.
The SRS air bags are ...
Other materials:
Starter Interlock Switch Removal/Installation [C66 M R]
1. Disconnect the negative battery cable..
2. Disconnect the starter interlock switch connector.
3. Remove the starter interlock using the following procedure:
a. Detach hook A in the direction of the arrow shown in the figure.
b. Slide the starter interlock switch in the direction of th ...
Front Frame (Rear) Removal [Panel Replacement]
Symbol Mark
Removal Procedure
1. Drill the 33 locations shown in the figure.
NOTE:
When drilling, do not drill a hole all the way through or there could be
a problem when installing the new part.
2. Remove the front frame (rear). ...
Front Bumper Removal/Installation
CAUTION:
Affix the protective tape to the position (vehicle body side) shown in the
figure to prevent scratches and damage.
1. Disconnect the negative battery cable..
2. Remove fasteners A.
3. Pull the front over fender in the direction of the arrow shown in the figure ...
