Mazda CX-5 Service & Repair Manual: Seat Warmer Control Unit Inspection
WARNING:
-
Handling a front seat (with built-in side air bag) improperly can accidentally operate (deploy) the air bag, which may seriously injure you. Read the service warnings/cautions before handling a front seat (with built-in side air bag)..
CAUTION:
-
After removing a front seat, do not operate the slider lever. If the slider lever is operated, the left and right slide positions will deviate, and the slide adjuster may be damaged after the front seat is installed.
-
Verify that there are no malfunctions in the sliding mechanism after installing a front seat.
-
When performing the procedure with a front seat removed from the vehicle, perform the procedure on a clean rag so as not to damage or soil the seat.
Forward
-
When performing an asterisked (*) troubleshooting inspection, shake the wiring harness and connectors while performing the inspection to discover whether poor contact points are the cause of any intermittent malfunction. If there is a problem, inspect to make sure connectors, terminals and wiring harnesses are connected correctly and undamaged.
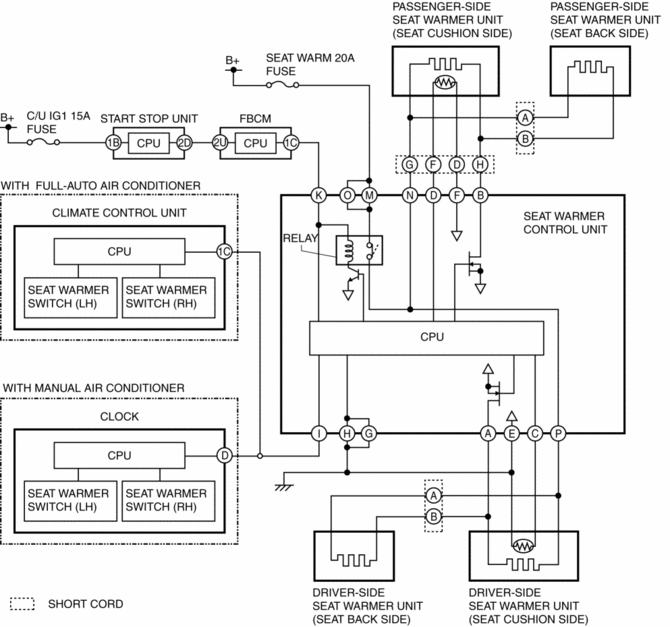
System Diagram
Symptom Trouble Shooting Index
|
No. |
Troubleshooting item |
Description |
|
1 |
Seat warmer function is inoperative. |
Seat warmer does not warm seat even though seat warmer switch is on |
|
2 |
Seat warmer always operations. |
Seat warmer warms seat even though seat warmer switch is off |
|
3 |
Temperature of the seat warmer cannot be adjusted. |
|
Inspection Procedure (No.1 Seat Warmer Function Is Inoperative)
|
No.1 |
Seat warmer function is inoperative |
|
DETECTION
|
Seat warmer does not warm seat even though seat warmer switch is on |
|
POSSIBLE CAUSE
|
|
Diagnostic procedure
|
STEP |
INSPECTION |
ACTION |
|
|
1 |
PERFORM
DTC INSPECTION
|
Yes |
Perform the diagnosis according to the inspection procedure for each code. |
|
No |
Go to the next step. |
||
|
2 |
DETERMINE
IF THE MALFUNCTION CAUSE IS THE SEAT WARMER SWITCH
|
Yes |
Go to the next step. |
|
No |
Inspect the climate control unit or clock. (See CLIMATE CONTROL UNIT INSPECTION [FULL-AUTO AIR CONDITIONER].) (See CLOCK INSPECTION.) |
||
|
3 |
DETERMINE
MALFUNCTIONING SYSTEM
|
Yes |
Go to step 9. |
|
No |
Go to the next step. |
||
|
4 |
INSPECT
THE SEAT WARMER CONTROL UNIT POWER SUPPLY FUSE
|
Yes |
Go to the next step. |
|
No |
|
||
|
5* |
DETERMINE
IF CAUSE OF MALFUNCTION IS CONTROLLER POWER SUPPLY WIRING HARNESS FOR SEAT
WARMER OR OTHER CAUSE
|
Yes |
Go to the next step. |
|
No |
|
||
|
6* |
VERIFY
IF MALFUNCTION CAUSE IS OPEN CIRCUIT IN SEAT WARMER CONTROL UNIT POWER SUPPLY
WIRING HARNESS
|
Yes |
Go to the next step. |
|
No |
|
||
|
7* |
VERIFY
IF MALFUNCTION CAUSE IS SHORT TO GROUND IN SEAT WARMER CONTROL UNIT
|
Yes |
Go to the next step. |
|
No |
|
||
|
8* |
VERIFY
IF MALFUNCTION CAUSE IS OPEN CIRCUIT IN WIRING HARNESS OF SEAT WARMER SWITCH
SIGNAL
|
Yes |
Go to the next step. |
|
No |
|
||
|
9* |
INSPECT
SEAT WARMER CONTROL UNIT AND SEAT WARMER UNIT CONNECTOR
|
Yes |
Repair or replace the malfunctions. |
|
No |
Go to the next step. |
||
|
10* |
VERIFY
IF MALFUNCTION CAUSE IS OPEN CIRCUIT IN WIRING HARNESS OF SEAT WARMER UNIT
CIRCUIT
|
Yes |
Go to the next step. |
|
No |
Replace the seat warmer unit. |
||
|
11 |
DETERMINE
IF THE MALFUNCTION CAUSE IS SEAT WARMER CONTROL UNIT
|
Yes |
Troubleshooting completed. |
|
No |
Replace the seat warmer control unit. |
||
Inspection Procedure (No.2 Seat Warmer Always Operations)
|
No.2 |
Seat warmer always operations |
|
DETECTION
|
Seat warmer warms seat even though seat warmer switch is off |
|
POSSIBLE CAUSE
|
|
Diagnostic procedure
|
STEP |
INSPECTION |
ACTION |
|
|
1* |
DETERMINE
IF THE MALFUNCTION CAUSE IS THE SEAT WARMER SWITCH
|
Yes |
Go to the next step. |
|
No |
Replace the climate control unit or clock. (See CLIMATE CONTROL UNIT REMOVAL/INSTALLATION [FULL-AUTO AIR CONDITIONER].) (See CLOCK REMOVAL/INSTALLATION.) |
||
|
2 |
DETERMINE
IF THE MALFUNCTION CAUSE IS THE SEAT WARMER COTROL UNIT
|
Yes |
Repair or replace for a short to ground in the wiring harness. |
|
No |
Replace the seat warmer control unit.. |
||
Inspection Procedure (No.3 Temperature Of Seat Warmer Cannot Be Adjusted)
|
No.3 |
Temperature of seat warmer cannot be adjusted |
|
DETECTION
|
|
|
POSSIBLE CAUSE
|
|
Diagnostic procedure
|
STEP |
INSPECTION |
ACTION |
|
|
1 |
DETERMINE
MALFUNCTIONING SYSTEM
|
Yes |
Replace the seat warmer control unit.. |
|
No |
Go to the next step. |
||
|
2* |
VERIFY
IF MALFUNCTION CAUSE IS OPEN CIRCUIT IN WIRING HARNESS OF SEAT WARMER UNIT
CIRCUIT
|
Yes |
Go to the next step. |
|
No |
Replace the seat warmer unit. |
||
|
3* |
VERIFY
IF MALFUNCTION CAUSE IS SHRT CIRCUIT IN WIRING HARNESS OF SEAT WARMER UNIT
CIRCUIT
|
Yes |
Repair or replace for a short to ground in the wiring harness. |
|
No |
Replace the seat warmer control unit. |
||
 Seat Track Position Sensor [Two Step Deployment Control System]
Purpose
The seat track position sensor detects the front and back positions of the
driver seat.
Function
The seat track position sensor converts the seat position into an electr ...
 Seat Warmer Control Unit Removal/Installation
WARNING:
Handling a side air bag improperly can accidentally operate (deploy) the
air bag, which may seriously injure you. Read the service warnings/cautions
in the Workshop Manual befor ...
Other materials:
Rear Differential Assembly
WARNING:
The engine stand is equipped with a self-lock mechanism, however, if the
rear differential is in a tilted condition, the self-lock mechanism could become
inoperative. If the rear differential unexpectedly rotates it could cause injury,
therefore do not maintain the rear dif ...
Glove Compartment Removal/Installation
1. Push the glove compartment in the direction of the arrow (1) and remove hooks
A.
2. Pull the stay damper in the direction of the arrow (2) shown in the figure
and remove the hook B.
CAUTION:
If the glove compartment is closed without being joined to the stay damper,
the sta ...
Suspension Features
Improved rigidity and handling stability
A strut type front suspension adopted
E-type multi-link rear suspension adopted
For the front/rear crossmembers, the welded flange has been eliminated
(flange-less), the cross-section expa ...
