Mazda CX-5 Service & Repair Manual: Front Side Trim Removal/Installation
1. Remove the front scuff plate..
2. Partially peel back the seaming welt.
3. Remove the cap nut.
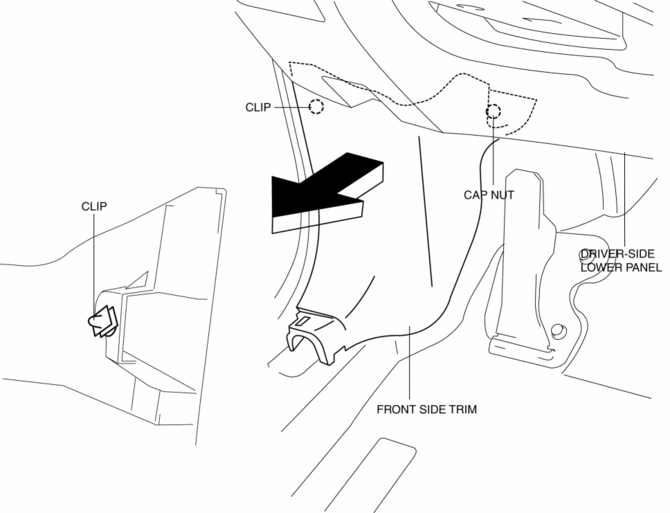
4. Pull the front side trim in the direction of the arrow shown in the figure and remove it while detaching the clip.
5. Install in the reverse order of removal.
 Front Scuff Plate Removal/Installation
1. Take the shaded area shown in the figure, detach tab A while pulling the front
scuff plate in the direction of the arrow (1) shown in the figure, then detach the
hook B, clip C, and pin D while ...
 Headliner
Purpose/Function
The headliner is equipped with a shock absorbing pad for driver's head protection
during a collision.
Construction
The front and rear side of the headliner ...
Other materials:
Main Silencer
Purpose, Function
Reduces the exhaust noise.
Construction
The main silencer is installed to the vehicle rear, under the trunk compartment.
2WD
AWD
The main silencer consists of the filters, holder, set plates and stiffener.
...
Oil Cooler Removal/Installation
WARNING:
Hot engines and engine oil can cause severe burns. Turn off the engine and
wait until it and the engine oil have cooled.
A vehicle that is lifted but not securely supported on safety stands is dangerous.
It can slip or fall, causing death or serious injury. Never work ...
Engine Oil Solenoid Valve Inspection
Engine Oil Solenoid Valve Operation Inspection
1. Remove the engine oil solenoid valve..
2. Verify that the battery is fully charged.
3. Connect the battery to the engine oil solenoid valve connector (2 terminals)
as shown in the figure.
4. Verify that there is an operation sound from t ...
