Mazda CX-5 Service & Repair Manual: Auto Light Sensor
Purpose
-
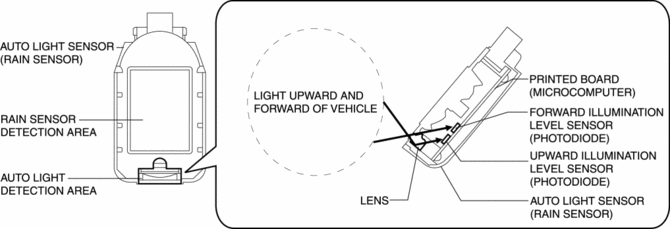
The auto light sensor detects the illumination level above and in front of the vehicle and outputs it to the front body control module (FBCM).
Function
-
The auto-light sensor uses the upward illumination level sensor to detect the illumination level above the vehicle, and uses the forward illumination level sensor to detect the illumination level in front of the vehicle.
Illumination level adjustment function
-
The illumination level can be switched through 5 levels by using the Mazda Modular Diagnostic System (M-MDS) or the audio unit (with color LCD)..
On-board diagnostic function
-
If there is a malfunction in the auto light sensor, notifies the front body control module (FBCM) and detects a DTC from the front body control module (FBCM).
-
For details on DTCs, refer to the diagnostic system (front body control module (FBCM)), DTC table (front body control module (FBCM)) in the Workshop Manual.
Construction
-
The auto-light sensor is integrated with the rain sensor as a single unit.
-
The auto light sensor consists of lens, forward illumination level sensor (photodiode), upward illumination level sensor (photodiode), and microcomputer.
Operation
CAUTION:
-
Correct illumination level detection is not be possible under the following conditions and could cause the system to operate incorrectly.
-
Stickers or labels are attached to the auto-light sensor area on the windshield.
-
Dirt is adhering to the the auto-light sensor area on the windshield.
1. The auto light sensor detects the illumination level above and in front of the vehicle when the ignition is switched ON and the light switch is operated to the AUTO position.
2. The auto light sensor outputs a headlight (LO) on signal to the front body control module (FBCM) according to the detected illumination level.
Fail-safe
-
Function not equipped.
 Adaptive Front Lighting System (Afs) Off Switch Inspection
1. Disconnect the negative battery cable..
2. Remove the switch panel..
3. Verify that the resistance between AFS OFF switches B and C is as indicated
in the table.
If the resist ...
 Back Up Light Switch Inspection
1. Disconnect the negative battery cable..
2. Remove the front under cover No.2..
3. Remove the back-up light switch..
4. Verify that the continuity between the back-up light switch terminals is ...
Other materials:
Manual Transaxle Operation
Manual Transaxle Shift Pattern
The shift pattern of the transaxle is conventional, as shown.
Depress the clutch pedal all the way down while shifting; then release it slowly.
Your vehicle is equipped with a device to prevent shifting to R (reverse) by
mistake.
Push the shift lever downward a ...
Keyless Antenna Removal/Installation
With Advanced Keyless Entry System
Vehicle interior, front
1. Disconnect the negative battery cable..
2. Remove the following parts:
a. Decoration panel.
b. Shift lever knob (MTX).
c. Front console box.
d. Shift panel.
e. Upper panel.
f. Rear console.
g. Side wall.
h. Front conso ...
Cooling Fan Relay [Skyactiv G 2.0]
Purpose, Function
The cooling fan relay operates by receiving the signal from the PCM to supply
power to the cooling fan motor.
Construction
The cooling fan relay is installed on the relay and fuse block.
Operation
The contact point is on when the battery vo ...
