Mazda CX-5 Service & Repair Manual: Windshield Installation
WARNING:
-
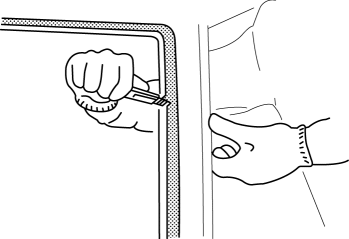
Using a utility knife with bare hands can cause injury. Always wear gloves when using a utility knife.
CAUTION:
-
If a door is opened or closed when all the window glass is closed, the resulting change in air pressure could cause the sealant to crack preventing the proper installation of the windshield. Keep the door glass opened until the windshield installation is completed.
1. Remove the sealant along the perimeter of the glass using a utility knife. (When reusing the glass)
2. Clean and degrease an approx. 50 mm {2.0 in}
wide strip along the perimeter of the windshield.
3. Inspect the glass for cracks. If it is cracked, chamfer it using sandpaper.
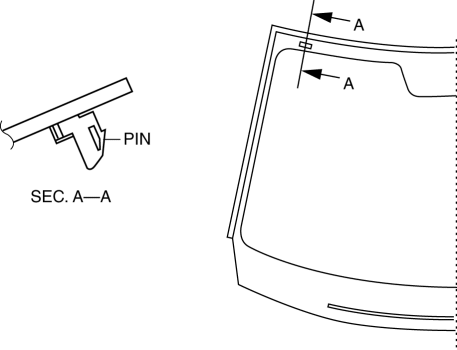
4. Align the alignment marks made before removal and install the pin to the windshield referring to the figure. (Reusing glass, pin removed)
5. Install the windshield molding.

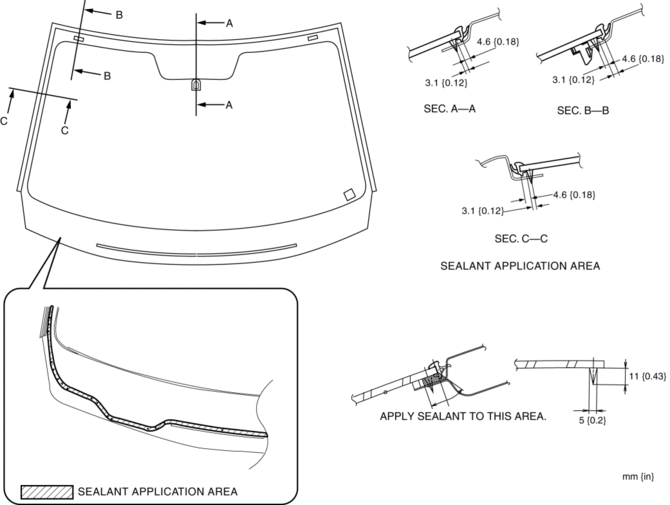
6. Apply glass primer on the glass as shown in the figure, then allow it to dry for approx. 30 min
.
CAUTION:
-
To prevent weakening of the primer adhesion, keep the bonding surface free of dirt, moisture, and grease. Do not touch the surface with your hand.
NOTE:
-
Apply primer to the hollowed marks in the ceramic coating.
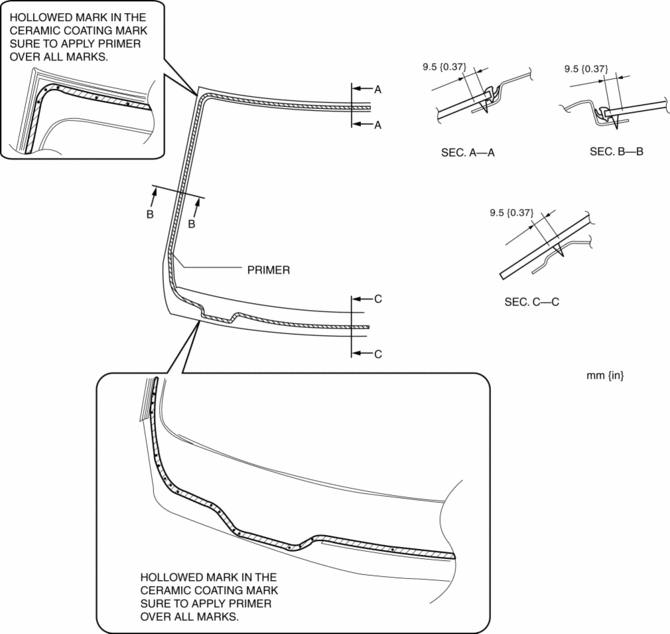
7. Cut away the old sealant using a utility knife so that 1—2 mm {0.04—0.07 in}
thickness of sealant remains along the perimeter of the frame.
8. If the sealant has come off completely in any one place, apply some primer after degreasing, and allow it approx. 30 min
to dry. Then apply 2 mm {0.07 in} thickness
of new sealant.
CAUTION:
-
To prevent weakening of the primer adhesion, keep the bonding surface free of dirt, moisture, and grease. Do not touch the surface with your hand.
9. Clean and degrease along the perimeter of the bonding area on the body.
10. Apply body primer on the body as shown in the figure, then allow it to dry for approx. 30 min
.
CAUTION:
-
Using the dowel for applying primer, apply primer 65 to the area shown in the figure.
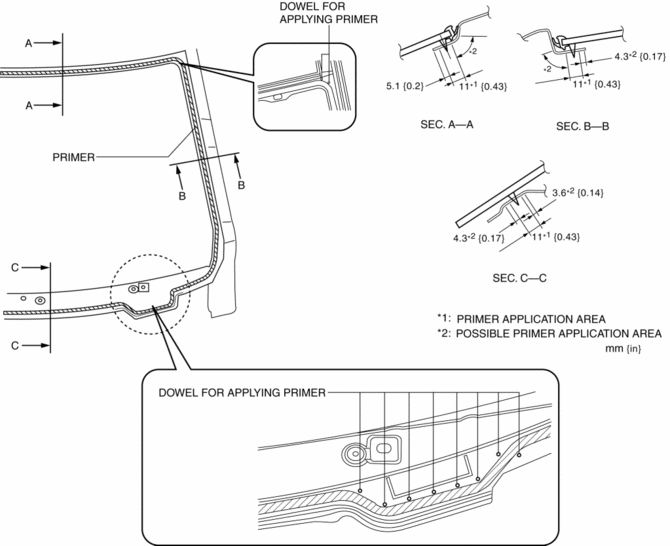
11. Apply sealant to the area of the glass surface as shown in the figure.
12. Insert the positioning pins to the body and install the windshield.
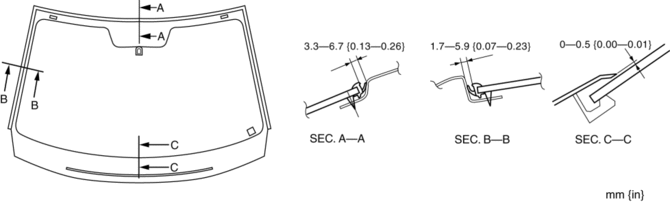
13. Verify that the clearance between the A-pillar and the roof is within the range shown in the figure, and press along the perimeter of the glass.
14. Install the headliner.
15. Install the following parts:
a. Assist handle.
b. Front map light.
c. Sunvisor.
d. A-pillar trim.
e. Rearview mirror (without auto-dimming mirror).
f. Auto-dimming mirror (with auto-dimming mirror).
g. Rain sensor (with auto light / wiper system).
h. Cowl grille.
i. Windshield wiper arm and blade.
16. Connect the negative battery cable..
17. Allow the sealant to harden completely. Sealant hardening time: 24 h
 Rear Window Glass Removal
1. Disconnect the negative battery cable..
2. Remove the following parts:
a. Liftgate upper trim.
b. Liftgate side trim.
c. Liftgate recess.
d. Liftgate lower trim.
e. Rear spoiler.
f. R ...
 Windshield Removal
1. Disconnect the negative battery cable..
2. Remove the following parts:
a. Windshield wiper arm and blade.
b. Cowl grille.
c. Rain sensor (with auto light/wiper system).
d. Auto-dimming mi ...
Other materials:
Engine Oil Control
Outline
The PCM reduces the oil pump load applied to the engine by controlling the
appropriate engine hydraulic pressure according to the engine operation conditions.
The engine hydraulic pressure switches in two steps. When hydraulic pressure
is not needed, the oil pump dischar ...
Fuel Filler Lid Opener Cable Removal/Installation
1. Disconnect the negative battery cable..
2. Remove the following parts:
a. Front scuff plate (LH).
b. Front seat (LH).
c. Rear scuff plate.
d. B-pillar lower trim (LH).
e. Rear seat (4:2:4 split type).
f. Rear seat cushion (6:4 split type).
g. Rear seat back (6:4 split type).
h. ...
Relay Inspection
Relay Type
Connector type
Part name
Type A
TNS relay
A/C relay
Headlight HI relay
Headlight LO relay
Headlight LO relay (LH)
Horn relay
ACC rel ...
