Mazda CX-5 Owners Manual: Troubleshooting
Bluetooth® does not operate under the following conditions. Check whether the following conditions apply to your Bluetooth® device:
• The device is not being operated correctly.
• The device is not connected to the Bluetooth® unit equipped on the vehicle.
• The device's battery is weak.
• A device which interferes with radio wave reception has been placed in the vehicle.
• The ignition switch has been turned off.
If none of the above conditions apply, refer to the following to see if any of the problem symptoms correspond to your device.
If the problem cannot be resolved, consult an Authorized Mazda Dealer or Mazda Bluetooth® Hands-Free Customer Service.
Mazda Bluetooth® Hands-Free Customer Service
If you have any problems with Bluetooth®, contact with our toll-free customer service center.
• U.S.A.
Phone:800-430-0153 (Toll-free) Web: www.MazdaUSA.com/bluetooth •Canada Phone:800-430-0153 (Toll-free) Web: www.mazdahandsfree.ca • Mexico Center of Attention to Client (CAC) Phone:01-800-01-MAZDA (Toll-free) Web: www.MazdaUSA.com/bluetooth
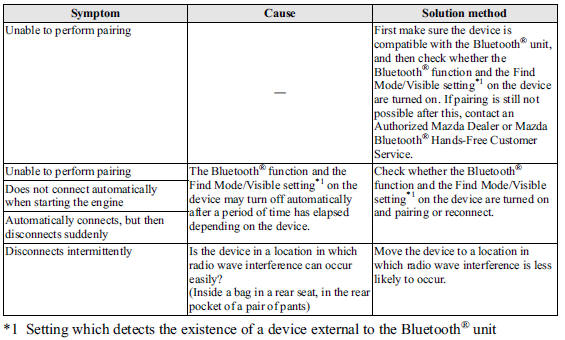
Device pairing, connection problems
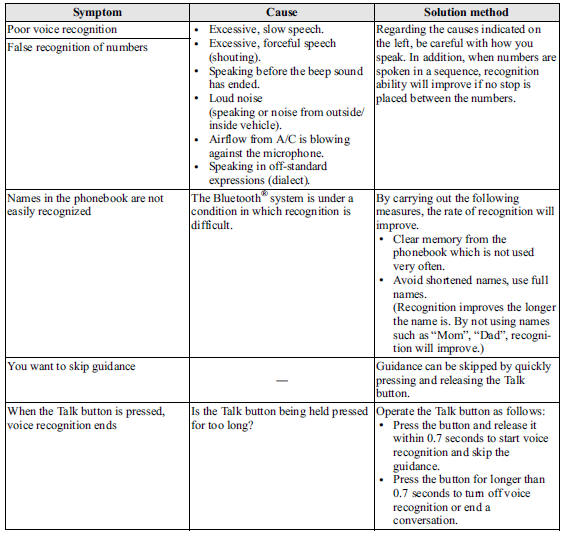
Voice recognition related problems
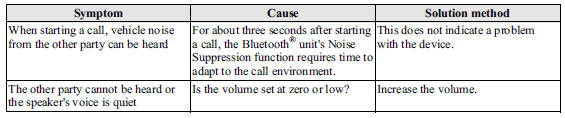
Regarding problems with calls
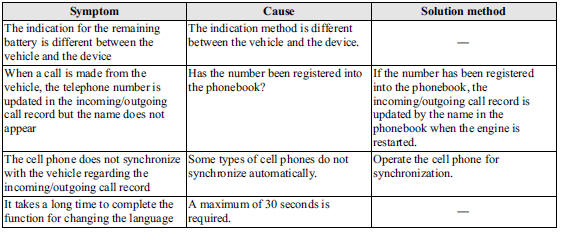
Other problems
 Bluetooth® Audio
Applicable Bluetooth® specification Ver. 2.0 or higher
Response profile
• A2DP (Advanced Audio Distribution Profile)
Ver. 1.0/1.2
• AVRCP (Audio/Video Remote Control Profile)
Ver. 1.0/1.3/ ...

Other materials:
Upper Cowl Side Reinforcement Removal [Panel Replacement]
Symbol Mark
Removal Procedure
1. Drill the 13 locations indicated by (A) shown in the figure.
2. Drill the 8 locations indicated by (B) shown in the figure.
NOTE:
When a drill the 8 locations indicated by (B) shown in the figure, the through
hole is not made in consideration of ...
Body Sealing [Water Proof And Rust Preventive]
Sealant is applied to the parts where the panels meet and to the hemmed parts
of the door panel and hood panel to provide water proofing and rust proofing.
...
Powertrain System Outline [Fw6 A EL, Fw6 Ax EL]
Outline
The powertrain consists of a 2-piece multi-plate clutch, 3-piece multi-plate
brake, a one-way clutch, and a 3-piece single-type planetary gear.
Construction
Component parts list
Component parts
Movement
Multi-plate clutch
...
