Mazda CX-5 Service & Repair Manual: Seal Plate Removal/Installation
1. Disconnect the negative battery cable..
2. Remove the seal board upper..
3. Remove the front bumper..
4. Remove fasteners A.
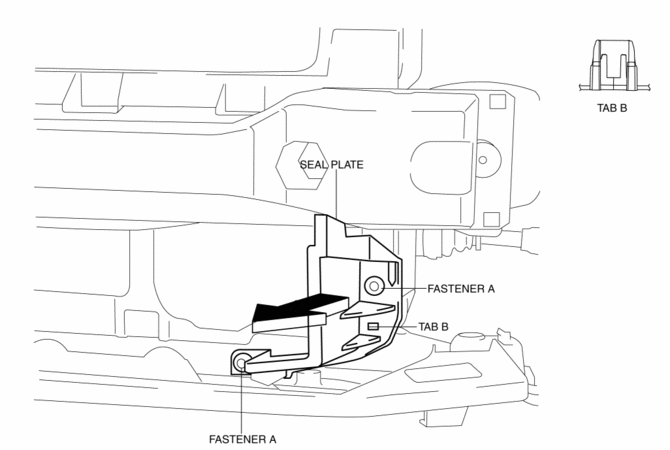
5. Remove the seal plate in the direction of the arrow shown in the figure while detaching tab B.
6. Install in the reverse order of removal.
 Seal Board Upper Removal/Installation
1. Remove fasteners A.
2. Pull the seal board upper in the direction of the arrow in the order of (1),
(2) and remove it while detaching hooks B.
3. Install in the reverse order of removal. ...
 Set Plate Removal/Installation
1. Disconnect the negative battery cable..
2. Remove the seal board upper..
3. Remove the front bumper..
4. Remove fasteners A.
5. Remove the set plate in the direction of the arrow shown ...
Other materials:
Turbine/Input Shaft Speed Sensor, Output Shaft Speed Sensor [Fw6 A EL, Fw6 Ax
EL]
Purpose/Function
The turbine/input shaft speed sensor detects the rotation speed of the input
shaft (low clutch drum).
The output shaft speed sensor detects the rotation speed of the output shaft
(primary gear).
The turbine/input shaft speed sensor and output shaft speed ...
SRS Air Bag Deployment Criteria
This chart indicates the applicable SRS equipment that will deploy depending
on the type of collision.
(The illustrations are the representative cases of collisions.)
X: The SRS air bag equipment is designed to deploy in a collision.
*1 (With Driver and Front Passenger Occupant Classification ...
Antenna Feeder No.2 Inspection
1. Disconnect the negative battery cable..
2. Remove the following parts:
a. A-pillar trim (RH).
b. Trunk board.
c. Trunk end trim (RH).
d. Rear scuff plate (RH).
e. Trunk side trim (RH).
3. Disconnect antenna feeder No.1.
4. Disconnect antenna feeder No.3.
5. Verify that t ...
