
Mazda CX-5 Service & Repair Manual: Rear Washer Nozzle Removal/Installation
1. Disconnect the negative battery cable..
2. Remove the liftgate upper trim..
3. Remove the rear spoiler..
4. Disconnect the rear washer hose from the rear washer nozzle..
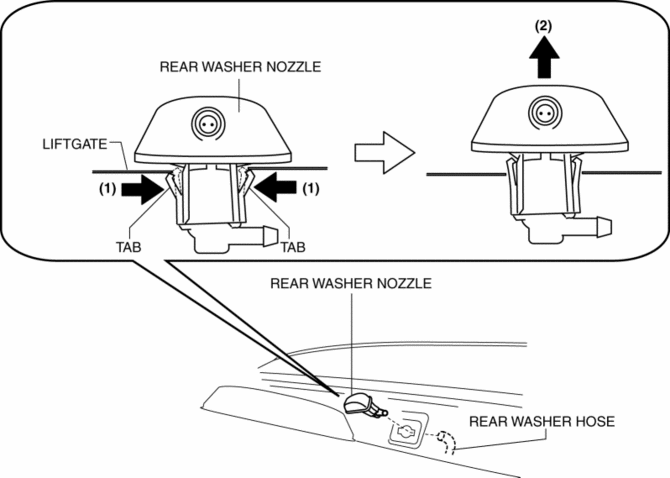
5. While pressing tabs of the rear washer nozzle in the direction of the arrows (1) shown in the figure, pull the rear washer nozzle in the direction of the arrow (2) to remove it from the liftgate.
6. Install in the reverse order of removal.
7. Adjust the rear washer nozzle..
 Rear Washer Nozzle Adjustment
CAUTION:
If the nozzle angle is adjusted with excessive force by strongly inserting
a needle or similar thin tool into the injection nozzle of rear washer nozzle,
it could damage the noz ...
 Washer Motor Inspection
1. Disconnect the negative battery cable..
2. Set the front over fender aside..
3. Set the mudguard (RH) aside..
4. Remove the front bumper..
5. Disconnect the washer motor connector from the ...
Other materials:
Air Bag System Service Cautions [Two Step Deployment Control System]
Air Bag System Component Disassembly
Disassembling the air bag system components could cause it to not operate
(deploy) normally. Never disassemble any air bag system components.
Air Bag Module, Pre-tensioner Seat Belt, Lap Pre-tensioner Seat Belt Handling
Oil, grease, or ...
Electric Variable Valve Timing Relay [Skyactiv G 2.0]
Purpose, Function
The electric variable valve timing actuator relay supplies power to the electric
variable valve timing motor/driver after receiving the signal from the PCM.
Construction
The electric variable valve timing actuator relay is installed to the relay
block..
...
Airflow Volume Control [Full Auto Air Conditioner]
Purpose
The airflow volume control changes the airflow volume according to the vehicle
environment.
Function
The airflow volume control changes the operation of the blower motor according
to the operations of the airflow volume control dial or temperature control
dial an ...
