Mazda CX-5 Service & Repair Manual: Rear ABS Wheel Speed Sensor Inspection [Awd]
Installation Visual Inspection
1. Inspect the following items:
-
If there is any malfunction, replace the applicable part.
a. Excessive play of the ABS wheel-speed sensor
b. Deformation of the ABS wheel-speed sensor
c. Deformation or damage of the ABS sensor rotor
Clearance Inspection
1. Remove the ABS wheel-speed sensor.
2. Measure the distance between the ABS wheel-speed sensor installation surface and the ABS sensor rotor. This is dimension A.
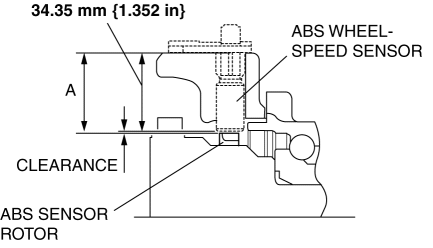
3. Calculate the clearance between the front ABS wheel-speed sensor and the ABS sensor rotor using the following formula:
-
Clearance (mm {in}) = A-34.35 {1.352}
4. Verify that the clearance between the ABS sensor rotor and the ABS wheel-speed sensor is as indicated below.
-
If there is any malfunction, replace it.
-
Clearance
-
0.3—1.4 mm {0.02—0.05 in}
Sensor Output Value Inspection
1. Switch the ignition to off.
2. Connect the M-MDS to the DLC-2.
3. Select the following PIDs using the M-MDS:
-
WSPD_SEN_LR (LR ABS wheel-speed sensor)
-
WSPD_SEN_RR (RR ABS wheel-speed sensor)
4. Start the engine and drive the vehicle.
5. Verify that the display of the M-MDS shows the same value as the speedometer.
-
If there is any malfunction, replace the ABS wheel-speed sensor.
 Rear ABS Wheel Speed Sensor Inspection [2 Wd]
Installation Visual Inspection
1. Inspect the following items:
If there is any malfunction, replace the applicable part.
a. Excessive play of the ABS wheel-speed sensor
b. Deformation ...
 Rear ABS Wheel Speed Sensor Removal/Installation
1. Remove the trunk board..
2. Remove the trunk end trim..
3. Remove the rear scuff plate..
4. Remove the trunk side trim..
5. Disconnect the rear ABS wheel-speed sensor connector.
6. Pr ...
Other materials:
Air Mix Actuator [Full Auto Air Conditioner]
Purpose
The air mix actuator moves the air mix door in the A/C unit to adjust the
temperature of the air blown from the air vent.
Function
Door open/close function
The air mix actuator drives the motor based on the signals from the climate
control unit and moves the air mi ...
Pre Delivery Inspection
Pre?Delivery Inspection Table
Exterior
INSPECT and ADJUST, if necessary, the following items to specification:
?Glass, exterior bright metal and paint for damage
?Wheel lug nuts
?All weatherstrips for damage or detachment
?Adjust tire pressures to specification
Adjust the tire pr ...
Shift Point Control (Manual Shift Control) [Fw6 A EL, Fw6 Ax EL]
Outline
The TCM operates the manual shift control when the M position is selected.
If the M position is selected, manual shifting is prioritized according to
the driver’s shift up/shift down operation. However, to assure driving safety
and protect the ATX, minimum automatic sh ...
