Mazda CX-5 Service & Repair Manual: Fuel Gauge Sender Unit Inspection [Awd]
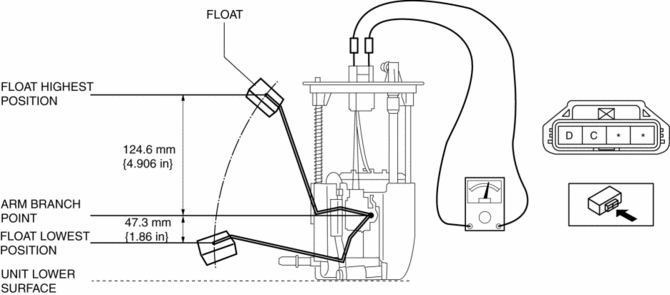
Fuel gauge sender unit (main)
NOTE:
-
For the fuel gauge sender unit removal/installation, refer to the fuel pump removal/installation because the fuel gauge sender unit is integrated with the fuel pump..
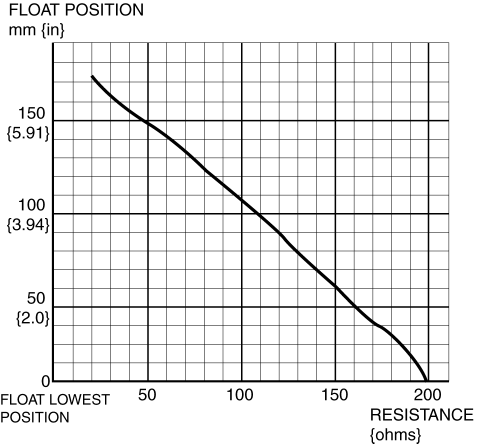
1. Verify that the resistance at fuel gauge sender unit (main) terminals D and C is as indicated in the table according to the height of the float.


-
If not as indicated in the table, replace the fuel gauge sender unit (main).
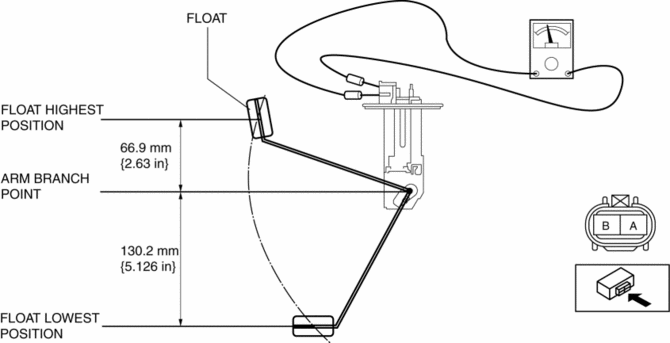
Fuel gauge sender unit (sub)
1. Remove the fuel gauge sender unit (sub)..
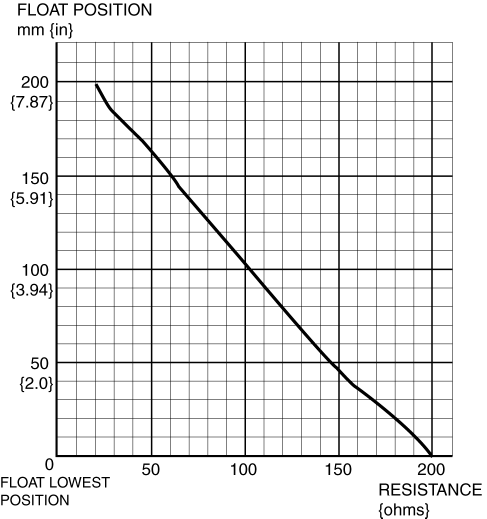
2. Verify that the resistance at fuel gauge sender unit (sub) terminals B and A is as indicated in the table according to the height of the float.


-
If not as indicated in the table, replace the fuel gauge sender unit (sub).
 Fuel Gauge Sender Unit Inspection [2 Wd]
NOTE:
For the fuel gauge sender unit removal/installation, refer to the fuel pump
removal/installation because the fuel gauge sender unit is integrated with the
fuel pump..
1. Veri ...
 Fuel Gauge Sender Unit Removal/Installation [2 Wd]
WARNING:
Always keep sparks and flames away from fuel when servicing the fuel system.
Fuel can be easily ignited which could cause serious injury or death, and damage
to equipment.
...
Other materials:
Shift Point Control (Manual Shift Control) [Fw6 A EL, Fw6 Ax EL]
Outline
The TCM operates the manual shift control when the M position is selected.
If the M position is selected, manual shifting is prioritized according to
the driver’s shift up/shift down operation. However, to assure driving safety
and protect the ATX, minimum automatic sh ...
On Board Diagnostic System PID/Data Monitor Inspection [Fw6 A EL, Fw6 Ax EL]
1. Connect the M-MDS to the DLC-2.
2. After the vehicle is identified, select the following items from the initialization
screen of the M-MDS.
a. Select “DataLogger”.
b. Select “Modules”.
c. Select “TCM”.
3. Select the applicable PID from the PID table.
4. Verify the PID da ...
Repairable Range Of Polypropylene Bumpers [Plastic Body Parts]
The three types of damaged bumpers shown below are considered repairable. Although
a bumper which has been damaged greater than this could also be repaired, it should
be replaced with a new one because such repair would detract from the looks and
quality of the bumper. In addition, such repair ...
