Mazda CX-5 Service & Repair Manual: Front Under Cover No.2 Removal/Installation
1. Lift up the vehicle.
2. Remove the front under cover No.1..
3. Remove bolts A.
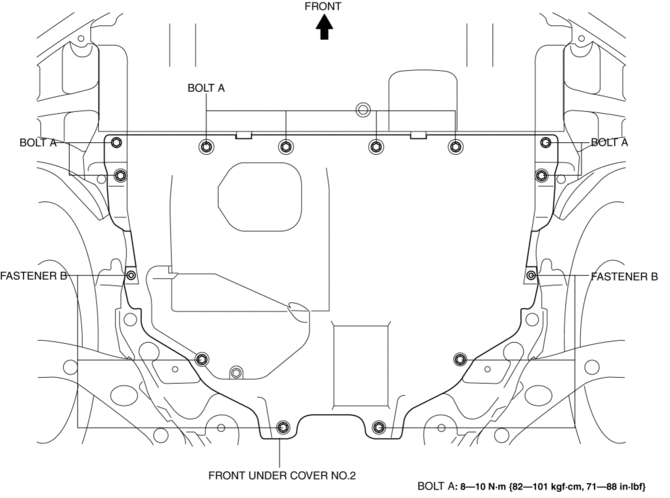
4. Remove fasteners B.
5. Remove the front under cover No.2.
6. Install in the reverse order of removal.
 Front Under Cover No.1 Removal/Installation
1. Remove bolts A.
2. Remove screws B.
3. Remove fasteners C.
4. Remove the front under cover No.1 in the direction of the arrow in the order
of (1), (2) shown in the figure while detachin ...
 Lower Cowl Side Reinforcement Installation [Panel Replacement]
Symbol Mark
Installation Procedure
1. When installing new parts, measure and adjust the body as necessary to conform
with standard dimensions.
2. Drill holes for the plug welding before inst ...
Other materials:
Manifold Absolute Pressure (Map) Sensor/Intake Air Temperature (Iat) Sensor
No.2 Removal/Installation
NOTE:
Because the IAT sensor No.2 is integrated in the MAP sensor, replacing the
IAT sensor No.2 includes replacement of the MAP sensor/IAT sensor No.2.
1. Disconnect the negative battery cable..
2. Disconnect the MAP sensor/IAT sensor No.2 connector.
3. Remove the MAP sensor/IA ...
Registering Your Vehicle in A Foreign Country (Except United States and Canada)
Registering your vehicle in a foreign country may be problematic depending on
whether it meets the specific emission and safety standards of the country in which
the vehicle will be driven. Consequently, your vehicle may require modifications
at personal expense in order to meet the regulation ...
All Wheel Drive System
Outline
The electronic all-wheel drive (AWD) control system automatically and optimally
controls drive torque distribution for the front and rear wheels. Due to this
off-road mobility and driving stability are improved.
Based on the input signals from each sensor, the AWD contro ...
