Mazda CX-5 Service & Repair Manual: Front Map Light
Purpose
-
The front map lights shine light at the front of the vehicle interior.
Function
-
The front map lights illuminate when the map light switch is turned on.
-
Illuminates according to the lock condition of the driver's door and open/close conditions of the doors under the rear body control module (RBCM) control when the interior light switch is in the DOOR position.
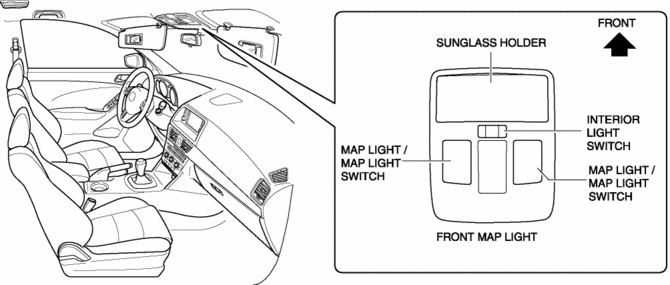
Construction
-
Map lights which are integrated with the sunglass holder have been adopted.
Operation
Map light switch operation
1. Turn the map light switch on.
2. The battery current flows to the map light bulb from the rear body control module (RBCM).
3. The map light illuminates.
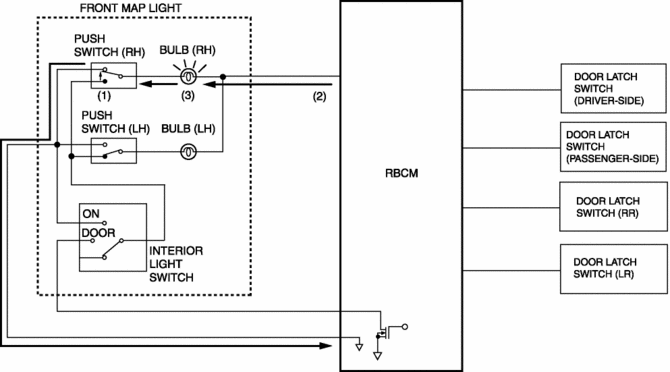
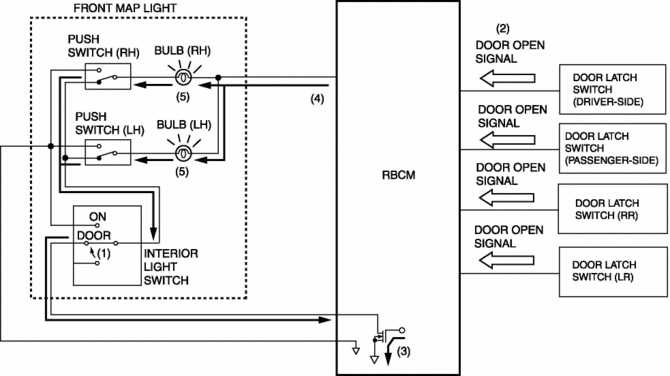
Interior light switch operation
1. Interior light switch is in DOOR position.
2. When any door is opened, the door open signal is input to the rear body control module (RBCM).
3. When the rear body control module (RBCM) receives the door-open signal, it turns on the transistor.
4. When the transistor turns on, the battery current flows to the map light bulb from the rear body control module (RBCM).
5. The map light illuminates.
NOTE:
-
When the interior light switch is in the DOOR position, the map light illumination on/off timing is controlled by the interior light control system. For details, refer to the interior light control system..
Fail-safe
-
Function not equipped.
 Interior
...
 Interior Lighting System
Outline
A room light control system has been adopted in which illumination time and
illumination level of the interior lights change.
The rear body control module (RBCM) performs roo ...
Other materials:
Fuel Pressure Sensor
Purpose/Function
Detects the fuel pressure in the fuel distributor as basic information for
mainly determining the fuel injection amount.
Detects the fuel pressure in the fuel distributor and inputs it to the PCM
as a fuel pressure signal.
Construction
Installed on ...
Clock Spring Inspection [Standard Deployment Control System]
1. Disconnect the negative battery cable and wait for 1 min or more..
2. Remove the driver?side air bag module..
3. Remove the steering wheel..
4. Remove the column cover..
5. Remove the clock spring..
6. Verify that the continuity is as indicated in the table.
If not as indicated ...
Instrument Cluster Operation Record
Purpose
The instrument cluster operation record stores the record of the illumination
or flashing of the warning light.
Function
The operation record is stored by the instrument cluster and displayed using
the Mazda Modular Diagnostic System (M-MDS).
The instrument ...
