Mazda CX-5 Service & Repair Manual: Electric Power Steering (Eps) Motor
Purpose, Function
-
The EPS motor is driven by the control current from the EPS CM (control module) and generates assist torque to manual steering mechanism.
Construction
-
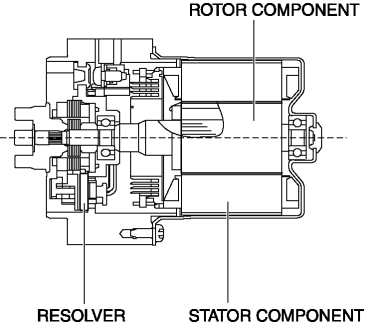
The EPS motor is installed to the steering column with an integrated EPS CM.
-
The EPS motor is a brushless motor which consists of a three-phase star-connected stator, a permanent magnet rotor, and resolver sensor.
Operation
-
Current flows from the EPS CM to the stator to rotate the motor axis which is integrated with the rotor.
-
A resolver sensor for detecting rotation angle is built into the EPS motor and outputs a motor rotation angle signal to the EPS CM.
-
The EPS CM switches the current flowing to each stator based on the rotation angle signal from the resolver sensor.
Fail-safe
|
DTC No. |
Fail-safe function |
|
C200D:1C |
|
|
C200D:64 |
|
|
U2011:19 |
|
|
U2011:1C |
|
|
U2011:62 |
|
|
U2011:72 |
|
|
U2011:92 |
|
 Electric Power Steering (Eps) Control Module
Purpose/ Function
The EPS control module (CM) calculates the optimum assist current based on
the steering torque signal from the torque sensor installed to the steering
column and the veh ...
 Electric Power Steering System
Outline
A column assist type EPS has been adopted for all models.
EPS provides smooth handling from low to high speeds as a result of the excellent
steering feel provided by the elec ...
Other materials:
Shift Pressure Control (Line Pressure Control) [Fw6 A EL, Fw6 Ax EL]
Outline
The TCM drives the pressure control solenoid and adjusts the pressure based
on the accelerator pedal depression amount, vehicle speed, ATF temperature,
and gear shift signal. As a result, line pressure is controlled finely and with
high accuracy according to the engine load c ...
Manual Transaxle Operation
Manual Transaxle Shift Pattern
The shift pattern of the transaxle is conventional, as shown.
Depress the clutch pedal all the way down while shifting; then release it slowly.
Your vehicle is equipped with a device to prevent shifting to R (reverse) by
mistake.
Push the shift lever downward a ...
Quarter Window Glass Removal
1. Disconnect the negative battery cable..
2. Remove the following parts:
a. Trunk board.
b. Trunk end trim.
c. Rear scuff plate.
d. Trunk side trim.
e. D-pillar trim.
f. C-pillar trim.
3. Apply protective tape along the edge of the body and the quarter window glass.
WARNING: ...
