Mazda CX-5 Service & Repair Manual: Door Adjustment
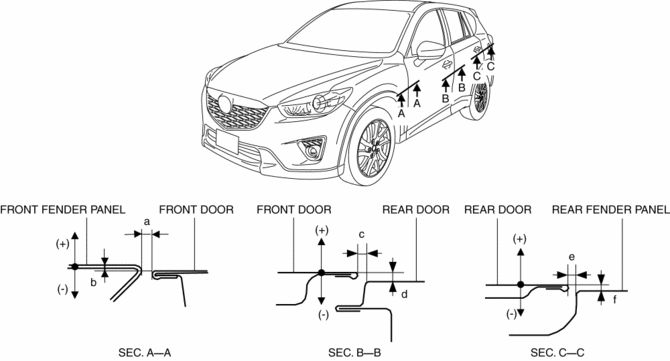
1. Measure the gap and height difference between the door and the body.
2. Loosen the door hinge installation bolts and adjust the door.
-
Standard clearance
-
a: 2.8?3.8 mm {0.12?0.14 in}
-
b: -1.0?1.0 mm {-0.039?0.039 in}
-
c: 2.5?4.5 mm {0.10?0.17 in}
-
d: -1.0?1.0 mm {-0.039?0.039 in}
-
e: 2.5?4.5 mm {0.10?0.17 in}
-
f: -1.0?1.0 mm {-0.039?0.039 in}
3. Tighten the door hinge installation bolts..
4. If the door does not open/close smoothly, adjust it by loosening the door lock striker installation screw..
5. Spray or pour water on the door and surrounding area using a hose or high pressure water pressure car wash and verify that there is no water leakage.

 Door Ajar Warning Light
Purpose
The door-ajar warning light notifies the driver that any door or the liftgate
is open.
Function
When the instrument cluster receives any of the following signals sent fr ...
Other materials:
Rear Bumper Disassembly/Assembly
1. Disassemble in the order indicated in the table.
1
Screw
2
Reflector
3
Rear bumper face
2. Assemble in the reverse order of disassembly. ...
AWD
All-Wheel Drive (AWD) Operation
• AWD provides excellent drivability
on snow-covered and ice-packed roads, sand and mud, as well as on steep slopes and
other slippery surfaces.
• A system malfunction or operation conditions
are indicated by a warning.
Refer to Warning/Indicator Light ...
Air Bag System Warning Light [Standard Deployment Control System]
Purpose
The air bag system warning light notifies the driver of a malfunction in
the SRS air bag system.
Function
If a malfunction occurs in the SRS air bag system, the air bag system warning
light illuminates or flashes.
Construction
LEDs (light-emitting d ...
