Mazda CX-5 Service & Repair Manual: Cruise Control Switch Inspection
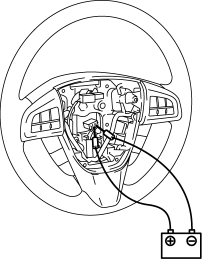
1. Disconnect the negative battery cable and wait for 1 min or more
..
2. Remove the driver?side air bag module..
3. Disconnect the clock spring connector (part wiring harness-side).
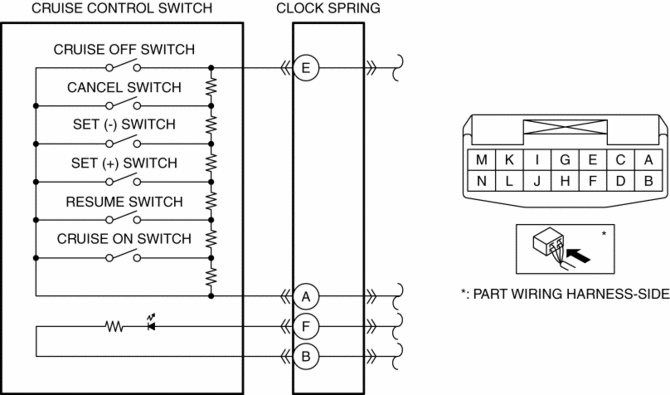
4. Measure the resistance between clock spring terminals E and A (part wiring harness-side) using a tester.
-
If as specified, go to the next step.
-
If not as specified, replace the steering switch..
|
Switch condition |
Resistance (ohm) |
|
Cruise OFF switch held at on |
Continuity |
|
CANCEL switch held at on |
Approx. 84.5 |
|
SET (?) switch held at on |
Approx. 189.5 |
|
SET (+) switch held at on |
Approx. 326.5 |
|
RESUME switch held at on |
Approx. 506.5 |
|
Cruise ON switch held at on |
Approx. 761.5 |
|
Neutral |
Approx. 3,311.5 |
5. Apply battery positive voltage to clock spring terminal F (part wiring harness-side), and terminal B (part wiring harness-side) to ground.
6. Verify that the LED illuminates.
-
If the LED does not illuminate, replace the steering switch..
 Cruise Control
...
 Cruise Control System
Outline
Enables driving at a constant speed by setting the vehicle speed with the
cruise control switch instead of operating the accelerator pedal.
The PCM controls the throttle valv ...
Other materials:
Suspension Abbreviations
AAS
Active Adaptive Shift
ABS
Antilock Brake System
ABDC
After Bottom Dead Center
ACC
Accessories
AFS
Adaptive Front Lighting System
ALC
...
Wiper/Washer System Personalization
A customize function has been adopted which switches the auto wiper system
between operable/inoperable.
Using Mazda Modular Diagnostic System (M-MDS)
The auto wiper function can be enabled or disabled using the Mazda Modular
Diagnostic System (M-MDS). Refer to the Workshop M ...
Rear Wheel Hub Bolt Replacement
1. Remove the brake calliper component and suspend it out of the way using a
cable.
2. Remove the disc plate.
3. Remove the wheel hub bolt using the SST as shown in the figure.
4. Place a new wheel hub bolt in the wheel hub.
5. Install the wheel hub by placing a proper sized washer o ...
