
Mazda CX-5 Owners Manual: Center-Rear Position Seat Belt
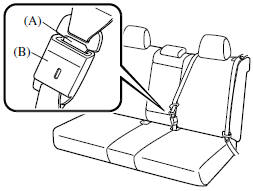
Before using the center-rear lap/shoulder belt make sure tongue (A) and anchor buckle (B) are fastened.
Fastening the Seat Belt
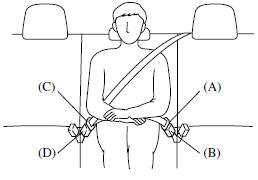
1. Grasp the seat belt tongue (C).
2. Slowly pull out the lap/shoulder belt.
3. Insert the seat belt tongue (C) into the seat belt buckle (D) until you hear a click sound.
WARNING
Fastening the Center-Rear Seat Belt with Only One Buckle: Fastening the center-rear seat belt with only one buckle is dangerous. If only one pair of seat belt tongues and buckles is fastened (either seat belt tongue (C) and seat belt anchor buckle (D) or seat belt tongue (A) and seat belt buckle (B)), then the seat belt cannot provide full protection. In a sudden stop or collision, the user could slide under the belt and suffer serious injuries. Always make sure that both pairs of seat belt tongues and buckles are fastened properly.
 Front Seat Belt Pretensioner and Load Limiting Systems
For optimum protection, the driver and front passenger seat belts are equipped
with pretensioner and load limiting systems. For both these systems to work properly
you must wear the seat belt prop ...
 Seat Belt Extender
If your seat belt is not long enough, even when fully extended, a seat belt extender
may be available to you at no charge from your Authorized Mazda Dealer.
This extender will be only for you and f ...
Other materials:
Purge Control
Outline
An appropriate amount of evaporative gas is fed into the intake manifold
by the purge solenoid valve operation according to the engine operation conditions.
This ensures driveability and prevents release of evaporative gas into the atmosphere.
The PCM drives the purge so ...
Cruise Control Switch Inspection
1. Disconnect the negative battery cable and wait for 1 min or more..
2. Remove the driver?side air bag module..
3. Disconnect the clock spring connector (part wiring harness-side).
4. Measure the resistance between clock spring terminals E and A (part wiring
harness-side) using a tester.
...
Evaporative Emission (Evap) Control System
Purpose, Outline
Prevents release of evaporative gas into the atmosphere.
The intake manifold vacuum introduces evaporative gas to the intake manifold
via the charcoal canister and the purge solenoid valve.
System Diagram
U.S.A. and CANADA
Except U.S.A. and CANADA
...
