Mazda CX-5 Service & Repair Manual: Blind Spot Monitoring (Bsm) Control Module
Purpose
-
Controls the blind spot monitoring (BSM) system.
Function
-
The BSM control module emits microwaves to detect an oncoming vehicle's position and speed information via the reflected microwaves.
-
The BSM system is controlled based on the detected vehicle position and speed information.
-
A self-diagnostic function has been adopted.
Construction
-
The BSM control module and radar have been integrated.
-
Microwaves are emitted from the radar.
-
Two control modules are positioned on the left and right sides of the body inside the rear bumper.
Operation
-
The BSM control module emits microwaves to the vehicle rear to detect the obstruction via the reflected microwaves.
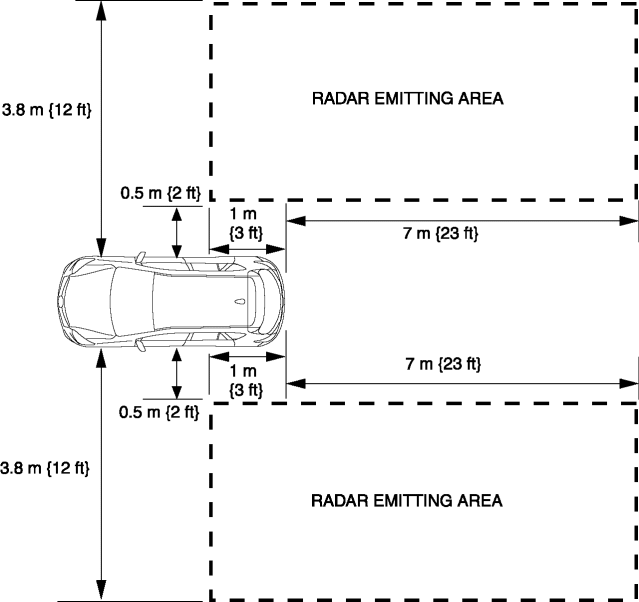
Radar Emitting Area
-
Cross-directional: 1 m {3 ft}
toward the front of the vehicle, and 7 m {23 ft}
toward the rear of the vehicle from the rear end of the vehicle (total, 8 m {26 ft}
).
-
Lateral direction: 0.5—3.8 m {2—12 ft}
from the side of the vehicle (total, 3.3 m {11 ft}
).
-
When the vehicle is cornering, such as turning into an intersection, the shape of the warning area on the inner side changes.
-
Cross-directional: Length of the vehicle rear changes depending on the steering angle.
-
Lateral direction: Angle of the warning area changes along the vehicle’s turning orbit.
Fail-safe
|
DTC No. |
Fail-safe function |
|
B118C:11 |
BSM is stopped. |
|
B118C:15 |
BSM is stopped. |
|
B118D:11 |
BSM is stopped. |
|
B118D:15 |
BSM is stopped. |
|
U0001:88 |
BSM is stopped. |
|
U0100:00 |
BSM is stopped. |
|
U0131:00 |
BSM is stopped. |
|
U0155:00 |
BSM is stopped. |
|
U0214:00 |
BSM is stopped. |
|
U0232:00 |
BSM is stopped. |
|
U0233:00 |
BSM is stopped. |
|
U0401:68 |
BSM is stopped. |
|
U0420:68 |
BSM is stopped. |
|
U0423:68 |
BSM is stopped. |
|
U0515:68 |
BSM is stopped. |
|
U0533:68 |
BSM is stopped. |
|
U0534:68 |
BSM is stopped. |
|
U3000:01 |
BSM is stopped. |
|
U3000:09 |
BSM is stopped. |
|
U3000:4A |
Not equipped. |
|
U3000:97 |
Not equipped. |
|
U3003:16 |
BSM is stopped. |
|
U3003:17 |
BSM is stopped. |
 Blind Spot Monitoring (Bsm) Bracket Removal/Installation
1. Disconnect the negative battery cable..
2. Remove the following parts:
a. Rear combination lights.
b. Rear bumper.
c. BSM control module.
3. Remove the nuts.
4. While pressing the c ...
 Blind Spot Monitoring (Bsm) Control Module Inspection
1. Disconnect the negative battery cable..
2. Remove the rear combination light..
3. Remove the rear bumper..
4. Connect the negative battery cable..
5. Verify that the voltages of each of the ...
Other materials:
Front Seat Belt Pretensioner and Load Limiting Systems
For optimum protection, the driver and front passenger seat belts are equipped
with pretensioner and load limiting systems. For both these systems to work properly
you must wear the seat belt properly.
Pretensioners:
In moderate or severe frontal or nearfrontal accidents, the front air bag and ...
Hood
WARNING
Always check that the hood is closed and securely locked:
A hood that is not closed and securely locked is dangerous as it could fly open
while the vehicle is moving and block the driver's vision which could result in
a serious accident.
Opening the Hood
1. With the vehicle parke ...
DSC Related Parts Sensor Initialization Procedure
WARNING:
If the initialization procedure is not completed, the DSC will not operate
properly and it might cause an unexpected accident. Therefore, after replacing
or removing the DSC HU/CM or SAS control module, make sure to perform the initialization
procedure to insure proper DSC ...
