Mazda CX-5 Service & Repair Manual: Audio Pilot®2 Microphone Removal/Installation
NOTE:
-
AudioPilot®2 is a registered trademark of Bose® Corporation.
1. Disconnect the negative battery cable..
2. Remove the following parts:
a. Driver-side front scuff plate.
b. Driver-side front side trim.
c. Switch panel.
d. Decoration panel.
e. Shift lever knob (MTX).
f. Front console box.
g. Shift panel.
h. Upper panel.
i. Rear console.
j. Side wall.
k. Front console.
l. Hood release lever.
m. Driver-side lower panel.
3. Disconnect the connector.
4. Remove the nut.
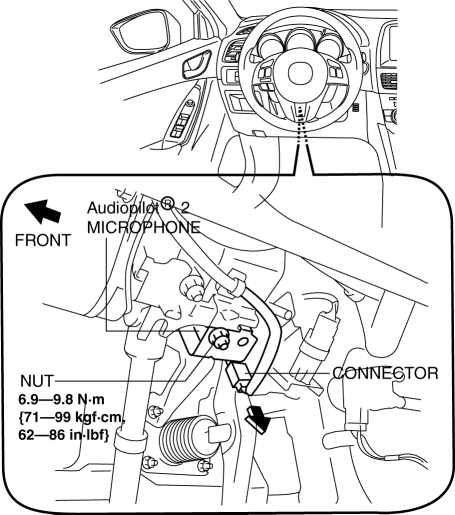
5. Remove the AudioPilot®2 microphone.
6. Install in the reverse order of removal.
 Audio Amplifier Removal/Installation
1. Disconnect the negative battery cable..
2. Remove the following parts:
a. Front scuff plate (RH).
b. Front side trim (RH).
3. Remove the bolts.
4. Lift up the audio amplifier in the d ...
 Audio System
NOTE:
“iPod” is a registered trademark of Apple Inc. in the United States and other
countries.
Outline
An audio unit compatible with AM/FM tuner and MP3/WMA (Windows Media ...
Other materials:
Negative Battery Cable Disconnection/Connection [Skyactiv G 2.0]
WARNING:
Before removing the SRS air bag system-related parts, always disconnect the
negative battery cable and wait for 1 min. or more to allow the back-up power
supply to deplete its stored power..
Required procedure after negative battery cable disconnection/connection
...
Rear Drive Shaft Inspection
1. Inspect each connecting part for looseness.
Tighten or replace parts if necessary.
2. Inspect the dust boot on the drive shaft for cracks, damage, leaking grease,
and looseness in the boot band.
3. Inspect the drive shaft for bends, cracks, and wear in the joints or splines. ...
Turn and Lane-Change Signals
NOTE
• If an indicator light stays on without
flashing or if it flashes abnormally, one of the turn signal bulbs may be burned
out.
• A personalized function is available to change
the turn indicator sound volume.
Refer to Personalization Features on .
Turn Signals
Move the signal lev ...
