Mazda CX-5 Service & Repair Manual: Rear Bumper Reinforcement Removal/Installation
1. Disconnect the negative battery cable..
2. Remove the following parts:
a. Rear splash shield.
b. Rear combination light.
c. Rear bumper.
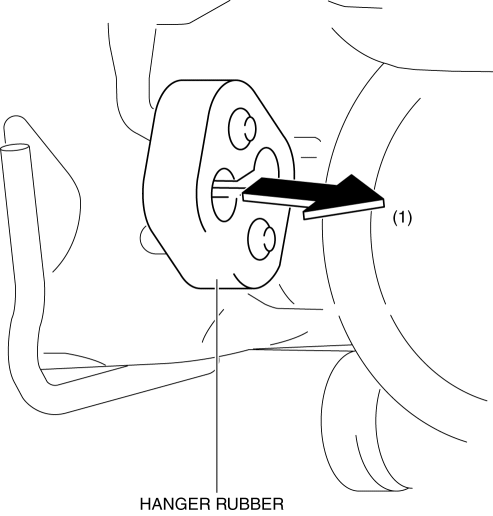
3. Remove the hanger rubber in the direction of the arrow (1) shown in the figure.
4. Remove nuts.
CAUTION:
-
Removing the rear bumper reinforcement without supporting it could cause the rear bumper reinforcement to fall and cause serious injury. Always perform the procedure with at least another person to prevent the rear bumper reinforcement from falling.
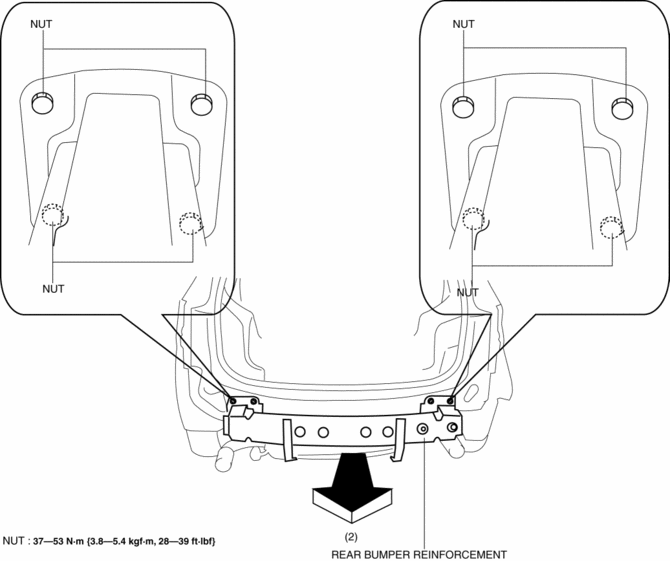
5. Remove the rear bumper reinforcement in the direction of the arrow (2) shown in the figure.
6. Install in the reverse order of removal.
 Rear Bumper Disassembly/Assembly
1. Disassemble in the order indicated in the table.
1
Screw
2
Reflector
3
Rear bumper face
2. Assemble ...
 Rear Bumper Removal/Installation
CAUTION:
Affix the protective tape to the position (body side) shown in the figure.
1. Disconnect the negative battery cable..
2. Remove the rear combination light..
3. Remove ...
Other materials:
Sirius Satellite Radio Unit
Purpose
Satellite radio programming can be listened to.
Function
The voltage signal sent from the center roof antenna (SIRIUS satellite radio
antenna) is output to the audio unit.
Construction
The SIRIUS satellite radio unit is installed to the interior of the glo ...
Shift Point Control (Manual Shift Control) [Fw6 A EL, Fw6 Ax EL]
Outline
The TCM operates the manual shift control when the M position is selected.
If the M position is selected, manual shifting is prioritized according to
the driver’s shift up/shift down operation. However, to assure driving safety
and protect the ATX, minimum automatic sh ...
Cowl Upper Plate Installation [Panel Replacement]
Symbol Mark
Installation Procedure
1. When installing new parts, measure and adjust the body as necessary to conform
with standard dimensions.
2. Drill holes for the plug welding before installing the new parts.
3. After temporarily installing new parts, make sure the related parts fit p ...
