Mazda CX-5 Service & Repair Manual: Power Window Motor Removal/Installation
Front Power Window Motor
1. Fully lower the front door glass.
2. Disconnect the negative battery cable..
3. Remove the inner garnish..
4. Remove the front door trim..
5. Disconnect the front power window motor connector.
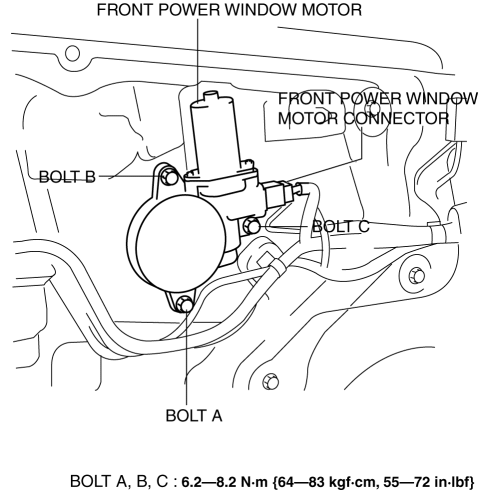
6. Remove bolt A.
7. Remove bolt B.
8. Remove bolt C.
9. Remove the front power window motor.
10. Install in the reverse order of removal.
NOTE:
-
When installing the power window motor to the power window regulator drum, the drum housing tab may come off the door unit. If this happens, remove the door speaker, insert your hand in the speaker installation hole, connect the drum housing tabs, and while supporting the drum housing, install the power window motor to the drum.
Rear Power Window Motor
1. Fully lower the rear door glass.
2. Disconnect the negative battery cable..
3. Remove the rear door trim..
4. Disconnect the rear power window motor connector.
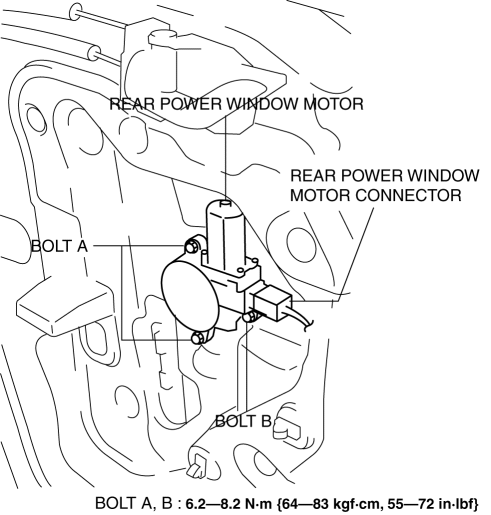
5. Remove bolts A.
6. Remove bolt B.
7. Remove the rear power window motor.
8. Install in the reverse order of removal.
NOTE:
-
When installing the power window motor to the power window regulator drum, the drum housing tab may come off the door unit. If this happens, remove the door speaker, insert your hand in the speaker installation hole, connect the drum housing tabs, and while supporting the drum housing, install the power window motor to the drum.
 Power Window Motor Inspection
Front driver side
1. Disconnect the negative battery cable..
2. Remove the inner garnish..
3. Remove the front door trim..
4. Disconnect the power window motor connector.
5. Apply battery pos ...
 Power Window Regulator
Purpose
The power window regulator moves the carrier plate up and down to open/close
the door glass using the rotation force transmitted from the power window motor.
Function
Th ...
Other materials:
Rear Fender Panel Removal [Panel Replacement]
Symbol Mark
Removal Procedure
CAUTION:
Avoid cutting with a blowtorch or similar tools as the insulator (shaded
area) is flammable.
1. Rough cut the 3 locations indicated by (A) shown in the figure.
2. Drill the 90 locations indicated by (B) shown in the figure.
...
Clock Spring Removal/Installation [Standard Deployment Control System]
CAUTION:
If the disc on the combination switch is deformed or has foreign material
adhering to it, performance of the steering angle sensor may be reduced, causing
abnormal operation. When handling the clock spring, be careful not to deform
the disc and make sure there is no foreign ...
Engine Front Cover
Purpose, Function
The engine front cover covers the front of the engine to prevent engine oil
spillage, noise leakage, and foreign material penetration.
Construction
The engine front cover is installed to the front of the engine.
The lightweight engine front ...
